Are you ready to whip up some delightful Pumpkin Chocolate Chip Muffins that taste like they’re straight from a bakery? In this post, I’ll guide you through each step, from choosing the right ingredients to baking perfection. Whether you’re a seasoned baker or just getting started, these muffins will impress everyone. Let’s dive into the world of cozy flavors and fluffy textures, and create a treat you can’t resist!

Ingredients
Detailed Ingredients List
– 1 cup canned pumpkin puree
– 1/2 cup vegetable oil
– 3/4 cup brown sugar, tightly packed
– 1/4 cup granulated sugar
– 2 large eggs, at room temperature
– 1 teaspoon vanilla extract
– 1 1/2 cups all-purpose flour
– 1 teaspoon baking soda
– 1 teaspoon baking powder
– 1 teaspoon ground cinnamon
– 1/2 teaspoon ground nutmeg
– 1/2 teaspoon ground ginger
– 1/4 teaspoon sea salt
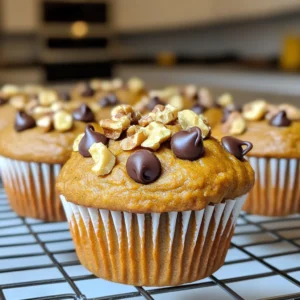
– 1 cup semi-sweet chocolate chips
– 1/2 cup chopped walnuts (optional)
Ingredient Substitutions
You can make some swaps if you need. For the vegetable oil, use melted coconut oil for a hint of flavor. Brown sugar can be replaced with white sugar if you prefer a lighter taste. For a dairy-free option, use flax eggs instead of regular eggs. This means mixing 1 tablespoon of ground flaxseed with 2.5 tablespoons of water per egg. You can also use dairy-free chocolate chips if you want to keep the muffins vegan.
Baking Supplies Needed
To bake these muffins, you will need a few key tools:
– Standard muffin tin
– Paper liners or non-stick cooking spray
– Large mixing bowl
– Whisk for mixing
– Spatula or wooden spoon for folding
– Ice cream scoop or tablespoon for batter
– Toothpick for checking doneness
– Wire rack for cooling
These supplies make the process smooth and fun. Enjoy baking!
Step-by-Step Instructions
Prepping the Muffin Tin
Start by heating your oven to 350°F (175°C). Grab your muffin tin and line it with paper liners. You can also grease it with cooking spray. This step is key. It keeps the muffins from sticking and makes cleanup a breeze.
Mixing Wet Ingredients
In a large bowl, mix the pumpkin puree, vegetable oil, brown sugar, and granulated sugar. Use a whisk for this. Blend until the mixture is smooth and well combined. Now, add the eggs and vanilla extract. Whisk again until everything is light and fluffy.
Combining Dry Ingredients
In another bowl, sift together the all-purpose flour, baking soda, baking powder, ground cinnamon, nutmeg, ginger, and sea salt. Sifting helps mix the dry ingredients well and aerates the flour. This makes your muffins light and fluffy.
Folding in Chocolate Chips and Walnuts
Gradually add the dry mixture into the wet pumpkin mixture. Use a spatula or wooden spoon to stir gently. Mix until just combined. Be careful not to overmix. Then, fold in the chocolate chips and walnuts if you choose to use them. This adds a sweet touch and a nice crunch.
Baking the Muffins
Scoop the batter into the lined muffin tins. Fill each cavity about 3/4 full. This gives them room to rise. Place the muffin tin in the oven and bake for 18-20 minutes. Check doneness by inserting a toothpick in the center. It should come out clean with a few crumbs.
Cooling the Muffins
After baking, let the muffins cool in the tin for about 5 minutes. Then, move them to a wire rack to cool completely. This step is important. It keeps the muffins from getting soggy and helps them stay fluffy.
Tips & Tricks
Achieving Bakery-Style Muffins
To get bakery-style muffins, focus on texture and rise. Here are some key tips:
– Use room temperature eggs. They mix better with other ingredients.
– Don’t overmix the batter. Stir gently until just combined.
– Fill muffin cups about 3/4 full. This allows them to rise nicely.
– Bake at 350°F (175°C) for 18-20 minutes. Check with a toothpick to be sure.
Common Mistakes to Avoid
Watch out for these common mistakes:
– Using cold ingredients. This can lead to dense muffins.
– Overmixing the batter. This can make the muffins tough.
– Skipping the cooling step. Cooling helps keep the muffins fluffy.
– Not greasing the pan. Sticking can ruin your perfect muffins.
Best Practices for Storing Muffins
Storing muffins right keeps them fresh. Here’s how:
– Let muffins cool completely before storing.
– Place them in an airtight container. This keeps moisture in.
– Store at room temperature for up to 3 days.
– For longer storage, freeze them. Wrap each muffin in plastic wrap.

Variations
Gluten-Free Pumpkin Chocolate Chip Muffins
To make gluten-free muffins, swap all-purpose flour with a gluten-free blend. Many brands work well, but look for one that includes xanthan gum. This helps mimic the texture of wheat flour. Follow the same steps in the recipe, and enjoy your gluten-free treat. They will be just as moist and tasty.
Vegan Pumpkin Chocolate Chip Muffins
For a vegan version, replace the eggs with flax eggs. Mix one tablespoon of ground flaxseed with three tablespoons of water. Let it sit for five minutes until it thickens. Use vegetable oil as usual, and choose vegan chocolate chips. These muffins will still have great flavor and texture.
Flavor Enhancements
You can elevate your muffins with extra spices. Try adding a pinch of clove or allspice for depth. You can also mix in chopped nuts. Walnuts add a nice crunch, but pecans are a great choice too. If you love sweet and salty, sprinkle a bit of sea salt on top before baking. This will enhance the flavors even more.
Storage Info
How to Store Leftover Muffins
Store leftover muffins in an airtight container. This keeps them fresh and moist. Place a paper towel at the bottom of the container to absorb any extra moisture. It helps keep your muffins from getting soggy. If you plan to eat them within a few days, store them at room temperature. If not, the fridge works too. Just remember, muffins can dry out in the fridge.
Freezing Muffins for Later Use
Freezing muffins is easy and a great way to save them. First, let the muffins cool completely. Wrap each muffin in plastic wrap or foil. Then, place them in a freezer-safe bag. Remove as much air as possible before sealing. Label the bag with the date. You can freeze muffins for up to three months. When you are ready to eat one, just take it out and let it thaw in the fridge overnight.
Reheating Tips
To reheat your muffins, use your oven or microwave. For the oven, preheat it to 350°F (175°C). Place the muffins on a baking sheet and heat for about 5 to 10 minutes. This restores their fresh-baked taste. If you use a microwave, place a muffin on a plate and cover it with a damp paper towel. Heat for 15 to 20 seconds. This keeps the muffin soft. Enjoy your warm, delicious muffins anytime!
FAQs
Can I use fresh pumpkin instead of canned?
Yes, you can use fresh pumpkin. Just roast and puree it first. This gives a fresh taste. Fresh pumpkin has a different moisture level. You might need to adjust other wet ingredients.
How do I know when the muffins are done baking?
Check the muffins at 18 minutes. Insert a toothpick into the center. If it comes out clean or with a few crumbs, they are done. If the toothpick has wet batter, bake a few more minutes.
What can I add for additional flavor?
You can add spices like cloves or allspice for warmth. Chopped apples or cranberries add fruitiness. Try adding orange zest for a citrus kick. You can also mix in different types of nuts.
Can I make mini muffins with this recipe?
Yes, mini muffins work great! Fill the mini muffin tin only halfway. Bake for about 10-12 minutes. Check with a toothpick as you would for regular muffins. Enjoy bite-sized treats!
Now you know how to make amazing pumpkin chocolate chip muffins. We covered all the key steps, from gathering ingredients to enjoying the warm treats. Remember to choose the right substitutes and avoid common mistakes for perfect muffins. You can even try fun variations like gluten-free or vegan options. Store them properly to keep them fresh longer. Dive into baking with confidence and share your tasty muffins with others. Your kitchen adventure is just beginning!