FREE DINNER EBOOK! Get your copy!
  • Cookie Policy
  • GDPR Policy
  • Disclaimer
  • Terms Of Use
  • Visit my other site: Fun Cookie Recipes
feastful focus
  • Home
  • Dinner
  • Desserts
  • Drinks
  • Appetizers
  • Contact
  • About
  • Privacy Policy
  • Home
  • Dinner
  • Desserts
  • Drinks
  • Appetizers
  • Contact
  • About
  • Privacy Policy
  • Cookie Policy
  • GDPR Policy
  • Disclaimer
  • Terms Of Use
Visit my other site: Fun Cookie Recipes

HOME / CATEGORIES /

Latest

- 2 large cucumbers, thinly sliced - 1 tablespoon kosher salt - 2 tablespoons sesame oil - 1 tablespoon rice vinegar - 1 tablespoon soy sauce - 1 teaspoon chili paste - 1 teaspoon sugar - 2 tablespoons toasted sesame seeds - 2 green onions, finely chopped - Fresh cilantro leaves To make the best Spicy Sesame Cucumber Salad, use these measurements: - 2 cucumbers give the right crunch. - 1 tablespoon of kosher salt helps draw out moisture. - 2 tablespoons of sesame oil add rich flavor. - 1 tablespoon of rice vinegar lends tanginess. - 1 tablespoon of soy sauce boosts umami. - 1 teaspoon of chili paste controls the heat. - 1 teaspoon of sugar balances the spice. - 2 tablespoons of toasted sesame seeds add a nutty crunch. - 2 green onions brighten the dish. - Fresh cilantro garnishes and adds freshness. You can swap ingredients for different flavors: - Use sea salt instead of kosher salt if needed. - Canola or olive oil works instead of sesame oil. - Apple cider vinegar is a good choice if you lack rice vinegar. - Tamari can replace soy sauce for a gluten-free option. - For less spice, use a milder chili sauce or omit it. - Maple syrup or honey can replace sugar for a natural sweetener. - Chopped nuts can replace sesame seeds for a different crunch. - Fresh parsley can substitute for cilantro if preferred. Start by slicing the cucumbers thinly. I use two large cucumbers for this recipe. Place the sliced cucumbers in a large bowl. Next, sprinkle one tablespoon of kosher salt over them. Use your hands to toss the slices well. Make sure every piece gets some salt. Let the cucumbers sit for about 15 minutes. This step draws out extra moisture and makes the flavors pop. While the cucumbers rest, it’s time to make the dressing. Grab a small bowl and combine two tablespoons of sesame oil, one tablespoon of rice vinegar, one tablespoon of soy sauce, one teaspoon of chili paste, and one teaspoon of sugar. Use a whisk or a fork to mix everything until smooth. This dressing brings a fantastic blend of flavors to the salad. After 15 minutes, check the cucumbers. Drain any liquid that has collected. Use a clean paper towel to pat the cucumbers dry. This step keeps your salad crunchy. Now, transfer the cucumbers to the bowl with your dressing. Gently toss them to coat every slice well. Next, add two tablespoons of toasted sesame seeds and two finely chopped green onions. Fold them in carefully. Finally, serve your salad in a nice dish and add fresh cilantro leaves on top for a beautiful finish. To get the best flavor, use fresh ingredients. The cucumbers should be crisp and firm. Salting the cucumbers draws out excess moisture. This step boosts the salad's taste. The dressing needs a mix of salty, sweet, and spicy. Adjust the chili paste to your liking. Taste the dressing before adding it to the cucumbers. This way, you ensure it meets your flavor needs. Texture is key in this salad. Thinly slice the cucumbers for a crunchy bite. Pat them dry after salting to keep them crisp. Tossing the cucumbers gently in the dressing ensures even coverage. Adding toasted sesame seeds adds a lovely crunch. You can also mix in finely chopped green onions. They add both flavor and texture to the dish. For a beautiful presentation, serve this salad in a chilled bowl. Garnish with fresh cilantro leaves for color. You can also add a few extra sesame seeds on top. This salad pairs well with grilled meats or as a light starter. Consider serving it alongside dishes with rich flavors. The salad will refresh your palate beautifully. {{image_4}} You can make this salad even better by adding more veggies. Try adding sliced bell peppers, shredded carrots, or radishes. Each of these adds a nice crunch and color. You can also use thinly sliced cabbage for extra texture. Mixing in different vegetables not only enhances the look but also boosts the flavor. You can change how spicy the salad is by adjusting the chili paste. If you like it milder, add less chili paste. For more heat, simply add more. Also, consider using fresh chili slices for a different spice kick. Remember, taste as you go! This way, you can find the spice level that works for you. While the sesame dressing is great, you can try other options too. A simple lemon juice and olive oil mix can add a fresh taste. You might also use a peanut dressing for a nutty twist. Another option is to mix in some ginger for a zesty kick. Feel free to experiment and find your favorite dressing. To keep your spicy sesame cucumber salad fresh, store it in an airtight container. This helps lock in flavor and crunch. Place the salad in the fridge right after serving. Avoid leaving it at room temperature for too long. If you have leftovers, separate the dressing from the cucumbers. This keeps the salad crisp and delicious. The salad stays fresh for about two days in the fridge. After that, the cucumbers may lose their crunch. You’ll notice the flavors start to fade too. For the best taste and texture, enjoy it within this time frame. Always check for any signs of spoilage before eating leftovers. If it looks or smells off, trust your instincts and toss it. You do not need to reheat this salad. It is best served cold. If the cucumbers lose some crunch, add a pinch of salt and a dash of sesame oil. Toss gently to refresh the flavors. Adding a few more sesame seeds or chopped green onions can also boost the taste. Enjoy it as a cool side dish or a light snack! Yes, you can make this salad ahead of time. I recommend prepping the cucumbers and dressing a few hours before serving. The salt will draw out moisture and enhance the taste. However, wait to mix the dressing with the cucumbers until just before serving. This keeps the salad crunchy. If you store it in the fridge, it stays fresh for about a day. To increase the heat in your Spicy Sesame Cucumber Salad, add more chili paste. Start with an extra half teaspoon and taste as you go. You can also add fresh chili slices for a fresh kick. If you want some more depth, try using chili oil. It can give a nice flavor along with the heat. This salad pairs well with grilled meats, like chicken or steak. The coolness of the salad balances the heat from the grill. You can also serve it with rice dishes or noodle bowls. It makes a great side for Asian-inspired meals. Try it alongside dumplings for a delicious feast! This article covered how to make a Spicy Sesame Cucumber Salad. We discussed key ingredients, including measurements and substitutions. You learned the step-by-step process to prepare cucumbers and make the dressing. Tips helped you balance flavors and enhance texture. We also explored fun variations and best storage practices. In conclusion, this salad is both easy and tasty. You can make it your own with simple changes. Enjoy your fresh creation and share it with others!

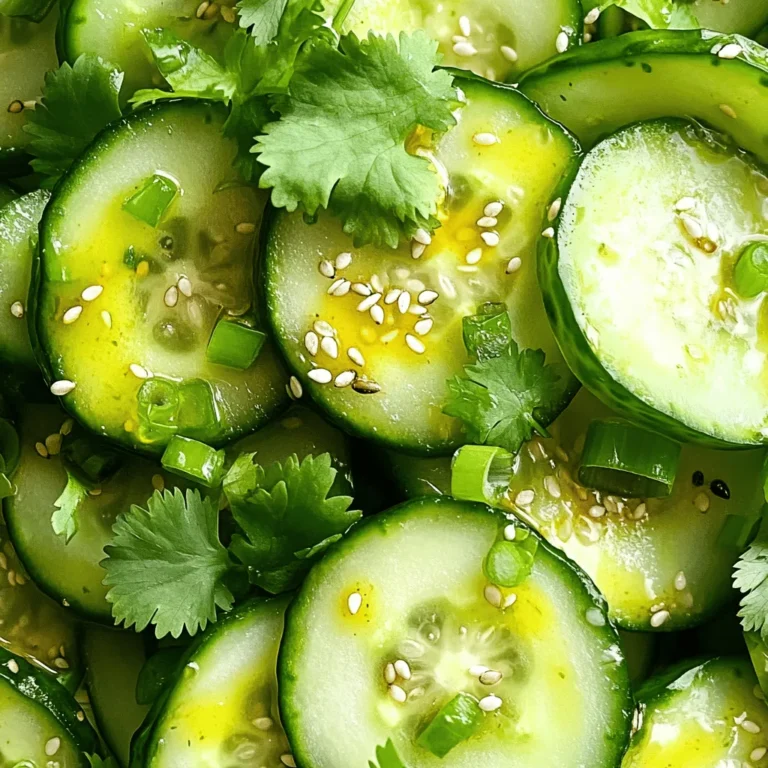
Spicy Sesame Cucumber Salad Fresh and Flavorful Dish

To make delicious Parmesan crusted zucchini fries, you need a few key items: - 2 medium zucchinis - 1 cup panko breadcrumbs - 1/2 cup freshly grated Parmesan cheese - 1 teaspoon garlic powder - 1 teaspoon onion powder - 1 teaspoon dried oregano - Sea salt and black pepper to taste - 2 large eggs - 1 tablespoon Dijon mustard - Olive oil spray These ingredients come together to create a crispy and savory experience. The panko breadcrumbs add that irresistible crunch, while the Parmesan gives a rich flavor. Want to switch things up? You can try these alternate ingredients: - Swap zucchini for eggplant or sweet potatoes for a different taste and texture. - Use seasoned breadcrumbs for extra flavor. - Try different cheeses, like cheddar or mozzarella, for a fun twist. These changes can add a new layer to your dish while keeping it tasty. Choosing the right zucchini is key to great fries. Here’s how to pick them: - Look for firm zucchinis with smooth skin. Avoid any that have soft spots or blemishes. - Choose medium-sized zucchinis. They tend to have better flavor and texture than larger ones. - Check for a vibrant green color. This indicates freshness and quality. Fresh zucchinis will give your fries the best taste and crunch. Enjoy your cooking! Start with fresh zucchinis. Rinse them under cool water and dry them off. Trim both ends to remove any tough bits. Next, slice the zucchinis into fry-shaped pieces. Aim for about 1/2 inch thick. This size helps them cook evenly and get crispy. In one bowl, mix panko breadcrumbs, grated Parmesan cheese, garlic powder, onion powder, oregano, salt, and pepper. Stir until all the dry ingredients blend well. In another bowl, whisk the eggs and Dijon mustard together until smooth. This mixture will help the coating stick to the zucchini. Take each zucchini fry. First, dip it into the egg mixture. Let any extra drip off. Then, roll it in the breadcrumb mix. Press down gently to coat it well. This step is key for that crunchy texture. Preheat your oven to 425°F (220°C). Line a baking sheet with parchment paper to make cleanup easy. Place the coated zucchini fries on the sheet in a single layer. Leave space between each fry so they can crisp up nicely. Give the tops a light spray of olive oil. This helps them brown well. Bake them for 20 to 25 minutes. Halfway through, flip the fries. This ensures they cook evenly. When they turn golden brown, they are done. Let them cool for a few minutes before you dig in! Enjoy the crispy, cheesy goodness! Panko breadcrumbs are key for a great crunch. They are lighter and flakier than regular bread crumbs. This helps create that crispy bite we all want. When mixing panko with Parmesan, it gives a nice flavor boost. Make sure to coat the zucchini fries well. Press them gently into the mixture. This helps the coating stick better when baking. Adding herbs and spices makes your fries pop with flavor. I like using garlic powder and onion powder. These give a nice savory taste. Dried oregano adds an earthy note, too. Feel free to get creative! You could add paprika for a smoky touch or even a pinch of cayenne for heat. The right seasonings can turn a simple dish into something special. No one likes soggy fries. To keep them crisp, start by slicing your zucchini evenly. This ensures they cook at the same time. Make sure to dry the zucchini slices well before coating. Removing moisture is key. Also, use parchment paper on your baking sheet. This keeps the fries from sticking, promoting even browning. Lastly, don’t overcrowd the fries on the sheet. A little space allows hot air to circulate, keeping them crispy. {{image_4}} To spice things up, add cayenne pepper or crushed red pepper to the breadcrumb mix. Start with a half teaspoon and adjust to your heat preference. The added spice gives the fries an exciting kick. Pair these spicy fries with a cool dipping sauce like ranch or yogurt to balance the heat. If you need a gluten-free version, swap panko for almond flour. Almond flour gives a nice nutty flavor and a crunchy texture. Just combine it with Parmesan, garlic powder, and spices. You may need to adjust the baking time, so keep an eye on those fries! Experiment with different cheeses for a unique taste. Try mixing mozzarella for meltiness or cheddar for a sharp flavor. You can also sprinkle feta on top before baking for a Mediterranean twist. Each cheese brings its own flair, making your zucchini fries even more delicious. To store leftover zucchini fries, first let them cool completely. Place them in an airtight container. This keeps them fresh and helps avoid moisture. You can store them in the fridge for up to three days. If you want to enjoy them later, freezing is a great option too. To reheat your zucchini fries and keep them crispy, use an oven or an air fryer. Preheat the oven to 400°F (200°C). Place the fries on a baking sheet and heat for about 10 minutes. If using an air fryer, set it to 375°F (190°C) for about 5 minutes. Avoid using the microwave, as it can make them soggy. You can freeze zucchini fries for later. After baking, let them cool completely. Arrange them in a single layer on a baking sheet and freeze for about an hour. Once frozen, transfer them to a freezer bag. This way, you can grab a portion whenever you want a tasty snack. Enjoy them straight from the freezer or bake them from frozen. Just add a few extra minutes to the cooking time. Yes, you can use other veggies like eggplant, carrots, or sweet potatoes. Cut them into fry shapes, just like the zucchini. Keep in mind that cooking times may vary. Thin vegetables will cook faster, while thicker ones may need more time in the oven. Experiment with your favorites for a tasty twist! To make this recipe vegan, swap the eggs for a mixture of ground flaxseed and water. Mix 1 tablespoon of ground flaxseed with 2.5 tablespoons of water. Let it sit for a few minutes until it thickens. Use this as your binding agent. Ensure the Parmesan cheese is dairy-free, or replace it with nutritional yeast for a cheesy flavor. Zucchini fries taste great with many dipping sauces. Some popular choices are marinara sauce, garlic aioli, or ranch dressing. For a spicy kick, try sriracha mayo or a zesty yogurt dip. Feel free to mix and match to find your perfect pairing! Zucchini fries are a tasty and healthy snack. In this post, we covered essential ingredients, including tips for selecting fresh zucchini. You learned a step-by-step process to prepare, bread, and bake them for a crunchy bite. We explored unique variations and discussed storage and reheating methods. Stick to these tips, and enjoy making your crisp zucchini fries. New flavors await with each variation. Have fun creating your perfect batch!

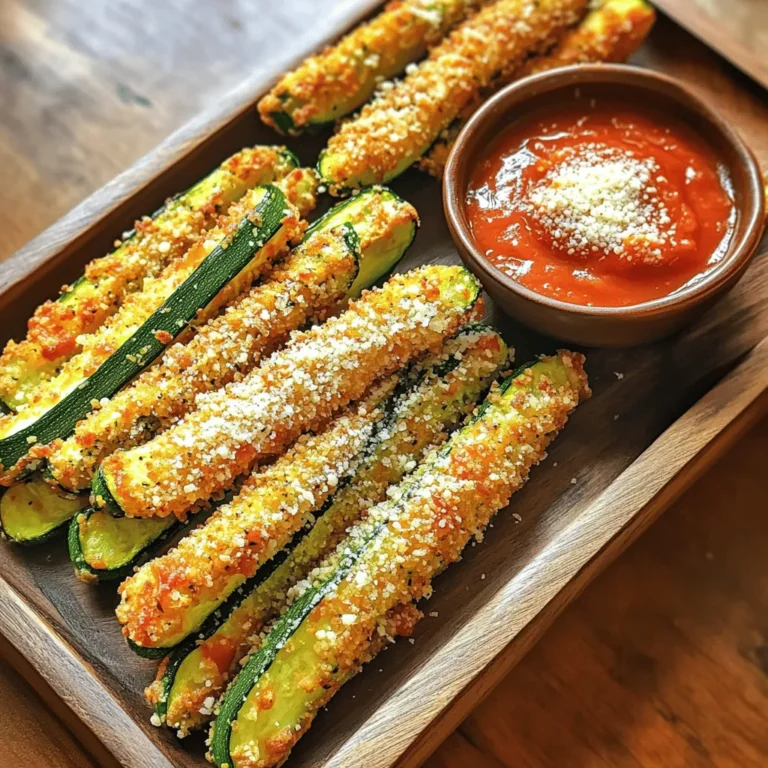
Parmesan Crusted Zucchini Fries Crispy and Delicious

- 8 oz noodles (udon or spaghetti) - 4 tablespoons olive oil - 6 cloves garlic, finely minced - 2 tablespoons red chili flakes - 2 tablespoons soy sauce - 1 tablespoon sesame oil - 2 green onions, thinly sliced - Fresh cilantro for garnish - Toasted sesame seeds for garnish Gathering these ingredients is key. The noodles are the heart of the dish. Udon offers a chewy texture, while spaghetti provides a familiar taste. Both work great! Next, olive oil adds richness. Garlic is a must. It brings bold flavor. Mince it finely to get the most from its taste. The sauce components pack a punch. Red chili flakes give heat. Adjust them based on your spice level. Soy sauce adds depth and saltiness. Sesame oil brings a nutty aroma, completing the mix. Garnishes brighten up the dish. Green onions add a fresh crunch. Cilantro gives a pop of color and flavor. Toasted sesame seeds offer a nice crunch. All these elements come together to make the dish beautiful and tasty. To start, bring a large pot of salted water to a boil. Use enough salt so it tastes like the sea. This helps the noodles taste good. Next, add 8 oz of your favorite noodles. You can use udon or spaghetti. Cook them until they are al dente. This means they should be firm but not hard. Check the package for timing. Once done, drain the noodles in a colander and set them aside. In a small bowl, whisk together the following ingredients: - 2 tablespoons soy sauce - 1 tablespoon sesame oil - 1 tablespoon granulated sugar - 1 tablespoon rice vinegar Make sure the sugar dissolves well. This will give your sauce a nice balance of flavors. Set the sauce aside for later. Now, heat 4 tablespoons of olive oil in a large skillet over medium heat. Add 6 cloves of finely minced garlic. Sauté the garlic for 1-2 minutes. You want it to smell great but not burn. If it gets too brown, it will taste bitter. After that, sprinkle in 2 tablespoons of red chili flakes. This adds heat. Sauté for another minute to bring out the flavors. Gently add the cooked noodles to the skillet with the garlic and chili oil mixture. Pour the prepared sauce over the top. Use tongs or a spatula to toss everything together. Make sure all the noodles are coated in the sauce evenly. Now, add 2 thinly sliced green onions into the skillet. Toss everything again. This adds freshness and crunch. Let the dish sit for a minute. This helps the flavors blend together. Serve the spicy garlic noodles hot. Garnish with fresh cilantro and a sprinkle of toasted sesame seeds. This adds color and crunch. Enjoy your meal! Cook your noodles just right. For udon, that means 8-10 minutes. Spaghetti takes about 8-12 minutes. Always check the package for exact times. Once cooked, drain and rinse them with cold water. This stops the cooking and keeps them firm. If you have leftovers, store them in an airtight container. They stay fresh in the fridge for up to three days. To reheat, add a splash of water and microwave or warm in a pan. Want more heat? Add extra chili flakes to amp up the spice. If it’s too spicy, dial back the flakes. For a touch of sweetness, mix in a bit of granulated sugar. This balances the heat and makes the dish pop. Taste your sauce before adding it to the noodles. Adjust until you find your perfect flavor. Sautéing garlic can be tricky. Use medium heat and watch closely. Garlic cooks fast and can burn easily. If it turns brown, it can taste bitter. A wok is great for this recipe. It gives you more room to toss the noodles. A skillet works too but might not infuse flavors as well. Use what you have and enjoy the cooking process! {{image_4}} You can make spicy garlic noodles vegetarian with simple changes. Try using zucchini noodles instead of regular noodles. They are light and add a nice texture. You can also add vegetables like bell peppers or broccoli. These choices boost the flavor and add color to your dish. For a protein-packed meal, think about adding chicken, shrimp, or tofu. Cook your protein in the skillet with the garlic. This way, the protein absorbs the garlic flavor. It makes your dish even more tasty and satisfying. Want to change things up? Use teriyaki sauce instead of soy sauce. This swap gives a sweet touch to your noodles. You can also experiment with different oils, like chili oil. It adds a rich heat and enhances the overall flavor. To keep your spicy garlic noodles fresh, store them in an airtight container. Place them in the fridge right after they cool. They will stay tasty for about 3 to 4 days. If you wait too long, the noodles may dry out or lose flavor. You can freeze your spicy garlic noodles. To do this, put them in a freezer-safe container. Make sure to leave some space for expansion. They will stay good for about 1 to 2 months. When you want to eat them, thaw them overnight in the fridge. Reheat them on a skillet with a splash of water or oil to keep them moist. When you reheat the noodles, do it gently on low heat. This helps keep the texture nice. If they seem dry, add a little water or broth. To refresh the flavor, add a sprinkle of fresh green onions or cilantro right before serving. This makes the dish bright and tasty again. I recommend using udon or spaghetti. Udon noodles are thick and chewy. They soak up the sauce well. Spaghetti is great too, as it’s easy to find. Both types give a lovely texture to the dish. The spice level can vary. You can start with two tablespoons of red chili flakes. If you like more heat, add more flakes. If you prefer milder noodles, use less. Adjust the spice to match your taste. Yes, you can prepare these noodles in advance. Cook the noodles and sauce separately. Store them in airtight containers. When ready to eat, reheat them together. This helps flavors blend nicely. These noodles pair well with many dishes. Try serving them with steamed vegetables or grilled chicken. A side salad also adds a fresh touch. You can even enjoy them with dumplings for a fun meal. This recipe can be made vegan with simple swaps. Use vegetable oil instead of olive oil. Ensure your soy sauce is vegan-friendly too. You can also replace sugar with agave syrup if you want. In this blog post, we explored how to create spicy garlic noodles using simple ingredients and steps. You learned about the main elements, like noodles and garlic, and how to make an easy sauce. I shared tips for perfecting your dish and even suggested variations. Cooking should be fun and rewarding. Enjoy your spicy garlic noodles with fresh garnishes, and don’t hesitate to adjust flavors to suit your taste. Now, get cooking and savor each bite!

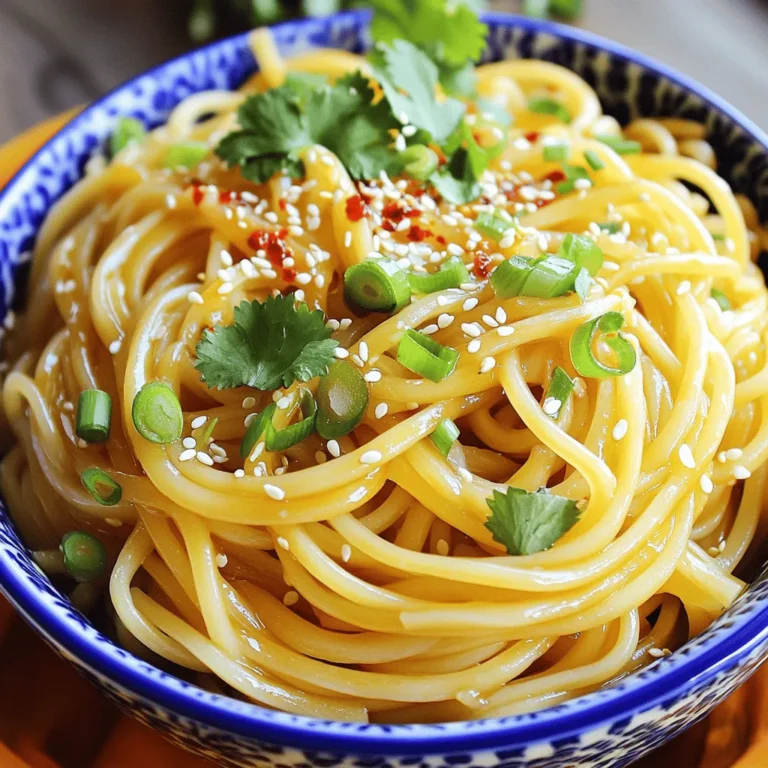
Spicy Garlic Noodles Bold and Flavorful Recipe

To make tasty Chicken Parmesan meatballs, you need a few key ingredients. Here’s what you need: - 1 lb ground chicken - 1/2 cup Italian seasoned breadcrumbs - 1/4 cup freshly grated Parmesan cheese - 1/2 cup shredded mozzarella cheese - 1 large egg, lightly beaten These ingredients give your meatballs a great texture and flavor. The ground chicken keeps them light, while the cheeses add a creamy, cheesy taste. Seasonings make a big difference in flavor. Here’s what to include: - 2 cloves garlic, finely minced - 1/4 cup fresh basil, finely chopped (or 1 tablespoon dried basil) - 1 teaspoon dried oregano - 1/2 teaspoon salt - 1/4 teaspoon freshly ground black pepper These herbs and spices infuse the meatballs with a rich Italian flavor. Fresh basil adds a bright note, while garlic gives it depth. Toppings can elevate your dish. Consider these options: - Extra mozzarella and Parmesan cheese for topping - 2 cups marinara sauce Adding more cheese on top creates a gooey finish. Marinara sauce adds moisture and flavor, making each bite even better. You can serve with a side of extra marinara for dipping, too. First, gather all your ingredients together. This will make cooking easier. In a large mixing bowl, combine the ground chicken, breadcrumbs, and cheeses. Add the beaten egg, minced garlic, chopped basil, oregano, salt, and black pepper. Mix everything gently with your hands or a spoon. Be careful not to overmix. This keeps the meatballs tender and juicy. Next, you’ll want to shape the mixture into meatballs. Use your hands to scoop out a small amount. Roll it into a ball about the size of a golf ball. Place them on a baking sheet lined with parchment paper. This helps with cleanup later. Heat a good amount of olive oil in a large skillet over medium heat. Once the oil is hot, add the meatballs in small batches. Don’t crowd them. Cook each side for about 4-5 minutes until they turn golden brown. Make sure they are cooked all the way through. Now, it’s time for the best part—baking! After you brown the meatballs, move them to a baking dish. Pour the marinara sauce over the meatballs. Top each one with extra mozzarella and Parmesan cheese. This is where the magic happens! Place the dish in your preheated oven at 400°F (200°C). Bake for 15-20 minutes. Look for the cheese to be melted, bubbly, and slightly golden. Once done, take them out and let them cool for a few minutes. This helps the flavors mix well before you serve. To keep your meatballs soft, avoid overmixing the meat. Gently combine the ingredients just until mixed. This helps keep the meatballs light. Using ground chicken also adds moisture, which keeps them juicy. Fry the meatballs first to get a nice crust. Heat olive oil in a skillet, then add them in small batches. Cook for about 4-5 minutes on each side until they are golden brown. After frying, bake them in marinara sauce to finish cooking. This adds flavor and keeps them tender. For a beautiful look, serve the meatballs on a large platter. Drizzle with extra marinara sauce and top with fresh basil leaves. This adds a pop of color. You can also serve them alongside spaghetti for a complete meal. This makes your dish appealing and fun to eat! {{image_4}} You can boost nutrition by adding veggies to your meatball mix. Try finely chopped spinach or grated zucchini. Both add moisture and flavor without changing the taste too much. You can also use bell peppers for a slight crunch. Just remember to squeeze out excess water from the veggies. This keeps your meatballs firm and tasty. Feel free to switch up your sauce and cheese. Instead of marinara, use pesto for a fresh twist. A creamy Alfredo sauce can also make a rich meal. For cheese, mix it up with provolone or fontina. These cheeses melt well and add unique flavors. Experiment to find what you like best! If you need gluten-free meatballs, swap breadcrumbs for almond flour or gluten-free crumbs. They bind the meatballs just as well. For a low-carb version, use crushed pork rinds instead of breadcrumbs. They offer a nice crunch and keep the meatballs low in carbs. Enjoy your meal guilt-free! After you enjoy your Chicken Parmesan Meatballs, store any leftovers in the fridge. Place the meatballs in an airtight container. They will stay fresh for up to three days. Make sure the marinara sauce covers the meatballs to keep them moist. If you separate the sauce, it helps prevent sogginess. If you want to keep your meatballs longer, freezing is a great option. First, let the meatballs cool completely. Arrange them in a single layer on a baking sheet. Freeze them for about an hour until solid. Once frozen, transfer the meatballs to a freezer-safe bag. They can last up to three months in the freezer. Label the bag with the date so you know when to use them. Reheating Chicken Parmesan Meatballs is simple. For the best results, thaw them overnight in the fridge if you froze them. You can reheat them in the oven or microwave. To reheat in the oven, place them in a dish with marinara sauce and cover with foil. Bake at 350°F (175°C) for about 20 minutes. If using a microwave, heat in short bursts of one minute, checking often. Enjoy them warm with extra cheese on top! Yes, you can use ground turkey. It makes a great substitute for ground chicken. Turkey has a mild flavor and works well in meatballs. Just keep in mind that turkey may be a bit leaner. You might want to add a little extra cheese or oil to keep the meatballs moist. To check if the meatballs are done, use a meat thermometer. They should reach an internal temperature of 165°F. If you don't have a thermometer, cut one meatball in half. The center should not be pink, and the juices should run clear. Cooking them until golden brown on the outside also helps ensure they are cooked through. Chicken Parmesan meatballs go well with many sides. Here are some tasty options: - A bed of spaghetti tossed in olive oil and herbs - Garlic bread or crusty bread for dipping - A fresh garden salad with a light vinaigrette - Steamed veggies like broccoli or green beans for a healthy touch These sides make your meal hearty and satisfying! This guide covered making delicious chicken parmesan meatballs. We explored key ingredients like ground chicken, cheese, and seasonings. You learned step-by-step instructions to prep, cook, and bake your meatballs. I shared tips for great texture and presentation. Variations like gluten-free options added flair. Don't forget how to store leftovers for later. Try these easy recipes, and enjoy cooking!

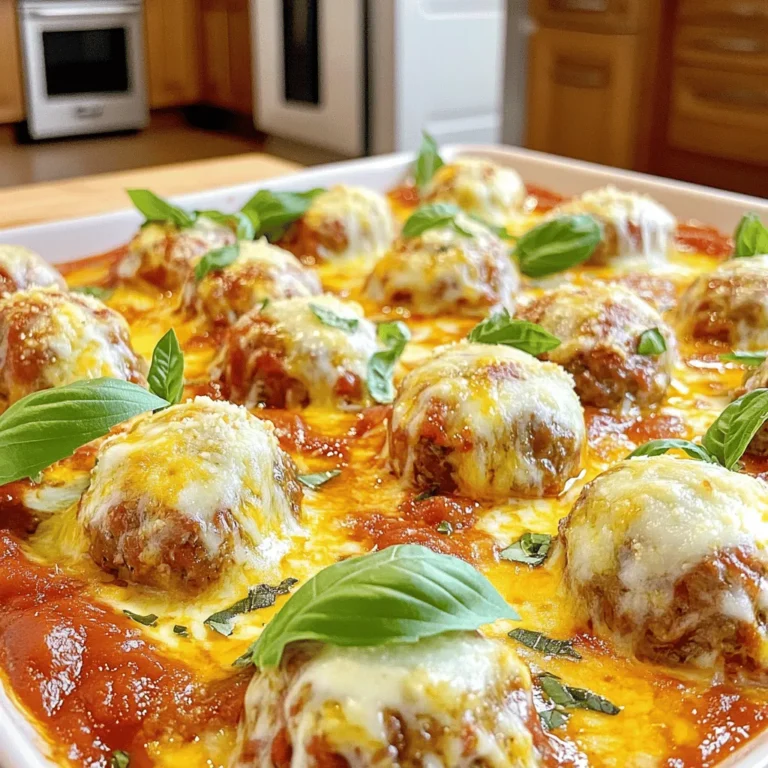
Chicken Parmesan Meatballs Tasty and Hearty Recipe

To make a tasty sushi bake, you need key ingredients. Here’s what you will need: - 2 cups sushi rice - 2 1/2 cups water - 1 pound imitation crab meat, shredded - 1/2 cup cream cheese, softened - 1/4 cup mayonnaise These ingredients create a creamy and savory base for your dish. The sushi rice gives it the right texture, while the imitation crab meat adds that classic seafood flavor. Next, you need to add some flavor and flair. These ingredients are essential: - 1/4 cup rice vinegar - 3 tablespoons granulated sugar - 1 teaspoon salt - Sesame seeds for garnish - Nori strips for topping The rice vinegar, sugar, and salt work together to season the rice perfectly. The sesame seeds and nori strips add crunch and color on top. Want to spice things up? You can add a few optional ingredients: - 1 tablespoon sriracha for heat - Alternative seafood options like shrimp or salmon Sriracha gives it a kick if you like it spicy. You can also swap the crab for other seafood based on your taste. This keeps the recipe fun and fresh! {{ingredient_image_2}} Preheat the oven: Start by preheating your oven to 350°F (175°C). This step is key. It makes sure your sushi bake cooks evenly. Rinsing and cooking sushi rice: Rinse 2 cups of sushi rice under cold water. Keep rinsing until the water runs clear. This helps remove excess starch. In a medium pot, combine the rinsed rice with 2 1/2 cups of water. Bring it to a boil over high heat. Once boiling, reduce the heat to low, cover, and let it simmer for 15 minutes. After that, turn off the heat and let it sit, covered, for 10 more minutes. This steaming makes the rice fluffy and perfect. Seasoning the rice: In a small bowl, mix 1/4 cup rice vinegar, 3 tablespoons sugar, and 1 teaspoon salt. Whisk until the sugar dissolves. Gently fold this mixture into the cooked rice. Be careful not to mash the grains. Set the seasoned rice aside to cool slightly. Combining the crab mixture: In a large bowl, mix 1 pound of shredded imitation crab meat, 1/2 cup of softened cream cheese, 1/4 cup of mayonnaise, 1 tablespoon of sriracha (adjust based on your spice preference), and 1/4 cup of chopped green onions. Stir until well blended and creamy. Assembling in the baking dish: Grease a 9x9-inch baking dish with non-stick spray or a little oil. Spread the seasoned sushi rice evenly across the bottom. Then, layer the crab mixture over the rice, smoothing it out evenly. Baking time and temperature: Place the dish in your preheated oven. Bake for 20 to 25 minutes. Look for a golden brown top and make sure it is hot throughout. Enjoy the warm, savory smell as it bakes! Ensuring rice texture and flavor To get the best sushi rice, rinse it well. You want to remove all the excess starch. This makes the rice less sticky and gives it a nice texture. After rinsing, cook it with just the right amount of water. Use 2 1/2 cups of water for 2 cups of rice. When it’s done, let it sit for 10 minutes. This helps the rice steam and become fluffy. Mix in the rice vinegar, sugar, and salt gently. This adds flavor and gives the rice a nice shine. Achieving the perfect crab mixture consistency For the crab mixture, make sure your cream cheese is soft. This helps it blend well with the crab and mayo. Mix them together until smooth. Add the sriracha and chopped green onions next. This adds flavor and a bit of heat. The mixture should be creamy but not too runny. If it feels too thick, add a little more mayo. This way, it spreads easily over the rice. Creative plating ideas When it comes to serving, have fun with the plating! Cut the sushi bake into squares for easy serving. Place them on a nice platter. You can garnish with extra nori strips and sesame seeds on top. This adds color and makes it look fancy. Serve with small bowls of soy sauce on the side. This way, everyone can dip as they like. Recommended side dishes For sides, consider simple salads or pickled veggies. They add a nice crunch and balance the meal. A cucumber salad drizzled with rice vinegar works great. You can also serve edamame for a fun snack. Both options are light and refreshing. Best practices for storage If you have leftovers, store them in an airtight container. This keeps the sushi bake fresh. It can last in the fridge for about three days. Just make sure to let it cool before sealing. How to reheat without losing texture To reheat, the oven is best. Preheat it to 350°F. Place the sushi bake in a baking dish and cover it with foil. Heat for about 10-15 minutes. This helps keep the top crispy while warming the inside. If you use a microwave, be careful. Heat in short bursts to avoid making it soggy. Pro Tips Perfect Rice Texture: Rinse the sushi rice thoroughly until the water runs clear to remove excess starch, ensuring the rice is sticky yet fluffy after cooking. Adjusting Spice Level: Modify the amount of sriracha in the crab mixture according to your personal heat preference, or substitute it with a milder sauce if needed. Even Baking: To achieve a golden brown top, consider broiling the sushi bake for a few minutes at the end of the baking process, keeping a close eye to prevent burning. Creative Serving: Serve with additional toppings like avocado slices, pickled ginger, or wasabi for a fun and interactive sushi experience. {{image_4}} You can switch out the crab meat for other proteins. Shrimp or cooked salmon works great. You can also use cooked chicken for a twist. If you want a vegetarian option, try using tofu or avocado. These swaps allow you to make the dish suit your taste. Different sauces can change the flavor of your sushi bake. Try using eel sauce for a sweet and savory touch. A sprinkle of chili flakes adds a kick if you like spice. You can also mix in veggies, like bell peppers or cucumbers. These add color and crunch to the dish. You can personalize how you serve your sushi bake. Try making sushi bake roll-ups. Just spread the mixture on a nori sheet and roll it up. You can also use muffin tins to create sushi bake cups. This makes for easy serving and fun bites. Each bite can be a new flavor experience! To keep your sushi bake fresh, store it in an airtight container. This helps to keep the flavors intact. You can use glass or plastic containers. Make sure the lid seals tightly. The leftovers will stay good in the fridge for about 3 to 4 days. If you want to enjoy it later, freezing is a good option. Freezing your sushi bake is easy. First, let it cool completely. Then, cut it into portions. Wrap each piece in plastic wrap. Place these wrapped pieces in a freezer-safe bag. Be sure to remove as much air as possible. This helps prevent freezer burn. Your sushi bake can last for about 2 months in the freezer. When you want to eat it, take it out and thaw it in the fridge overnight. You can also thaw it quickly in the microwave. To reheat, you have two choices: oven or microwave. Oven: Preheat your oven to 350°F (175°C). Place the sushi bake in an oven-safe dish. Cover it with foil to keep it moist. Heat for about 15 to 20 minutes. Microwave: If you use the microwave, place a piece on a microwave-safe plate. Cover it with a damp paper towel. Heat in 30-second bursts until warm. Both methods work well, but the oven keeps the texture better. Enjoy your sushi bake just like it was fresh! Making a Quick and Easy Sushi Bake takes about 45 minutes in total. Here’s how the time breaks down: - Prep Time: 20 minutes to prepare all ingredients and get the rice ready. - Cooking Time: 25 minutes to bake the dish until golden brown. Yes, you can use fresh crab! Fresh crab offers a better texture and taste. It adds a more authentic seafood flavor. Just make sure to shred it fine to mix well with the other ingredients. The cream cheese and mayonnaise will help combine everything nicely. Yes, this sushi bake is great for freezing. Here are some tips: - Freezing: After baking, let it cool completely. Cut it into squares before freezing. This makes it easier to reheat later. - Reheating: Thaw in the fridge overnight. To reheat, bake in the oven until warm. This keeps the texture nice and fresh. Avoid the microwave if you want to keep it crispy! In this blog post, I broke down how to make a quick and easy sushi bake. We discussed the essential ingredients, like sushi rice and imitation crab. I covered step-by-step instructions, from preparing the rice to baking the dish. Tips on perfecting your bake and creative serving ideas ensure tasty results. Don't forget about storage and reheating tips to enjoy leftovers. Whether you're new to sushi or a fan, this dish offers fun variations to try. Enjoy crafting your own unique sushi bake masterpiece!

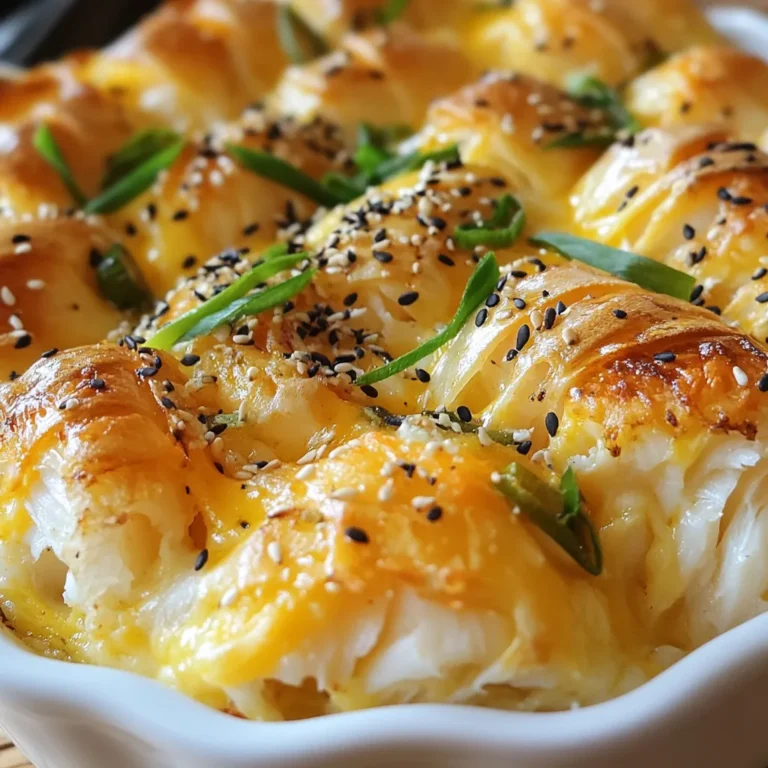
Quick and Easy Sushi Bake Flavorful and Fun Recipe

To make Vanilla Bean Crème Brûlée French Toast, you'll need a few key items. Here's what you should gather: - 1 loaf of brioche bread, sliced thick (about 8 slices) - 4 large eggs - 1 cup heavy cream - 1/2 cup whole milk - 1/4 cup granulated sugar - 1 tablespoon pure vanilla extract - 1 vanilla bean, split and seeds scraped - 1 teaspoon ground cinnamon - 1/2 teaspoon ground nutmeg - Pinch of salt - Extra granulated sugar for caramelizing These ingredients work together to create a rich and creamy custard, perfect for soaking the brioche. The heavy cream and milk add a nice texture, while the eggs help bind everything. The vanilla bean gives a wonderful depth of flavor, far beyond just using vanilla extract! The spices bring warmth, making each bite feel cozy. Make sure to use fresh brioche bread. Its buttery softness will soak up the custard beautifully. Each ingredient plays a role, so be mindful when you choose them. Start with a large bowl. Crack the four eggs and whisk them until smooth. Next, add the heavy cream and whole milk. Then, pour in the granulated sugar, pure vanilla extract, and the seeds from the split vanilla bean. Sprinkle in the ground cinnamon, nutmeg, and a pinch of salt. Whisk this mixture well. Make sure the sugar dissolves fully for a smooth custard. Grab your brioche bread and slice it thick. Arrange the slices in a single layer in a baking dish. Pour the custard over the bread evenly. Press down gently on each slice to help it soak up the custard. This step is key! Cover the dish and refrigerate for at least one hour. For the best flavor, let it soak overnight. When you're ready to bake, preheat the oven to 375°F (190°C). After soaking, take out the baking dish from the fridge. Place it in the preheated oven and bake for about 25-30 minutes. You'll know it's done when the custard is set and the top is golden brown and puffy. This means it’s ready for the next step! - Soak the brioche for at least one hour. Overnight soaking gives the best flavor. - Preheat your oven to 375°F (190°C) for even baking. Bake for 25-30 minutes for perfect texture. Look for a golden brown top and set custard. - For the best caramelized topping, sprinkle an even layer of sugar on the baked French toast. Use a kitchen torch for a crispy finish. If you lack a torch, broil for a few minutes, but watch closely. - Dust each serving with powdered sugar for a sweet touch. A sprig of mint adds a fresh look. - Add colorful garnishes like raspberries or blueberries. They pop against the golden toast. - Enhance each plate with toppings like fresh berries, maple syrup, or whipped cream. These add flavor and make it visually appealing. {{image_4}} You can change the flavor of your Vanilla Bean Crème Brûlée French Toast in fun ways. - Substituting different types of bread: Try using challah or sourdough instead of brioche. Each type brings its own taste and texture. - Infusing flavors like almond or orange: Add almond extract for a nutty note. Orange zest adds a bright, citrus twist. - Using flavored syrups or sauces: Maple syrup is classic, but adding caramel or berry sauce can elevate the dish even more. Making this dish fit your diet is easy. - Making it gluten-free: Use gluten-free bread for a tasty, safe option. Many brands offer great flavors. - Vegan alternatives for eggs and dairy: Swap eggs with flaxseed meal or aquafaba. Use almond or coconut milk instead of cream and regular milk. - Reducing sugar for a healthier option: You can cut down granulated sugar and use a natural sweetener like honey or agave. These variations and adjustments let you enjoy this dish in many ways. You can impress your friends and family while meeting dietary needs! To keep your Vanilla Bean Crème Brûlée French Toast fresh, store it in the fridge. Place any leftover slices in an airtight container. This helps prevent them from drying out. You can also wrap the slices tightly in plastic wrap. Make sure they stay well covered to lock in moisture. When it comes time to reheat, you want to keep the texture nice. For best results, use your oven. Preheat it to 350°F (175°C). Place the slices on a baking sheet and cover them with foil. Bake for about 10-15 minutes. This method warms them up without making them soggy. If you want to freeze your baked dish, cut it into slices first. Wrap each slice in plastic wrap. Then place them in a heavy-duty freezer bag. Make sure to remove as much air as possible. This helps prevent freezer burn. When you’re ready to enjoy it again, take a slice out of the freezer. Thaw it in the fridge overnight. Then, reheat it as mentioned before. This keeps the custard creamy and the top crispy. Enjoy your delicious French toast even after days! Yes, you can prepare this dish ahead of time. It helps the flavors blend well. - Soak the bread overnight in the custard. - Store it in the fridge covered with plastic wrap. - Bake it fresh in the morning for a warm treat. The French toast is done when it looks puffed and golden. - Check if the custard is set in the middle. - A toothpick should come out clean from the center. - Watch for a nice golden color on top. This dish pairs well with many sides and drinks. - Serve it with fresh berries or whipped cream. - Drizzle some maple syrup for extra sweetness. - Enjoy with a cup of coffee or hot tea. For a perfect breakfast or brunch menu, consider adding: - Crispy bacon or sausage for a savory touch. - A light fruit salad to balance the richness. - A refreshing mimosa or smoothie for a drink. This blog post outlined a delicious recipe for Vanilla Bean Crème Brûlée French Toast. We discussed the key ingredients and walked through each step, from preparing the custard to baking. I also shared tips for the best texture and flavor, along with variations for your taste buds. In conclusion, make this dish your own with fun toppings or flavors. Just remember, practice makes perfect. Enjoy creating a delightful meal that will impress everyone at the table!

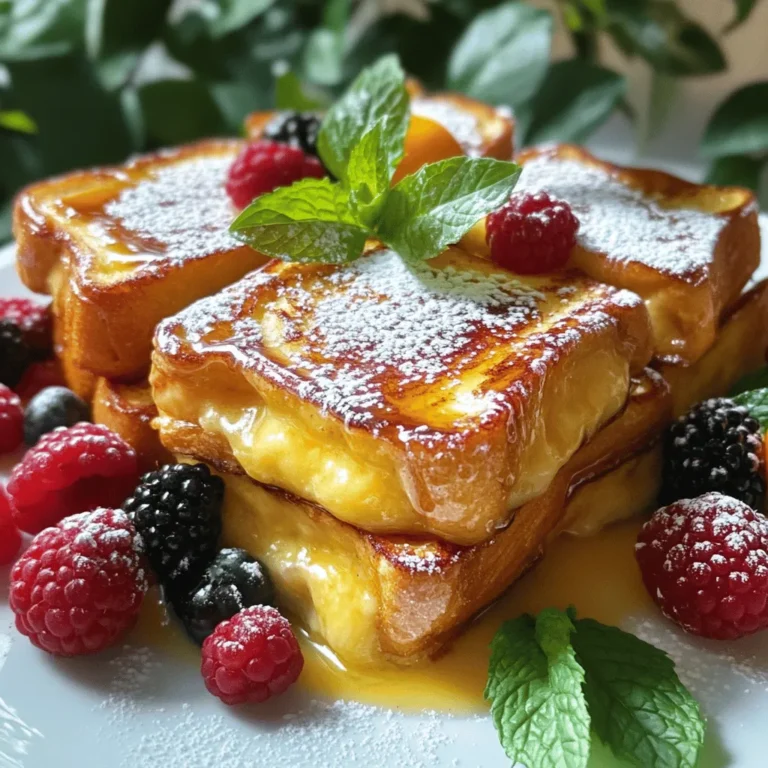
Vanilla Bean Crème Brûlée French Toast Delight

- Edamame: Fresh vs. Frozen You can use either fresh or frozen edamame for this dish. Fresh edamame gives a bright, crisp taste. Frozen edamame is quick and easy. It cooks in just a few minutes. Both options are tasty and nutritious. - Garlic: Choosing the Best Variety Choose fresh garlic for the best flavor. Look for firm bulbs with no soft spots. Mince the garlic finely to release its bold aroma. This step is key to the spicy kick in your dish. - Spices and Seasonings: Red Pepper Flakes, Soy Sauce, and More Red pepper flakes add heat. Adjust the amount to fit your spice level. Low-sodium soy sauce keeps the dish savory without too much salt. Toasted sesame oil gives a rich, nutty flavor. The sugar balances the heat and salty notes. - Toasted Sesame Seeds Toasted sesame seeds add crunch. They enhance the dish’s flavor and look great on top. Just sprinkle them over the finished edamame. - Sliced Green Onions Sliced green onions bring freshness. They add a pop of color and taste. Scatter them on top for a nice finish. - Alternative Garnishes You can try other garnishes too. Chopped cilantro or crushed peanuts work well. Get creative with what you have on hand! Cooking Frozen Edamame If you have frozen edamame, start by checking the package instructions. Usually, it takes about 5 minutes to cook them in boiling water. They should be tender but still bright green. After cooking, drain them and set them aside. Cooking Fresh Edamame For fresh edamame, fill a pot with salted water. Bring it to a boil. Add the edamame pods and cook for around 5 minutes. Once they are tender, drain them and set them aside as well. Heating Olive Oil Grab a large skillet or frying pan. Pour in 2 tablespoons of extra virgin olive oil. Heat it over medium heat until it shimmers. Sautéing Garlic and Seasonings Add 4 cloves of finely minced garlic to the hot oil. Sauté the garlic for about 1 minute. Keep stirring to avoid burning. When you smell a strong garlic aroma, you’re ready for the next step. Now, sprinkle in 1 teaspoon of red pepper flakes. Cook for another 30 seconds. This will add a spicy kick to your dish. Combining Ingredients Next, toss in the cooked edamame pods. Drizzle 1 tablespoon of low-sodium soy sauce and 1 tablespoon of toasted sesame oil over them. Add 1 teaspoon of granulated sugar, zest from 1 lime, and the juice from the same lime. Stir everything together until the edamame is well-coated in the mixture. Let it cook for an additional 2 to 3 minutes. This allows all the flavors to blend nicely. Seasoning with Sea Salt Before serving, taste your spicy garlic edamame. Add sea salt to your liking. This step enhances the flavors. Serving Suggestions Once ready, transfer the edamame to a serving bowl. For a lovely finish, garnish with toasted sesame seeds and sliced green onions. This adds great texture and a pop of color. Serve warm and enjoy your tasty snack! - Cooking Time Guidelines: Cook fresh edamame for about 5 minutes. For frozen, follow the package instructions. Aim for tender, bright-green pods. - Avoiding Overcooking Garlic: Sauté minced garlic for just 1 minute. Watch closely to keep it from burning. This step is key for great flavor. - Tips for Balancing Heat: Start with 1 teaspoon of red pepper flakes. Adjust to your taste. If it’s too spicy, add more sugar or lime juice to balance. - Adjusting Seasoning to Taste: After cooking, taste the edamame. Add sea salt as needed. This step helps bring all the flavors together. - Serving Style: Serve warm in a rustic bowl for a cozy feel. This makes the dish look inviting and delicious. - Using Lime Wedges for Added Flavor: Add lime wedges on the side. They give a fresh, zesty kick when squeezed over the edamame. This little touch makes a big difference! {{image_4}} You can easily make this dish vegan or vegetarian. The main ingredient, edamame, is already plant-based. For soy sauce, choose a vegan brand. Some soy sauces contain fish sauce, so read labels carefully. You can also use tamari, which is gluten-free. It gives a similar umami taste without animal products. Get creative with your spices! Add a dash of smoked paprika for a smoky flavor. Or try a pinch of cumin for a warm, earthy taste. You can also mix in some crushed peanuts or walnuts for extra crunch. If you like veggies, toss in sliced bell peppers or carrots. They add color and nutrition. Spicy garlic edamame pairs well with many main dishes. Serve it alongside grilled chicken or tofu for a full meal. You can also add it to rice bowls or salads. The spicy edamame brings a fun twist to any dish. Try it in a grain bowl with quinoa and fresh veggies for a tasty lunch. To store your spicy garlic edamame, let it cool first. Place the leftovers in an airtight container. This keeps them fresh and tasty. You can store them in the fridge. They will stay good for about 3 days. To reheat edamame, the best method is using a skillet. Heat it over medium heat. Add a splash of water to keep them moist. This helps maintain their texture. You can also use the microwave but cover them with a damp paper towel. This keeps the heat in and avoids losing flavor. Reheat for about 30 seconds, then check. If they need more time, heat in 10-second bursts. To make Spicy Garlic Edamame vegan, simply swap the toasted sesame oil with another plant-based oil. You can use olive oil or avocado oil. Both provide good flavor. Ensure your soy sauce is also vegan. Most brands are, but it’s best to check the label. Yes, you can use frozen edamame. Just cook it according to the package directions. This usually means boiling or steaming until tender. Frozen edamame cooks quickly, so it’s perfect for a fast snack. Follow the cooking time carefully to keep it bright green. If you need a substitute for sesame oil, try using olive oil or peanut oil. These oils can give a nice flavor. You can also use grapeseed oil. It has a mild taste that will not overpower the dish. Yes, Spicy Garlic Edamame is healthy! Edamame is high in protein and fiber. It also provides vitamins and minerals. Garlic has health benefits too, like boosting your immune system. The dish is low in calories and can fit into many diets. You can prepare Spicy Garlic Edamame in advance. Cook the edamame and sauce, then store them separately. When ready to serve, reheat the edamame and mix with the sauce. This keeps the flavors fresh. Enjoy this tasty snack anytime! Spicy garlic edamame combines fresh or frozen beans with rich garlic and spices. We explored key ingredients and detailed step-by-step cooking instructions. Using simple tips, you can achieve perfectly cooked edamame every time. Consider adding your favorite garnishes to elevate the dish even further. Whether you're serving as a snack or side, this recipe is versatile. Enjoy experimenting with flavors and sharing this tasty treat with others. Trust me, it's worth the effort!

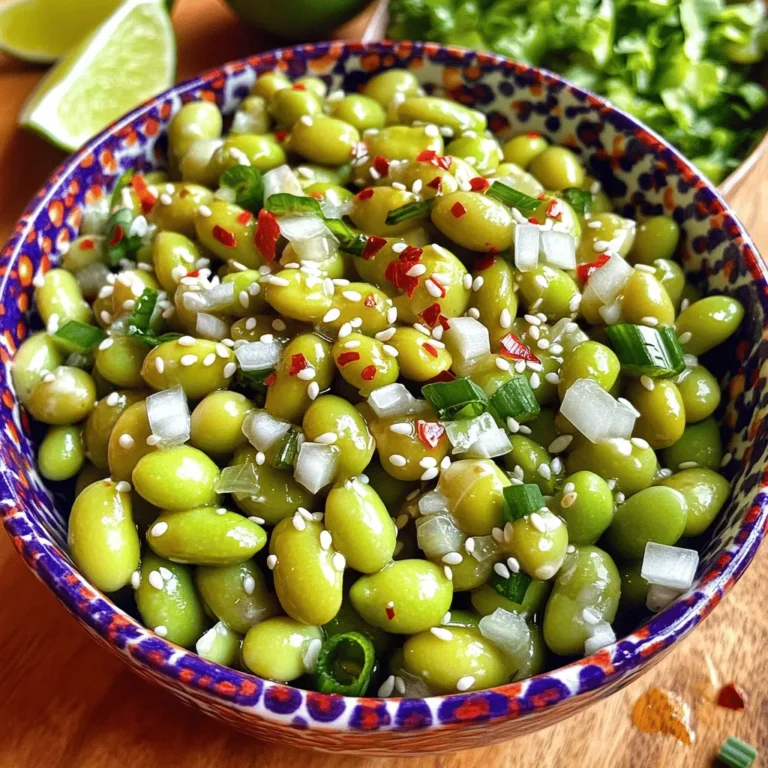
Spicy Garlic Edamame Flavorful and Easy Snack Recipe

- 1 cup all-purpose flour - 2 large eggs - 1 1/2 cups milk - 1 tablespoon granulated sugar - 1/2 teaspoon fine salt - 2 tablespoons unsalted butter, melted (plus extra for cooking) - 1 ripe banana, sliced into thin rounds - 1/2 cup creamy chocolate hazelnut spread - 1/4 cup chopped hazelnuts, for garnish - Powdered sugar, for dusting For this recipe, I use standard measurements. If you need to make changes, here are some options: - You can swap all-purpose flour for gluten-free flour. It works well for crepes. - Use almond milk or oat milk instead of regular milk for a dairy-free version. - If you want less sugar, cut down on the granulated sugar. The bananas add sweetness. When buying ingredients, I prefer these brands for the best results: - Flour: King Arthur Flour for its quality. - Chocolate Hazelnut Spread: Nutella is a classic choice, but look for Justin's for a natural option. - Butter: Kerrygold for its rich flavor. - Powdered Sugar: Domino is widely available and mixes well. These choices can help you create the most tasty chocolate hazelnut banana crepes. To start, grab a large mixing bowl. Add 1 cup of all-purpose flour, 2 large eggs, and 1 1/2 cups of milk. Sprinkle in 1 tablespoon of granulated sugar and 1/2 teaspoon of fine salt. Use a whisk to blend everything until it's smooth and lump-free. Next, stir in 2 tablespoons of melted unsalted butter. Cover the bowl with a cloth and let it rest for 30 minutes. This resting time helps the flour soak up the liquid. Next, heat a non-stick skillet over medium heat. Once it's hot, add a small pat of butter. Swirl the butter around to coat the pan. For each crepe, pour about 1/4 cup of the batter into the skillet. Quickly tilt and swirl the skillet to spread the batter into a thin layer. Cook the crepe for 1-2 minutes. You want the edges to lift and the bottom to turn golden brown. Then, carefully flip the crepe with a spatula and cook for another minute. After cooking, stack the crepes on a plate. Add more butter for the next crepes to avoid sticking. Now, it’s time to fill your crepes. Take one cooked crepe and spread about 1 tablespoon of chocolate hazelnut spread on one half. Lay a few banana slices on top of the spread. Fold the crepe in half, then fold it again to make a triangle. This keeps the filling inside. Place the filled crepes on serving plates. Sprinkle chopped hazelnuts on top and dust with powdered sugar. For extra sweetness, you can drizzle more chocolate hazelnut spread just before serving. Enjoy your tasty creation! To get your crepes just right, start with a smooth batter. Whisk the flour, eggs, milk, sugar, and salt until it’s lump-free. Letting the batter rest for 30 minutes helps. This gives the flour time to soak up the liquid. A well-rested batter makes thin, flexible crepes. One mistake is pouring too much batter into the pan. Use only about 1/4 cup for each crepe. If the crepe is thick, it won’t cook evenly. Another error is skipping the butter in the pan. It keeps the crepes from sticking. Remember to flip the crepe when the edges are brown. Cooking too long makes them tough. For the best results, use a non-stick skillet or a crepe pan. A flat spatula works well for flipping. A whisk is great for mixing the batter. If you have a ladle, it can help pour the batter evenly. Finally, a measuring cup ensures you use the right amount of batter for each crepe. {{image_4}} If you want a nut-free version, swap the chocolate hazelnut spread with a sunbutter or soy nut butter. These spreads give similar creaminess without nuts. You can also use a simple chocolate spread made from cocoa and sugar. Just look for products that do not include nuts in the ingredients. You can change up the filling for fun flavors. Try fresh berries like strawberries or blueberries for a fruity twist. Cream cheese mixed with sugar and vanilla makes a tasty base for fresh fruit. You can also add a splash of vanilla extract to the batter for extra flavor. For a tropical touch, use sliced mango or pineapple. To make vegan crepes, replace eggs with a flaxseed meal mix. Use 1 tablespoon of ground flaxseed with 2.5 tablespoons of water. Let it sit for a few minutes until it thickens. Use almond milk or oat milk instead of regular milk. For the filling, opt for a dairy-free chocolate spread. This way, everyone can enjoy these tasty treats! To store leftover crepes, let them cool completely first. Then, stack them with a piece of parchment paper between each crepe. Place the stack in an airtight container. This helps keep them fresh. Store in the fridge for up to three days. If you plan to eat them later, this method works well. When you're ready to eat your crepes, take them out of the fridge. Heat a non-stick skillet over low heat. Place the crepe in the skillet for about 30 seconds on each side. This warms them up nicely. You can also use a microwave. Just place the crepe on a microwave-safe plate. Heat for about 15-20 seconds. Be careful not to overheat, as they can get tough. To freeze your crepes, cool them completely first. Stack the crepes with parchment paper between each one. Wrap the stack tightly in plastic wrap or foil. Place the wrapped stack in a freezer-safe bag. You can freeze them for up to two months. When you want to use them, thaw in the fridge overnight. Then, reheat as usual. This way, you always have a tasty treat ready to go! Yes, you can make the batter ahead. Prepare it and store it in the fridge for up to 24 hours. This makes it easy to whip up fresh crepes anytime. Just remember to stir the batter well before cooking, as it may separate. To stop crepes from sticking, use a non-stick pan. Heat it on medium and add a small amount of butter before each crepe. Swirl the butter to coat the pan. If you notice sticking, check the heat. Too high can cause sticking. Toppings can be fun and creative. Here are some ideas: - Fresh berries like strawberries or raspberries - Whipped cream or Greek yogurt - Drizzles of honey or maple syrup - Chopped nuts, like almonds or walnuts - Slices of other fruits, like apples or peaches Feel free to mix and match these toppings to find your favorite combinations! In this blog post, we explored the essential ingredients and step-by-step instructions for making delicious crepes. I shared tips to help you avoid common mistakes and suggested variations, catering to different dietary needs. Remember, storing and reheating crepes is simple, ensuring you can enjoy them later. Crepes are fun to make and eat. With practice, you’ll become a crepe expert. Enjoy your cooking adventures and keep experimenting with new flavors!

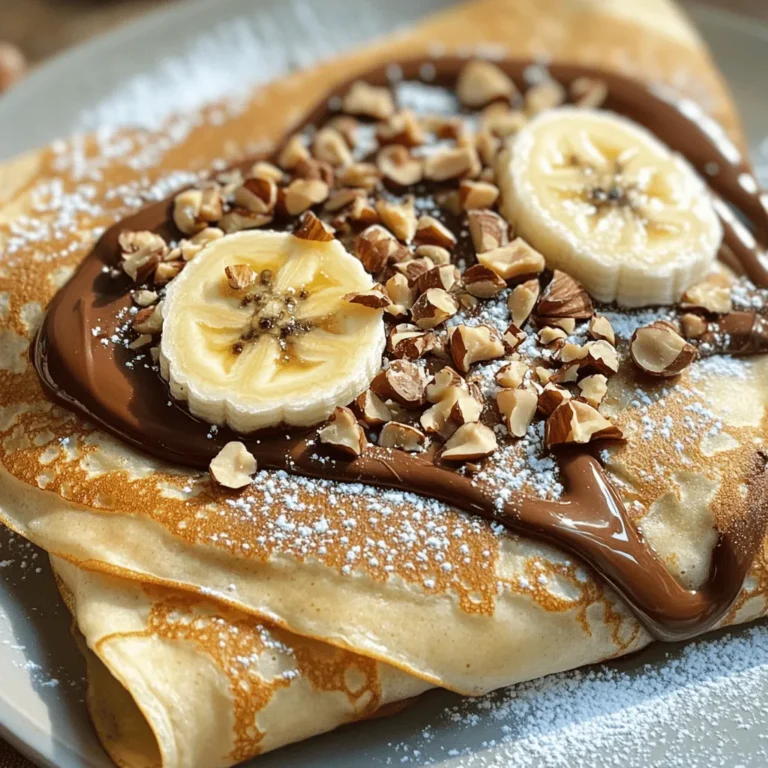
Chocolate Hazelnut Banana Crepes Simple and Delicious

- 1 red bell pepper, cut into thin strips - 1 yellow bell pepper, cut into thin strips - 1 large orange carrot, sliced into rounds - 1 medium zucchini, sliced into half-moons - 1 red onion, chopped into bite-sized pieces - 1 cup cherry tomatoes, halved These colorful veggies create a feast for the eyes and the palate. Each vegetable brings its own flavor and texture. The bell peppers add sweetness, while the carrot offers crunch. The zucchini keeps things light, and the cherry tomatoes burst with juice. - 3 tablespoons extra virgin olive oil - 2 teaspoons dried oregano - 2 teaspoons dried thyme - 1 teaspoon garlic powder - Sea salt and freshly cracked black pepper to taste This herb mix enhances the veggies' natural flavors. Olive oil helps them roast nicely. Oregano and thyme give that earthy taste. Garlic powder adds a nice kick. Salt and pepper balance everything for a savory treat. - Fresh parsley, chopped (for garnish) Garnishing with fresh parsley adds color and a fresh taste. You can also add a drizzle of olive oil before serving. This makes the dish shine and looks appetizing. Enjoy this vibrant dish with family and friends! Start by preheating your oven to 400°F (200°C). This step heats the oven to the right level for roasting. A hot oven helps the veggies get tender and caramelized. Next, gather your vegetables. You will need: - 1 red bell pepper, cut into thin strips - 1 yellow bell pepper, cut into thin strips - 1 large orange carrot, sliced into rounds - 1 medium zucchini, sliced into half-moons - 1 red onion, chopped into bite-sized pieces - 1 cup cherry tomatoes, halved Wash all the vegetables well. Then, cut them as listed. Make sure the pieces are similar in size. This helps them cook evenly. In a large mixing bowl, add all the chopped vegetables. Then, pour in: - 3 tablespoons extra virgin olive oil - 2 teaspoons dried oregano - 2 teaspoons dried thyme - 1 teaspoon garlic powder - Sea salt and freshly cracked black pepper to taste Drizzle the olive oil over the veggies. Sprinkle the herbs and spices too. Use your hands or a spatula to mix everything well. Every piece should be coated with oil and seasoning. This ensures great flavor in every bite. Line a baking sheet with parchment paper. This helps prevent sticking. Spread the seasoned vegetables in a single layer on the sheet. Place the baking sheet in your preheated oven. Roast the veggies for 25-30 minutes. Turn them halfway through. This step helps them caramelize and get sweeter. You want them soft and slightly golden when done. Once the vegetables are tender, take them out of the oven. Let them cool for a few minutes. This waiting time lets the flavors settle nicely. Transfer the vibrant veggies to a serving platter. To make it look special, garnish with fresh parsley. A sprinkle of parsley adds color and freshness. For extra flair, drizzle a bit of olive oil on top. Serve them warm and enjoy! To get your vegetables just right, keep a few things in mind. First, cut the veggies into similar sizes. This helps them cook evenly. Aim for about one-inch pieces. Next, spread them out on the baking sheet. Crowding can lead to steaming instead of roasting. Finally, turn the veggies halfway through cooking. This ensures all sides get that lovely caramelization. To boost the taste, use fresh herbs when possible. They add bright flavors. You can also mix in a splash of balsamic vinegar or lemon juice. This adds a nice tang. If you like heat, sprinkle in some red pepper flakes. The mix of spices and herbs brings out the natural sweetness of the veggies. Serve the herb-roasted rainbow vegetables warm. They make a great side for grilled meats or fish. You can also toss them into salads for extra crunch. For a fun twist, add them to wraps or grain bowls. Don’t forget to drizzle a bit of olive oil on top for shine. A sprinkle of fresh parsley adds a lovely finish. {{image_4}} You can swap out any veggies in this recipe. Try broccoli, asparagus, or cauliflower. These choices add different colors and flavors. I love using eggplant for a unique taste. Remember, the key is to keep the same cooking time for your veggies. Cutting them into similar sizes helps them cook evenly. Feel free to mix up the herbs. Basil and rosemary create a fresh twist. You can also try using Italian seasoning for a classic touch. If you want a spicy kick, add red pepper flakes. Experiment with different herb blends to find what you love most. You can cook these vegetables in an air fryer or on a grill. For an air fryer, set it to 400°F and cook for about 15-20 minutes. Shake the basket halfway through for even cooking. Grilling gives a smoky flavor. Just place the veggies on skewers or in a grill basket. Grill them for 10-15 minutes, turning often. Each method brings a new taste to your herb-roasted rainbow vegetables. After cooking, let the herb roasted rainbow vegetables cool down. Place them in an airtight container. Store the container in your fridge. They will stay fresh for up to four days. If you want to enjoy them later, keep them sealed. This helps maintain their flavors and texture. To reheat, you can use either the oven or the microwave. For the oven, preheat it to 350°F (175°C). Spread the vegetables on a baking sheet. Heat for about 10 minutes or until warm. For the microwave, place the veggies in a safe dish. Heat in short bursts of 30 seconds until warm, stirring between intervals. This keeps them nice and tender. If you have leftovers, you can freeze these vegetables. First, let them cool completely. Then, spread them on a baking sheet in a single layer. Freeze for about an hour, then transfer to a freezer-safe bag. Remove as much air as possible. They will last for up to three months. When you're ready to eat, thaw in the fridge overnight. Reheat as needed. Enjoy your vibrant flavors any time! Yes, you can use fresh herbs. Fresh herbs add bright flavor to your dish. Use three times more fresh herbs than dried. For example, if a recipe calls for 1 teaspoon of dried oregano, use 3 teaspoons of fresh oregano. Chop them finely to release their full flavor. Fresh herbs like basil or cilantro can also work well in this recipe. These vegetables pair well with many dishes. Serve them with grilled chicken or fish. They also go nicely with quinoa or rice. For a hearty meal, add them to pasta. You can even toss them in a salad for added color and crunch. The options are endless! Leftovers can last about 3 to 5 days in the fridge. Store them in an airtight container. To reheat, simply warm them in the oven or on the stovetop. You can also use them in wraps or sandwiches for a quick meal. Enjoy the flavors again with ease! In this post, we explored how to roast rainbow vegetables for great flavor. You learned about the best ingredients, step-by-step instructions, and helpful tips. We discussed veggie swaps and cooking methods to fit your needs. Finally, we covered how to store and reheat leftovers effectively. Roasting rainbow vegetables can be easy and fun. With these tips, you'll impress everyone at the table. Get cooking, enjoy the flavors, and share your tasty results!

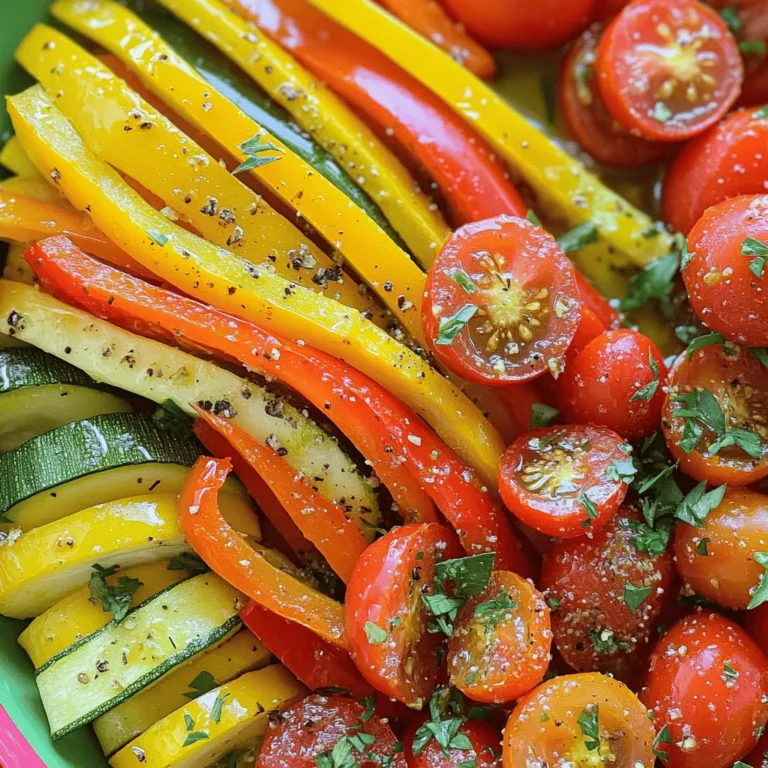
Herb Roasted Rainbow Vegetables Vibrant Flavor Treat

- 200g rice noodles - 1 tablespoon vegetable oil - 1 medium onion, finely chopped - 3 cloves garlic, minced - 1 tablespoon fresh ginger, grated - 2 tablespoons red curry paste - 1 can (400ml) coconut milk - 2 cups vegetable broth - 1 tablespoon soy sauce - 1 teaspoon brown sugar - 1 red bell pepper, thinly sliced - 1 cup snow peas, trimmed - 1 cup baby spinach leaves - Fresh cilantro leaves for garnish - Lime wedges for serving - Rice Noodles: They form the base of the soup. Choose thin rice noodles for a quick cook. - Vegetables: Onion gives sweetness. Red bell pepper adds crunch. Snow peas bring freshness. Baby spinach wilts beautifully in the broth. - Aromatics: Garlic and ginger add depth. They create a fragrant base for your soup. - Liquids: Coconut milk makes the soup creamy. Vegetable broth adds flavor and volume. Soy sauce gives it umami. - Flavor Enhancers: Red curry paste is the star. It gives the soup its warm, spicy kick. Brown sugar balances the heat with a touch of sweetness. The blend of these ingredients creates a balanced and vibrant soup. Each step builds flavor, making every bite a delight. Start by cooking the rice noodles. Follow the package instructions for timing. You want them soft but not mushy. Once they are done, drain them well. Set the noodles aside on a plate. This keeps them ready for the soup. In a large pot, heat the vegetable oil over medium heat. Add the finely chopped onion. Sauté for about 3-4 minutes until the onion is soft and clear. Next, add the minced garlic and grated ginger. Cook for one more minute. You will smell their great aroma! Then, add the red curry paste. Mix it well with the onion, garlic, and ginger. Cook for about 2 minutes to blend the flavors. Now, pour in the coconut milk and vegetable broth. Stir well so the curry paste mixes in. Add the soy sauce and brown sugar. Bring the soup to a gentle simmer. Once it simmers, toss in the sliced red bell pepper and snow peas. Cook for about 5 minutes. They should be tender but still crisp. Finally, add the baby spinach leaves. Stir them in and watch them wilt into the soup. To serve, place a portion of noodles in each bowl. Ladle the hot curry soup over the noodles. Garnish with fresh cilantro leaves on top. Don’t forget lime wedges on the side! They add a fresh burst of flavor. For extra heat, sprinkle sliced red chili on top. Enjoy your comforting bowl of Thai red curry noodle soup! To boost the flavor of your Thai red curry noodle soup, try these tips: - Use fresh herbs like basil or mint for a bright touch. - Add a dash of fish sauce for a deeper umami flavor. - Toss in some sliced red chilies for heat. - Top with toasted sesame seeds for crunch. - A spritz of fresh lime juice brightens the dish. These small additions can take your soup from good to great. Avoid these common pitfalls: - Don’t overcook the vegetables; they should stay crisp. - Watch the heat; simmer gently to avoid a burnt taste. - Use the right amount of curry paste; too much can overpower. - Don’t skip the lime; it adds essential brightness. - Make sure to drain the noodles well so they don’t become soggy. These mistakes can affect the overall taste and texture of your soup. Here are some tools that will make cooking easier: - Large pot for simmering the soup. - Wooden spoon for stirring; it won’t scratch your pot. - Sharp knife for chopping vegetables. - Cutting board for safe and easy prep. - Ladle for serving; it helps portion the soup. Having the right tools makes the process smooth and fun. {{image_4}} You can make this soup vegetarian or vegan easily. Start by using vegetable broth. The coconut milk adds creaminess without dairy. You can add more veggies like carrots or mushrooms. Tofu is a great protein in this dish. Just cut it into cubes and add it when you stir in the spinach. This way, you keep the flavor and texture rich. For meat lovers, chicken or shrimp work well. If you choose chicken, use boneless pieces cut into small bits. Cook it in the pot before adding the curry paste. For shrimp, add it later with the bell pepper. It cooks quickly and stays tender. Tofu is a fantastic choice too. You can pan-fry it first for more flavor and then mix it in. If you like heat, add more red curry paste. You can also slice fresh red chili peppers and top your soup with them. Another option is to use chili oil. Just a little drizzle can amp up the spice. Always taste as you go, so you find the right heat level for you. Store your Thai red curry noodle soup in an airtight container. It keeps well in the fridge for up to three days. Ensure it cools to room temperature before sealing. This helps prevent condensation and keeps it fresh. When you're ready to eat, just give it a quick stir to mix the flavors again. If you want to keep it longer, you can freeze the soup. Use a freezer-safe container, leaving some space at the top. The soup can last in the freezer for up to three months. When you're ready to enjoy it, move the container to the fridge for a day to thaw. This helps maintain the taste and texture. To reheat, pour the soup into a pot. Heat it over medium-low heat, stirring often. This helps it warm evenly without burning. You can also use the microwave. Place the soup in a microwave-safe bowl, cover it loosely, and heat for about two to three minutes. Stir halfway through to ensure it heats evenly. Enjoy your cozy bowl of soup! To spice up your Thai red curry noodle soup, add sliced red chili. You can use fresh or dried chili, based on your heat level. Another option is to add more red curry paste. Start with a small amount, then taste and adjust. Remember, spice builds over time, so go slow! Yes! While I love using rice noodles, you can try other types. Udon or egg noodles work well too. Just remember to adjust the cooking time based on the noodle type. If you use wheat noodles, they may need more time to cook. If you need a substitute for coconut milk, try almond milk or cashew cream. Both have a creamy texture, but they taste different. You can also mix soy milk with a bit of oil for creaminess. This will change the flavor, so choose what fits your taste best. You can store your Thai red curry noodle soup in the fridge for 3-4 days. Make sure to keep it in an airtight container. If you want to save it longer, freeze it for up to two months. Just remember to thaw it in the fridge before reheating. In this blog post, we explored how to make delicious Thai Red Curry Noodle Soup. We examined key ingredients, detailed step-by-step instructions, and shared useful tips and variations. You learned how to enhance flavor and avoid common mistakes. This soup is easy to customize, making it perfect for any taste. Whether you prefer vegetables, chicken, or tofu, there is an option for you. With proper storage tips, leftovers can taste just as great. Now, grab your kitchen tools and start cooking!

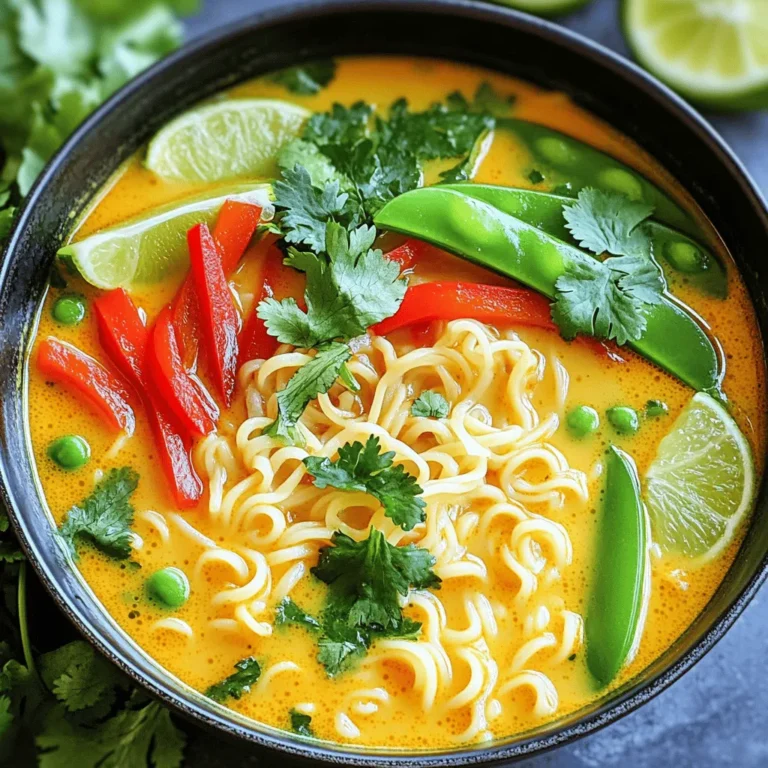
Thai Red Curry Noodle Soup Flavorful and Comforting Bowl

PREV 1 … 10 11 12 … 18 NEXT
feastful focus

explore

DessertsDinnerAppetizersDrinks

Our Policies

  • Cookie Policy
  • Copyright Policy
  • Disclaimer
  • GDPR Policy
  • Terms Of Use
Back to Top
  • About
  • Contact Us
  • Privacy Policy
© 2025 feastful focus