FREE DINNER EBOOK! Get your copy!
  • Cookie Policy
  • GDPR Policy
  • Disclaimer
  • Terms Of Use
  • Visit my other site: Fun Cookie Recipes
feastful focus
  • Home
  • Dinner
  • Desserts
  • Drinks
  • Appetizers
  • Contact
  • About
  • Privacy Policy
  • Home
  • Dinner
  • Desserts
  • Drinks
  • Appetizers
  • Contact
  • About
  • Privacy Policy
  • Cookie Policy
  • GDPR Policy
  • Disclaimer
  • Terms Of Use
Visit my other site: Fun Cookie Recipes

HOME / CATEGORIES /

Latest

- 2 cups crushed chocolate sandwich cookies (such as Oreos) - 1 cup cream cheese, softened to room temperature - 1/2 cup powdered sugar - 1 cup whipped cream (store-bought or homemade) - 1 teaspoon vanilla extract - 1 cup chocolate chips, melted - Additional crushed cookies for garnish To make these bars, start with the key ingredients. The crushed chocolate cookies give the bars their signature flavor and texture. Use any brand you like, but Oreos are a classic choice. Cream cheese adds a rich and creamy base. Make sure it is soft, so it mixes well. The powdered sugar sweetens the mix and helps it hold together. Whipped cream adds lightness and fluffiness. You can use store-bought or make your own. Vanilla extract gives a nice depth of flavor. Melted chocolate chips serve as a delicious topping. Lastly, add some extra crushed cookies on top for crunch. - Alternative flavors (e.g., mint chocolate cookies) - Decorative toppings (e.g., sprinkles, nuts) Feel free to get creative! You can use mint chocolate cookies instead of regular ones for a fun twist. Adding sprinkles or nuts can also make your bars look extra special. - Gluten-free cookie options - Dairy-free cream cheese alternatives If you need a gluten-free option, look for gluten-free chocolate cookies. You can also swap the cream cheese for a dairy-free version if needed. This way, everyone can enjoy these tasty treats! - Combine 2 cups of crushed chocolate sandwich cookies, 1 cup of softened cream cheese, and 1/2 cup of powdered sugar in a large mixing bowl. - Use a hand mixer or spatula to blend the mixture until smooth and creamy. Ensure you don’t have any lumps. - Gently fold in 1 cup of whipped cream and 1 teaspoon of vanilla extract. Use a spatula for this step. Stir until the mixture is light and fluffy. - Prepare an 8x8 inch baking dish by lining it with parchment paper. Make sure the edges hang over the sides for easy removal later. - Spoon the cookies and cream mixture into the lined baking dish. Spread it evenly, smoothing the top with a spatula. - Drizzle 1 cup of melted chocolate chips across the top of the mixture. Use a knife or spatula to create decorative swirls in the chocolate. This adds a fun look. - Cover the baking dish tightly with plastic wrap. Place it in the refrigerator for at least 4 hours, or until the mixture is firm. - To check the consistency, gently press your finger on the bars. If they feel firm and hold their shape, they are ready to serve. To avoid lumps in your mixture, blend the cream cheese well. Use a hand mixer or a spatula to mix until it is smooth. You want a creamy base for your bars. When you fold in the whipped cream, do it gently. Use a spatula and scoop from the bottom. This keeps the whipped cream light and airy, which makes the bars fluffy. You can add more taste with simple ingredients. A splash of mint extract adds a cool twist. You can also use different cookie types. Try using mint chocolate or peanut butter cookies for fun flavors. For a lovely presentation, arrange the squares on a pretty platter. You can drizzle extra melted chocolate on top. A dollop of whipped cream on each square looks nice, too. Pair these bars with ice cream or fresh berries. They make a complete dessert that everyone will love! {{image_4}} You can change up the flavor of your cookies and cream bars. One fun twist is to use white chocolate instead of dark chocolate. This gives a sweet and creamy taste. Just melt white chocolate, then drizzle it on top. You can also try different cookie bases. Instead of chocolate sandwich cookies, use peanut butter cookies for a nutty flavor. Each option adds a unique touch to your bars. If you need a vegan option, swap cream cheese for a plant-based cream cheese. Use coconut whipped cream instead of regular whipped cream. For a keto-friendly treat, try sugar alternatives like erythritol or stevia. This way, you can enjoy the bars without the carbs. These variations let everyone enjoy the same tasty dessert. You can make your no-bake bars fit any season. For holidays, decorate them with festive colors. Use red and green sprinkles for Christmas or pastel colors for Easter. You can also add seasonal flavors, like pumpkin spice in the fall. This way, your bars not only taste great but also look festive and fun. To keep your cookies and cream bars fresh, store them in an airtight container. Place parchment paper between layers to avoid sticking. They stay fresh for up to one week in the fridge. Always check for any signs of spoilage before serving. You can freeze cookies and cream bars for longer storage. Cut them into squares before freezing. Wrap each piece in plastic wrap, then place them in a freezer bag. They can last for up to three months in the freezer. To enjoy, remove them from the freezer and let them thaw in the fridge for a few hours. When serving chilled bars, allow them to sit at room temperature for about 10 minutes. This helps restore their creamy texture. If they feel too firm, you can gently microwave them for 5 to 10 seconds. Enjoy them cold for a refreshing treat! No-bake cookies and cream bars can last in the fridge for about five days. Store them in an airtight container to keep them fresh. If you want to enjoy them longer, you can freeze them. They can last up to three months in the freezer. Just remember to wrap them well. Yes, you can use low-fat cream cheese. It will still give you a nice texture. However, the bars may be a bit less rich. If you prefer a lighter option, low-fat cream cheese works well in this recipe. If you want to skip whipped cream, you can use whipped coconut cream. It adds a nice flavor and stays light. You can also try using Greek yogurt for a healthier twist, but the bars will be less fluffy. To cut the bars cleanly, use a sharp knife. Warm the knife under hot water before cutting. Wipe the knife between cuts to keep the edges neat. This helps you get those perfect squares without a mess. Absolutely! You can mix in crushed candy bars or mini chocolate chips for fun. Chopped nuts add a nice crunch too. If you want fruit, try adding mini marshmallows or diced strawberries. Get creative with your mix-ins! - [Link to the Full Recipe: Cookies and Cream Delight Bars ](#) You’ve learned how to make delicious no-bake cookies and cream bars. From the key ingredients to optional flavors and variations, you have options for any taste. Remember to chill the bars well for the best texture. Use the tips to enhance flavor and presentation. Whether you stick to the classic recipe or try a twist, these bars are a hit for any occasion. Make them your own and enjoy every bite!

No-Bake Cookies and Cream Bars Delightful Treat

To make Kielbasa Potato Soup, gather these ingredients: - 1 lb kielbasa, cut into bite-sized rounds - 4 medium potatoes, peeled and cubed - 1 medium onion, finely chopped - 3 cloves garlic, minced - 4 cups chicken broth (low-sodium recommended) - 1 cup heavy cream - 1 teaspoon smoked paprika - Salt and freshly ground pepper to taste - 2 tablespoons olive oil - 1 cup frozen corn (optional) - Fresh parsley, chopped, for garnish Use good-quality kielbasa for the best flavor. Look for brands with natural ingredients. Fresh potatoes are key. Choose firm ones without blemishes. Fresh garlic and onion add a punch. Use low-sodium chicken broth to control salt levels. Heavy cream gives richness, but you can use half-and-half for lighter soup. You can add frozen corn for sweetness and crunch. Other great additions are diced carrots or celery for more veggies. If you like heat, add a pinch of cayenne pepper. Fresh herbs like thyme or dill can brighten the soup's taste. Feel free to mix and match to suit your taste! {{ingredient_image_2}} Before cooking, gather all your ingredients. Cut the kielbasa into bite-sized rounds. Peel and cube the potatoes into small chunks. Chop the onion finely and mince the garlic. This makes cooking smoother. 1. In a large soup pot, add 2 tablespoons of olive oil. Heat it over medium heat until it shimmers. 2. Add the finely chopped onion. Sauté for about 5 minutes until it softens and turns translucent. Stir often to avoid burning. 3. Next, add the minced garlic and sliced kielbasa. Cook for another 4-5 minutes. Stir frequently until the kielbasa starts to brown. 4. Now, add the cubed potatoes and pour in 4 cups of chicken broth. Turn the heat up to bring it to a boil. 5. Once boiling, reduce the heat to a gentle simmer. Stir in 1 teaspoon of smoked paprika. Let the soup simmer for about 15-20 minutes. Check if the potatoes are fork-tender. 6. If you want, add 1 cup of frozen corn during the last 5 minutes of cooking. This gives a sweet taste and nice texture. 7. Once the potatoes are cooked, use an immersion blender. Blend part of the soup to make it creamy, but leave some chunks for heartiness. 8. Stir in 1 cup of heavy cream. Taste and adjust the seasoning with salt and freshly ground pepper. Heat through for another 5 minutes. To get the best texture, do not over-blend. You want creamy parts and some chunky bits. This gives a nice contrast. Check the potatoes early. They should be soft but not mushy. If you add corn, add it late to keep it crisp. Enjoy the warm, comforting feel of each spoonful! When making Kielbasa Potato Soup, be careful not to skip the sauté step. This builds flavor. Don't rush the browning of the kielbasa. It adds depth to the soup. If you cut the potatoes too small, they may turn mushy. Aim for uniform cubes for even cooking. Lastly, don't overlook the seasoning. Taste as you go to ensure a balanced flavor. To make this soup, you need a few key tools: - Large soup pot - Wooden spoon or spatula - Knife and cutting board - Immersion blender or regular blender - Measuring cups and spoons These tools help you cook efficiently and achieve the best texture. You can boost flavor easily. Try adding fresh herbs like thyme or dill for brightness. A splash of hot sauce can add a nice kick. For texture, consider including bacon bits or sautéed mushrooms. They give extra richness. If you want a creamier soup, add more heavy cream or even some sour cream before serving. For sweetness, toss in some frozen corn for a lovely pop. Pro Tips Choose the Right Kielbasa: For the best flavor, opt for a high-quality kielbasa that is naturally smoked. This will enhance the overall taste of your soup. Perfect Potato Selection: Use starchy potatoes like Russets for a creamy texture, or Yukon Golds for a buttery flavor. Avoid waxy potatoes, as they won't break down as nicely. Simmering Secrets: Allow the soup to simmer gently after adding the potatoes. This enhances the flavors and ensures the potatoes cook evenly without turning mushy. Make Ahead Magic: This soup can be made ahead of time and flavors improve after a day in the fridge. Just reheat gently and add cream before serving for the best taste. {{image_4}} You can swap kielbasa for turkey sausage or chicken sausage. Both options give a lighter taste. You might also try smoked tofu for a vegan version. It adds a nice texture and flavor. Each choice keeps the soup hearty while changing the flavor profile. In spring, add fresh peas or asparagus. In fall, try butternut squash or carrots. These veggies bring new colors and tastes. They also boost the nutrition. Just chop them up and add them when you put in the potatoes. Adjust cooking time as needed for the best results. To make this soup lower in carbs, use cauliflower instead of potatoes. Cauliflower gives a creamy texture when blended. For a healthier twist, replace heavy cream with coconut milk or a cashew cream. Both options keep the soup rich but lighter. You can still enjoy that creamy comfort with fewer carbs. To keep your Kielbasa Potato Soup fresh, let it cool first. Use an airtight container. Store it in the fridge for up to three days. If you want it to last longer, consider freezing it. When you are ready to enjoy leftovers, pour the soup into a pot. Heat it over medium heat. Stir often to ensure it warms evenly. You can also use the microwave. Place it in a microwave-safe bowl, cover it, and heat in 1-minute increments. For freezing, use freezer-safe containers or bags. Portion the soup into smaller servings. This helps with easy thawing later. Label each container with the date. Store it in the freezer for up to three months. When ready to eat, thaw overnight in the fridge before reheating. To make Kielbasa Potato Soup vegetarian, swap the kielbasa for plant-based sausage or mushrooms. You can use vegetable broth instead of chicken broth. Adding more veggies, like carrots or celery, enhances the flavor. You may also want to add spices like smoked paprika for depth. This way, you keep the taste rich and comforting. Yes, you can use other types of sausage. Try chicken sausage, turkey sausage, or even a spicy sausage if you like heat. Each will give the soup a unique taste. Just remember to adjust the cooking time based on the sausage you choose. The key is to pick a sausage that complements the creamy base of the soup. Kielbasa Potato Soup pairs well with crusty bread or a fresh salad. You can serve it with garlic bread for a flavorful touch. A light green salad adds crispness and balances the soup's richness. For a full meal, consider serving it with roasted vegetables. Each side enhances the warmth of the soup and makes for a satisfying meal. Kielbasa Potato Soup lasts about 3 to 4 days in the fridge. Store it in an airtight container to keep it fresh. When reheating, do it slowly on low heat. This helps maintain the soup's creamy texture. If you notice any off smells or colors, it’s best to discard it. Always trust your senses when it comes to food safety. This article covered everything you need to make delicious Kielbasa Potato Soup. You learned about the right ingredients, how to cook it step by step, and tips to enhance flavor. We discussed variations for personal tastes and how to store leftovers properly. Now you have the tools to create a warm, satisfying meal. Enjoy cooking, and feel free to experiment with the ingredients. Happy cooking!

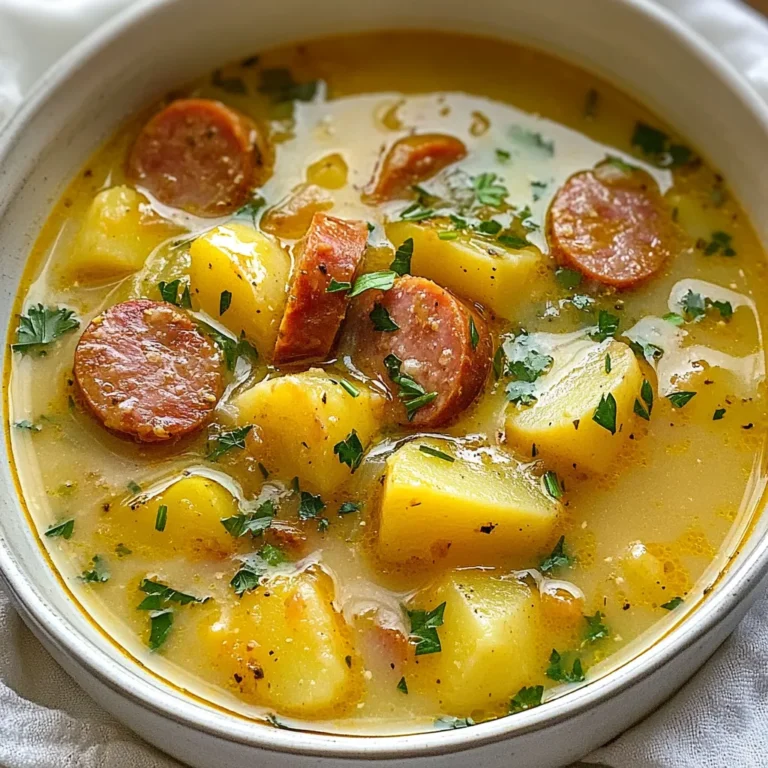
Kielbasa Potato Soup Flavorful and Filling Recipe

To make Strawberry Cheesecake French Toast Roll-Ups, gather these ingredients: - 8 slices of bread (white or whole wheat) - 1 cup fresh strawberries, hulled and finely diced - 1 cup cream cheese, softened - 1/4 cup powdered sugar (plus extra for serving) - 1 teaspoon pure vanilla extract - 2 large eggs - 1/4 cup milk of your choice - 1 teaspoon ground cinnamon - 1 tablespoon butter (for cooking) - Optional: extra powdered sugar and whole strawberries for garnish You can swap ingredients based on your taste or needs. For the bread, use gluten-free bread for a gluten-free option. If you want a lighter roll-up, consider low-fat cream cheese. You can replace fresh strawberries with other fruits like blueberries or raspberries for a different twist. If you need a dairy-free version, use almond milk and vegan cream cheese. To make these tasty roll-ups, you’ll need some basic kitchen tools: - A mixing bowl for the filling - A rolling pin to flatten the bread - A skillet for cooking the roll-ups - A spatula to mix and flip - Whisk for the egg mixture - A serving platter for presentation Having these items ready will make your cooking process smooth and fun. Enjoy creating this sweet breakfast treat! To start, we need to make the cheesecake filling. In a mixing bowl, combine: - 1 cup cream cheese (softened) - 1 cup fresh strawberries (hulled and finely diced) - 1/4 cup powdered sugar - 1 teaspoon pure vanilla extract Use a spatula to mix these ingredients until smooth. The cream cheese should be soft to make it easy to blend. Set this mixture aside so the flavors can mingle. This step is key for a rich taste. Next, grab your bread. You need 8 slices, either white or whole wheat. Use a rolling pin to flatten each slice. Aim for a uniform thickness so they roll easily. This helps prevent tearing. Once each slice is flat, it’s time to fill them. Take about 2 tablespoons of the cheesecake filling. Spoon it onto one edge of each slice. Carefully roll the bread around the filling, sealing the ends tightly. This keeps the filling from leaking out when you cook them. Now for the fun part—cooking! In a bowl, whisk together: - 2 large eggs - 1/4 cup milk (of your choice) - 1 teaspoon ground cinnamon This mixture will coat the roll-ups for a tasty finish. Preheat a skillet over medium heat, then add 1 tablespoon of butter. Let it melt. Dip each roll-up into the egg mixture, coating all sides gently. Place the roll-ups seam-side down in the hot skillet. Cook them for about 2-3 minutes on each side. They should turn golden brown and crispy. Adjust the heat if they start to burn. Once they are done, remove them and let them cool slightly. Dust with powdered sugar and garnish with fresh strawberries for a beautiful presentation! To get that perfect golden brown finish, heat your skillet to medium. Add butter and let it melt. This gives a nice crisp. Dip each roll-up in the egg mix for a quick coat. Don't soak them too long. Place them seam-side down in the pan. Cook for 2-3 minutes per side. Adjust the heat if they brown too fast. Keep an eye on them; they will be golden and crispy when done. Serve these roll-ups warm for the best taste. Dust with powdered sugar for sweetness. Add whole strawberries on top for a pop of color. You can also serve them with maple syrup or whipped cream. This adds a fun touch. Arrange them nicely on a platter for guests. A little garnish can make it look fancy. Avoid using bread that is too fresh. It may tear when rolling. Flat bread is best for easy rolling. Don’t overfill with the cheesecake mix. A little goes a long way. This keeps the roll from leaking. Also, make sure the skillet is hot enough. If it's too cool, the roll-ups won't crisp up. Lastly, watch your cooking time. Burning can happen quickly if you’re not careful. {{image_4}} You can change the taste of these roll-ups by using different fruits. Try raspberries, blueberries, or even bananas. Each fruit brings a unique flavor. For a tropical twist, add pineapple or mango. Mix and match fruits for a fun surprise. You can also use flavored cream cheese, like strawberry or vanilla, to add depth to your filling. If you want a healthier version, consider these swaps. Use whole grain bread instead of white bread. Whole grain adds fiber and nutrients. You can also choose low-fat cream cheese. This way, you cut down on calories without losing taste. For a sweet touch, try honey or maple syrup instead of powdered sugar. These changes make the dish lighter but still tasty. To make this recipe dairy-free, swap out the cream cheese for a dairy-free option. Look for cream cheese made from nuts or tofu. Use almond milk, oat milk, or coconut milk in the egg mixture. This keeps the roll-ups creamy and delicious. You won’t lose any flavor with these substitutes. Enjoy a guilt-free treat! After enjoying your Strawberry Cheesecake French Toast Roll-Ups, you may have some left. Store them in an airtight container. Let them cool down first. Keep the container in the fridge for up to three days. This keeps them fresh and tasty. If you want to enjoy them later, make sure they are fully sealed. To reheat, take the roll-ups out of the fridge. You can use the microwave or a skillet. If using the microwave, heat them for about 20-30 seconds. Check if they are warm enough. For a crispier texture, warm them in a skillet over medium heat. Cook for 1-2 minutes on each side. This way, you keep that yummy golden brown finish. If you want to save some for later, you can freeze them. Wrap each roll-up in plastic wrap. Place them in a freezer-safe bag or container. They will last up to two months in the freezer. When you are ready to eat, thaw them in the fridge overnight. Reheat as mentioned before for a tasty treat. Yes, you can prepare these roll-ups in advance. Make the filling and fill the bread slices. Store them in the fridge for up to one day. When you are ready to cook them, dip them in the egg mixture and fry them. This saves time and makes for a quick breakfast or dessert. I recommend using white or whole wheat bread. White bread gives a soft, fluffy texture. Whole wheat adds a nice, nutty flavor. You can also try brioche or challah for extra richness. Just make sure the bread is fresh and not too thick. To serve a crowd, make a big batch of roll-ups. Keep them warm in the oven at low heat. You can also set up a toppings bar. Include powdered sugar, fresh strawberries, and whipped cream. This way, everyone can customize their own roll-ups. This post covered how to make delicious Strawberry Cheesecake French Toast Roll-Ups. You learned about key ingredients, tasty substitutions, and the right equipment. Next, we explained step-by-step instructions for the perfect roll-ups. I also shared tips for a golden finish and common mistakes to avoid. You explored fun variations and how to store leftovers. Remember, these roll-ups are easy and fun! Enjoy making them for family or friends. Your kitchen adventures can lead to sweet rewards.

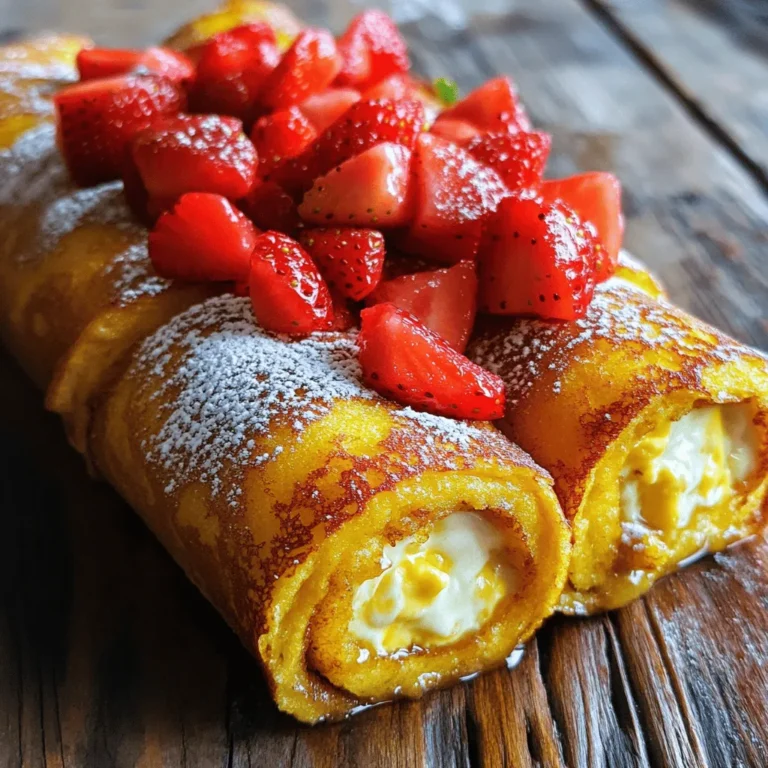
Strawberry Cheesecake French Toast Roll-Ups Delight

- 1 lb ground turkey - 1 head of romaine lettuce (for wraps) - 1 tablespoon olive oil - 1 small onion, finely diced - 2 garlic cloves, minced - 1 teaspoon ground cumin - 1 teaspoon chili powder - 1/2 teaspoon smoked paprika - 1/2 teaspoon sea salt - 1/4 teaspoon freshly cracked black pepper Ground turkey is lean and cooks quickly. It absorbs spices well, making it perfect for tacos. Romaine lettuce leaves are sturdy, making them great for holding the filling. The olive oil helps to sauté the onion and garlic, giving a rich flavor base. The spices add warmth and depth to the dish. - 1 cup cherry tomatoes, halved - 1 ripe avocado, diced - 1 cup corn kernels (fresh or frozen) Cherry tomatoes add a burst of sweetness. They also provide color and freshness. Diced avocado brings creaminess and health benefits. Corn kernels add a sweet crunch, balancing the savory turkey. - 1/4 cup fresh cilantro, chopped - Lime wedges (for serving) Fresh cilantro adds a bright herb taste. It enhances the flavors of the turkey. Lime wedges offer a zesty kick. Squeezing lime over the wraps brightens the dish and adds freshness. 1. Sautéing onions and garlic: Start by heating the olive oil in a large skillet over medium heat. Once the oil is hot, add the finely diced onion. Sauté it for about 3-4 minutes until the onion gets soft and turns translucent. Then, add the minced garlic and cook for another minute. You want the garlic to smell fragrant and turn a light golden color. 2. Cooking ground turkey: Next, add the ground turkey to the skillet. Use a wooden spoon to break it apart. Cook the turkey for about 5-7 minutes. Stir occasionally to ensure it browns evenly. Once it’s no longer pink, it's ready for seasoning. 1. Adding spices to the turkey mixture: Now, sprinkle the ground cumin, chili powder, smoked paprika, sea salt, and black pepper over the turkey. Stir well to coat the meat evenly with the spices. This step gives your turkey a burst of flavor. 2. Incorporating vegetables: Fold in the corn kernels and halved cherry tomatoes. Allow the mixture to cook for another 3-4 minutes. You want the corn to heat up and the tomatoes to soften just a bit. This adds freshness and color to your filling. 1. Preparing lettuce cups: While the turkey cooks, take your romaine lettuce head. Gently separate the leaves to create sturdy cups. These will hold your tasty filling. 2. Filling and garnishing the wraps: Generously spoon the turkey mixture into each lettuce cup. If you like, top it with extra chopped cilantro for a fresh touch. Arrange the filled wraps on a colorful platter. Serve with lime wedges on the side for a zesty squeeze before eating. - How to avoid dry turkey: To keep turkey moist, do not overcook it. Cook just until it turns brown. You can also mix in diced avocado at the end for extra creaminess. - Best sautéing techniques: Use medium heat for sautéing onions and garlic. This helps them soften without burning. Stir often to keep them from sticking and to ensure even cooking. - Pairing sides with lettuce wraps: These turkey taco lettuce wraps pair well with fresh fruit, like mango or pineapple. You can also add a side of black beans for extra protein. - Creative presentation ideas: Serve the wraps on a colorful platter. Add some extra chopped cilantro around the plate for a fresh look. You can also use lime wedges for a bright touch. - Making the recipe lower in calories: To cut calories, use less olive oil and opt for leaner turkey. Skip the avocado, or use less, while still enjoying flavor. - Health benefits of the ingredients: Ground turkey is a lean protein source, while lettuce adds fiber. Cherry tomatoes and corn provide vitamins and antioxidants. This meal is low in carbs and packed with nutrients. {{image_4}} You can easily swap ground turkey for other meats. Ground chicken works well and has a similar taste. Beef also makes a hearty filling. For those who prefer plants, use lentils or black beans. These options add protein and flavor. To enhance the flavor, mix in some cheese. Feta or cheddar adds creaminess. Salsa can also boost the taste. It adds freshness and a hint of heat. Don’t forget to experiment with spices. Adding taco seasoning or smoked paprika gives a nice kick. If you want a twist, try a taco-style bowl. Use rice or quinoa as a base and top with the turkey mix. For those who prefer a crunch, use different lettuces. Butter or iceberg lettuce adds a fresh texture. To store leftovers, let the turkey filling cool down first. Place it in an airtight container. This keeps it fresh and safe to eat. I prefer glass containers as they do not absorb odors. You can also use plastic containers, but ensure they are BPA-free. If you want to freeze the filling, pack it in a freezer-safe bag. Remove as much air as possible to prevent freezer burn. It’s best to freeze it without the avocado and cilantro. These ingredients do not freeze well. When you're ready to eat, thaw the filling overnight in the fridge. Reheat it in a pan over medium heat until hot. In the fridge, the turkey filling lasts about 3 to 4 days. Always check for signs of spoilage. Look for changes in color or smell. If it smells off or looks unusual, it’s best to discard it. Keeping track of your leftovers helps you enjoy them while they’re fresh. How can I make Turkey Taco Lettuce Wraps spicier? You can add heat easily. Use more chili powder or add diced jalapeños. A dash of hot sauce can also kick up the spice. For extra flavor, try adding cayenne pepper. Can I make these wraps ahead of time? Yes, you can prepare the turkey filling ahead. Store it in the fridge for up to three days. Assemble the wraps just before serving to keep the lettuce fresh. Are Turkey Taco Lettuce Wraps gluten-free? Yes, these wraps are naturally gluten-free. Just ensure your spices are free from gluten. This is a great option for gluten-sensitive diets. Tips for making this recipe keto-friendly To keep it keto, avoid corn and use less avocado. You can add more healthy fats like olive oil. Substitute with cheese for a creamy touch. Can I use frozen ground turkey? Absolutely! Frozen ground turkey works well. Just make sure to thaw it thoroughly before cooking. This keeps the texture nice and tender. What if I don’t have romaine lettuce? No problem! You can use iceberg lettuce or butter lettuce instead. Both provide a nice crunch and hold up well as wraps. This blog post covered Turkey Taco Lettuce Wraps, detailing key ingredients and steps. We explored using ground turkey, fresh veggies, and spices for flavor. You learned preparation tips and serving ideas to make your wraps shine. Optional garnishes add extra zest. Consider the variations to match your taste, from ingredient swaps to different serving styles. Storing and reheating leftovers ensures more delicious meals. Enjoy creating these healthy wraps, down to the last bite!

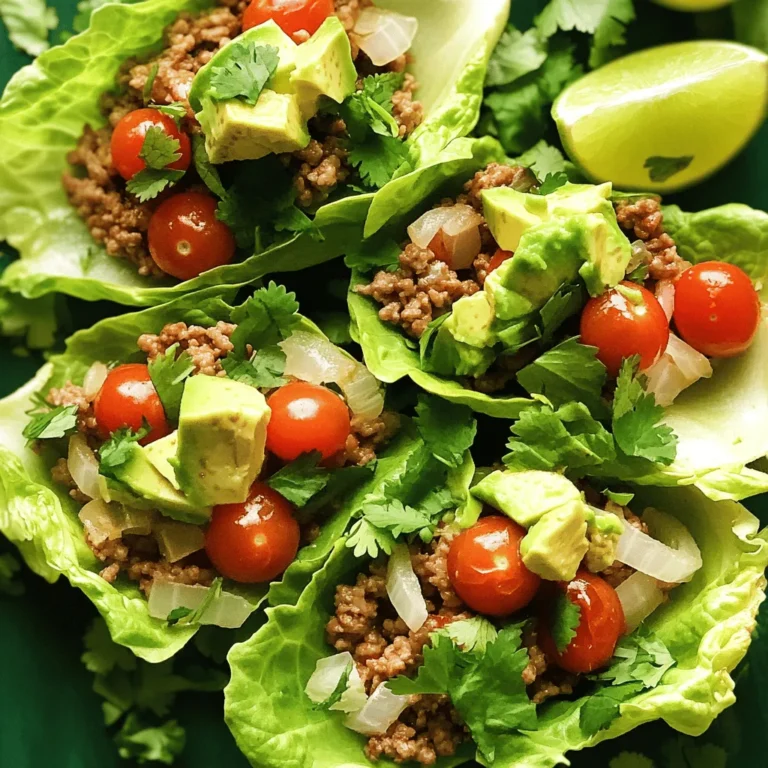
Turkey Taco Lettuce Wraps Quick and Flavorful Meal

- 2 pounds chicken wings - 1/2 cup low-sodium soy sauce - 1/4 cup pure honey - 2 cloves garlic, finely minced - 1 tablespoon fresh ginger, finely grated - 1 tablespoon sesame oil - 1 tablespoon rice vinegar - 1 teaspoon chili flakes (optional for heat) - 2 green onions, finely chopped (for garnish) - 1 tablespoon sesame seeds (for garnish) Best type of chicken wings to use: I recommend using fresh, whole chicken wings. They have a good amount of skin and meat. This gives the best flavor and texture. Substitute options for healthier versions: You can use skinless chicken wings if you want to cut fat. Also, try low-sugar honey or a sugar-free syrup. Importance of fresh ingredients (ginger, garlic): Always use fresh ginger and garlic. This boosts flavor and aroma. Dried spices won’t give you the same taste. For the best results, buy them whole and grate or mince them yourself. To make the marinade, grab a large mixing bowl. Add the low-sodium soy sauce, pure honey, minced garlic, grated ginger, sesame oil, rice vinegar, and chili flakes if you want some heat. Whisk all the ingredients together until the honey dissolves. This creates a smooth and tasty sauce that will coat your chicken wings. Next, place the chicken wings in the bowl. Make sure each wing gets a good coat of the marinade. Cover the bowl with plastic wrap or a lid. Let the wings sit in the fridge for at least one hour. If you have time, marinate overnight for even better flavor. The longer they soak, the more flavorful they become. Now it’s time to bake! Preheat your oven to 400°F (200°C). While the oven heats, line a baking sheet with parchment paper for easy cleanup. Take the wings out of the marinade and let any extra liquid drip off. Lay the wings in a single layer on the baking sheet. This helps them cook evenly. Bake the wings for 30-35 minutes. Flip them halfway through to ensure both sides brown nicely. If you want them extra crispy, broil them for an extra 2-3 minutes. Watch closely to avoid burning. Once cooked, take the wings out of the oven. Let them rest for about 5 minutes before serving. This keeps them juicy and tender. To get that perfect sticky texture, you need to focus on cooking time. Bake the wings for 30-35 minutes at 400°F (200°C). For extra crispiness, broil them for 2-3 minutes at the end. Keep an eye on them to avoid burning. If you like your wings extra crispy, you can also bake them longer. Just be careful not to overcook them. Want to add more flavor? You can mix in some citrus juice. A splash of lime or orange adds a nice zing. Fresh herbs like cilantro or basil can also lift the taste. For an extra kick, use fresh chili or jalapeños. These additions can make your wings pop with flavor and keep things interesting. What goes best with sticky honey soy chicken wings? Try serving them with coleslaw or rice. Both pair well and balance the sweetness. You can also add some fresh veggies like carrot sticks or cucumber slices. These sides not only taste great but also add color to your plate. For a fun touch, serve with lime wedges to squeeze over the wings! {{image_4}} To add heat to sticky honey soy chicken wings, use chili flakes. Start with 1 teaspoon in the marinade. If you like more spice, add an extra teaspoon. You can also use fresh chopped chili peppers for a fresh kick. Adjust the heat to your taste. This change makes the wings exciting and full of flavor. For a honey garlic twist, increase the garlic. Use 4 cloves instead of 2 for a stronger flavor. You can also reduce the honey slightly to balance the taste. This will give you a sweet and savory mix. Let the wings marinate longer to deepen the garlic flavor. Grilling these wings adds a smoky taste. Start by marinating your wings as usual. Preheat your grill to medium-high heat. Place the wings directly on the grill grates. Cook for about 20-25 minutes, turning often. Brush with reserved marinade for extra flavor. Grill until crispy and charred. Enjoy the delicious smoky flavor! To keep your sticky honey soy chicken wings fresh, start by letting them cool. Place the wings in an airtight container. Make sure to separate layers with parchment paper to avoid sticking. Store in the fridge for up to 3 days. If you want to keep them longer, consider freezing. Reheat your wings to keep them crispy. The best method is using an oven. Preheat the oven to 350°F (175°C). Place the wings on a baking sheet lined with foil. Heat them for about 10-15 minutes. This method keeps the skin crispy and the meat juicy. You can also use an air fryer for a quick reheat. Freezing chicken wings is easy. First, let the wings cool completely. Use a freezer bag or an airtight container. Remove as much air as possible. Label with the date. They can last in the freezer for up to 3 months. To defrost, place in the fridge overnight. This keeps the texture intact. Avoid thawing at room temperature, as it can affect safety and quality. Marinating chicken wings is key for great taste. I recommend at least one hour. For the best flavor, marinate them overnight. This longer time lets the wings soak up the marinade. If you are in a hurry, even thirty minutes can help. Yes, you can use frozen chicken wings. Just make sure to thaw them first. The best way is to leave them in the fridge overnight. You can also use the quick-thaw method by placing them in cold water for about an hour. Once thawed, follow the recipe as usual. If you need a honey substitute, you have options. Maple syrup works well and adds a nice flavor. Agave nectar is another choice that is sweeter. Keep in mind that these options may change the taste a little. Adjust the amount to suit your taste. These sticky honey soy chicken wings are fun to make and eat. You learned about the key ingredients, like fresh garlic and ginger, that enhance flavor. Following the step-by-step guide helps you achieve perfect texture and taste. Whether you choose to bake, grill, or add your own twist, these wings are a hit. Remember to store leftovers properly to keep them fresh. Enjoy experimenting with variations and serving ideas. You'll impress friends and family with your delicious creations!

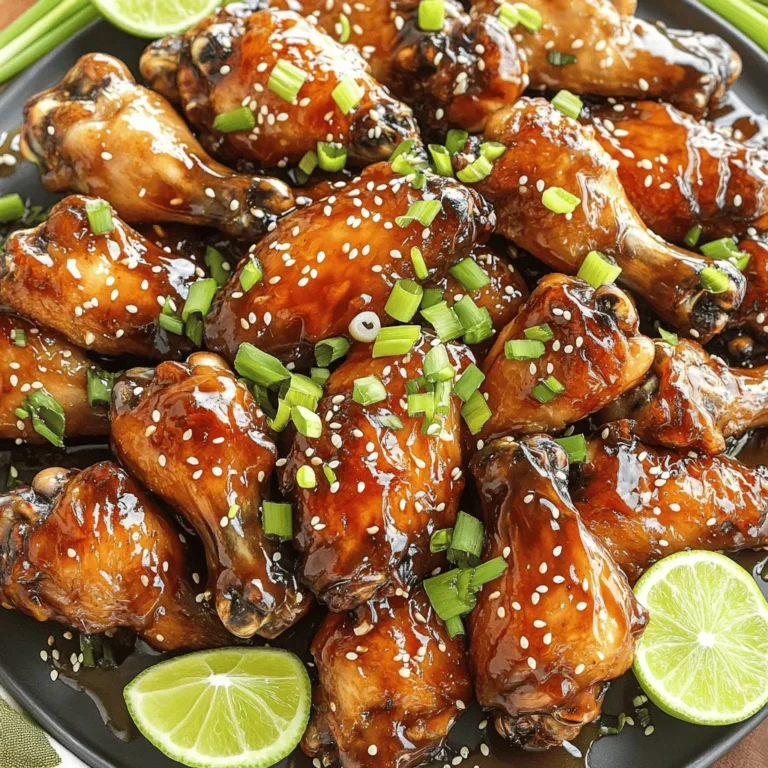
Sticky Honey Soy Chicken Wings Irresistible Flavor Treat

- 2 cups roasted red peppers, drained and roughly chopped - 3 cloves garlic, finely minced - 1 cup heavy cream - 1/2 cup freshly grated Parmesan cheese - 8 ounces fettuccine or your choice of pasta Roasted red peppers are the star of this dish. Their sweet and smoky flavor gives the sauce a rich taste. You can use homemade roasted peppers or store-bought ones. They save time and still taste great. Heavy cream and Parmesan cheese make the sauce creamy and rich. The cream adds smoothness, while the cheese gives depth. This combination creates a luxurious texture that coats the pasta perfectly. You can use any pasta you like. Fettuccine is my go-to choice because it holds sauce well. You can also try penne, spaghetti, or even gluten-free pasta. - 1/4 teaspoon red pepper flakes (adjust according to your spice preference) - Fresh basil leaves, for garnish - 2 tablespoons extra virgin olive oil - Salt and freshly ground black pepper to taste Red pepper flakes are key for adding a little heat. Adjust the amount based on how spicy you want the dish. Just a pinch can elevate the flavor. Fresh basil leaves add color and aroma. They provide a lovely contrast to the creamy sauce. Sprinkle them on top before serving for a fresh touch. Using high-quality olive oil enhances the overall flavor. It also helps to sauté the garlic and blend the sauce. Salt and pepper are essential for bringing out all the flavors. Taste as you go to find the perfect balance. This combination of ingredients makes creamy roasted red pepper pasta a simple, yet satisfying meal. To start, fill a large pot with water. Add a good amount of salt. This helps flavor the pasta. Bring the water to a rolling boil. Once boiling, add 8 ounces of fettuccine. Cook it until it is al dente, which takes about 8 to 10 minutes. Al dente means the pasta is firm but not hard. It should have a slight bite to it. After cooking, reserve 1/2 cup of the pasta water. This water helps adjust the sauce later. Drain the pasta and set it aside for now. Next, we will make the sauce. In a high-speed blender, combine 2 cups of roasted red peppers, 3 cloves of minced garlic, 1 cup of heavy cream, 1/2 cup of grated Parmesan cheese, and 1/4 teaspoon of red pepper flakes. Blend this mixture on high until it is smooth and creamy. You want to ensure there are no chunks left in the sauce. Now, heat 2 tablespoons of extra virgin olive oil in a large skillet over medium heat. Once the oil is shimmering, pour in the blended sauce. Let it simmer gently for about 5 minutes. Stir occasionally to avoid sticking. This step lets the flavors blend well together. Once your sauce is heated, add the drained fettuccine to the skillet. Toss the pasta in the sauce until every piece is coated. If the sauce seems too thick, use the reserved pasta water. Pour it in slowly, a little at a time, until you reach your desired creamy consistency. This helps make the dish rich and smooth. Taste the pasta and adjust the flavor with salt and freshly ground black pepper. You can also change how spicy the sauce is. This is your chance to make it just right! - Avoiding overcooked pasta: Always check the pasta a minute or two before the time on the package. You want it al dente, which means firm to the bite. This keeps the pasta from getting mushy when mixed with the sauce. - Ensuring a smooth sauce: Blend the roasted red peppers, garlic, cream, and cheese until there are no chunks. This gives the sauce a rich, creamy texture. If you want a thinner sauce, add a bit of reserved pasta water while blending. - Spice level adjustments: If you like more heat, add extra red pepper flakes. Start with a little, then taste and add more as needed. This way, you control the spice level just right for your family. - Additional seasoning ideas: Try adding a pinch of smoked paprika or a dash of lemon juice for a fresh twist. You could also mix in some Italian herbs like oregano or thyme for extra flavor. - Garnishing options: Fresh basil leaves not only look pretty but add a nice aroma. You can also sprinkle more Parmesan cheese on top for a gourmet touch. - Serving suggestions for a beautiful plate: Use large, shallow bowls to serve. For an elegant finish, drizzle a little olive oil on top before serving. This makes the dish pop and adds flavor. {{image_4}} You can switch up your pasta to fit your needs. Here are some options: - Gluten-free options: Use gluten-free pasta made from rice or corn. It cooks well and tastes great. - Whole grain choices: Choose whole wheat pasta for added fiber. It has a nutty flavor that pairs nicely with the sauce. Want to make your meal even better? Consider these add-ins: - Vegetables to include: Try adding spinach, zucchini, or bell peppers. They add color and nutrients. - Protein suggestions: Add grilled chicken or shrimp for a protein boost. They make the dish more filling and satisfying. You can easily make this dish vegan. Here’s how: - Dairy-free cream alternatives: Use coconut cream or cashew cream. They give a rich texture without dairy. - Plant-based cheese options: Try nutritional yeast or vegan cheese. They add a savory flavor without animal products. To keep your creamy roasted red pepper pasta fresh, store it in an airtight container. Make sure to seal it well to prevent moisture loss. Place it in the refrigerator within two hours of cooking. It will stay fresh for up to three days. If you want to save it for later, you can freeze the pasta. Just let it cool completely. Then, pack it in freezer-safe bags or containers. This way, it can last for up to three months. You have two easy ways to reheat your pasta: the microwave or the stovetop. For the microwave, place your pasta in a microwave-safe bowl. Add a splash of water or cream to keep it moist. Heat it in short bursts, stirring in between until warm. For the stovetop, add your pasta to a skillet over low heat. Stir it gently, adding a bit of water or cream to help it heat evenly. Both methods will bring back the creamy goodness. In the fridge, your creamy roasted red pepper pasta will last for about three days. If you freeze it, aim to use it within three months for the best taste. Always check for signs of spoilage, like off smells or changes in texture. This way, you can enjoy your delicious meal without worry! You can use several options instead of heavy cream. - Dairy-free alternatives: Coconut cream works well for a rich taste. Almond milk can also be used, but add some cornstarch for thickness. - Other creamy options: Greek yogurt adds creaminess. Silken tofu blended until smooth is another great choice. These substitutes will change the flavor. Experiment to find your favorite! Yes, you can use jarred roasted red peppers. - Pros: They save time and are easy to find. Jarred peppers are usually soft and blend well. - Cons: They may contain added salt or preservatives. Fresh roasted peppers have better flavor and texture. Using jarred peppers is a great way to save time, but fresh is best if you can. To add spice, you have a few simple options. - Adding heat to the dish: Increase the red pepper flakes in the sauce. Add fresh chopped jalapeños or crushed red pepper for more heat. You can also add hot sauce while mixing the pasta. Adjust the spice to fit your taste. Enjoy your fiery twist! This blog post showed you how to make a tasty roasted red pepper pasta. You learned about key ingredients like roasted red peppers and heavy cream, as well as tips for cooking and garnishing. Remember to choose the pasta you like best, and don’t be afraid to add your favorite veggies or proteins. Don’t forget to store leftovers properly so you can enjoy this meal later. Cooking can be fun and creative, so have fun experimenting with flavors and variations. Happy cooking!

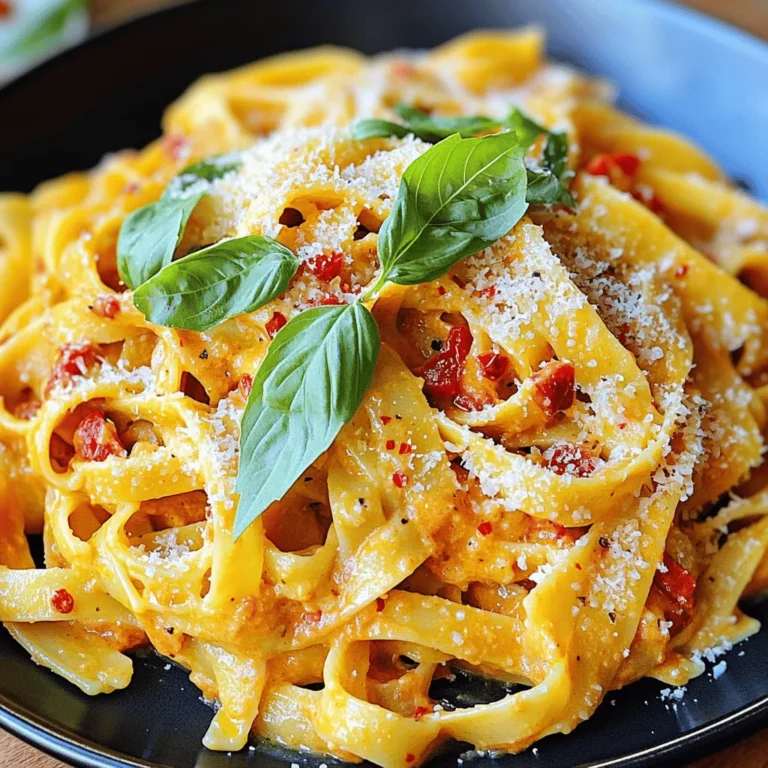
Creamy Roasted Red Pepper Pasta Delicious Weeknight Meal

- 1 large bag of crispy tortilla chips - 1 can (15 oz) black beans, rinsed and drained - 1 cup cooked ground turkey or beef, seasoned with your favorite taco spices - 1 cup sharp cheddar cheese, freshly shredded - 1 cup Monterey Jack cheese, freshly shredded - 1 medium jalapeño, thinly sliced - 1 medium ripe tomato, diced - 1 green onion, finely sliced - 1 avocado, diced for creaminess - 1 cup sour cream or Greek yogurt for drizzling I love making loaded nachos because they are fun and easy. You can switch up the toppings based on what you like. The base starts with crunchy tortilla chips. They give the nachos their unique texture. Next, I add black beans. They are full of protein and fiber. They make this dish filling and hearty. Ground turkey or beef adds even more flavor and richness. You can season it with taco spices to make it pop. Cheese is what makes nachos special. I mix sharp cheddar and Monterey Jack for a great melt. These cheeses create a gooey layer that binds it all together. Now, let’s talk about the optional toppings. Jalapeños add a nice kick. If you want it milder, skip these. Diced tomatoes give freshness and color. Green onions add crunch and a bit of bite. Avocado is perfect for creaminess. It balances the spicy and cheesy flavors. Finally, a drizzle of sour cream or Greek yogurt brings it all together. It adds a cool, creamy finish that everyone loves. Feel free to mix and match these ingredients. You can create your perfect loaded nacho sheet pan! - Preheat your oven to 400°F (200°C). - Line a large baking sheet with parchment paper. This helps with cleanup. - Spread a layer of tortilla chips on the baking sheet. Cover it well but leave space. - Evenly distribute your seasoned ground turkey or beef on top of the chips. This adds great flavor. - Scatter the rinsed black beans over the meat. They boost protein and fiber. - Sprinkle freshly shredded cheddar and Monterey Jack cheese all over. This creates a gooey, cheesy goodness. - Place the baking sheet in the oven. Bake for 10-12 minutes. Keep an eye on it! - Once the cheese melts, take it out and let it cool for a few minutes. - Toss on sliced green onions and diced avocado for freshness. - Drizzle sour cream or Greek yogurt over the nachos right before serving. - Finish with chopped cilantro for a pop of color and flavor. - Choosing the right tortilla chips: Select sturdy, thick tortilla chips. They hold toppings well and stay crisp. Avoid thin chips, as they can break easily. - Avoiding sogginess: Layer your toppings wisely. Spread the meat and beans evenly. Don't overload the chips with wet ingredients. - Best cheese combinations: Use a mix of sharp cheddar and Monterey Jack. These cheeses melt perfectly and add great flavor. - How to melt cheese evenly: Grate your cheese fresh. This helps it melt smoothly. Spread it evenly over the nachos for even melting. - Additional spices for a kick: Sprinkle taco seasoning over the meat or chips. You can also add a dash of cayenne or chili powder. - Creative topping ideas: Try adding black olives, diced bell peppers, or corn. Fresh lime juice adds a zesty twist. Don't forget fresh cilantro for extra flavor! {{image_4}} For a tasty vegetarian twist on loaded nachos, swap meat for hearty ingredients. Use a can of black beans or pinto beans for protein. You can also try lentils or quinoa for a filling option. - Ingredients substitution options: - Replace ground turkey or beef with black beans or lentils. - Use a mix of grilled veggies like bell peppers and mushrooms. - Protein alternatives: - Try adding extra cheese or plant-based cheese for creaminess. - Consider tofu crumbles seasoned with taco spices for a savory touch. If you love heat, spice up your nachos with bold flavors. Start by adding sliced jalapeños right on top of the cheese. You can also mix in spicy salsa or hot sauce for extra kick. - Incorporating spicy ingredients: - Use spicy cheese like pepper jack for a zesty flavor. - Add diced serrano peppers for a fresh and fiery taste. - Options for heat levels: - Adjust the amount of jalapeños based on your heat preference. - Serve with a side of hot sauce for those who want more spice. Take your nachos on a world tour by adding unique flavors. Try different cuisines by mixing in international ingredients. Seasonal themes can also bring fresh ideas to your nacho game. - International flair variations: - Use Greek toppings like feta cheese, olives, and tzatziki. - For an Italian twist, add marinara sauce and mozzarella cheese. - Seasonal ingredient ideas: - In summer, use fresh corn, diced peaches, and cilantro. - In fall, add roasted pumpkin, sage, and goat cheese for warmth. After enjoying your loaded nacho sheet pan, store leftovers right away. Place them in a shallow container. Cover the container tightly with a lid or plastic wrap. This keeps your nachos fresh and prevents them from drying out. Use glass or plastic containers for storage. They work well and help avoid messes. To reheat your nachos, the oven is best. Preheat it to 350°F (175°C). Spread the nachos on a baking sheet. Bake for about 10 minutes. This helps keep the chips crunchy. You can also use the microwave. Heat in short bursts of 30 seconds. This method may soften your chips. To maintain texture, avoid overcooking. You can freeze loaded nachos, but some toppings may not freeze well. It’s best to freeze nachos without fresh toppings. To freeze, place them in an airtight container. You can also wrap them tightly in foil. When ready to eat, thaw in the fridge overnight. Reheat in the oven for best results. To spice up your nachos, try these tips: - Add sliced jalapeños for heat. - Use spicy taco seasoning for more flavor. - Mix in diced green chilies for a kick. - Choose pepper jack cheese instead of regular cheese. - Top with hot sauce or salsa for extra spice. Each method boosts the heat level and makes each bite exciting. Yes, you can prepare some parts ahead. - Cook the meat and beans earlier in the day. - Layer the chips on the sheet pan and store them. - Add cheese and toppings just before baking. This way, you save time and keep your nachos fresh. Great sides for your nachos include: - A fresh garden salad to balance flavors. - Guacamole for a creamy dip. - Salsa or pico de gallo for added freshness. - Cold drinks like lemonade or soda to cool off. These pairings enhance the meal and make it even more fun. Keep your nachos crispy with these tips: - Use thick tortilla chips to hold toppings better. - Layer cheese directly on the chips before adding wet toppings. - Bake immediately after assembling to avoid sogginess. - Serve nachos right away so they stay crunchy. Following these steps keeps your nachos delicious and enjoyable. Loaded Nacho Sheet Pan is a fun dish to make. You only need a few ingredients like tortilla chips, beans, and cheese. Layer them well and bake for a crunchy treat. You can even add spicy flavors or fresh toppings! With proper storage and reheating, you can enjoy leftovers too. Experiment with variations to keep it exciting. Nachos can be a family favorite with a bit of creativity! Enjoy your cooking and happy eating!

Loaded Nacho Sheet Pan Flavorful and Fun Meal Ideas

- 4 cups Rice Krispies cereal - 10 oz marshmallows - 3 tablespoons unsalted butter - 1 teaspoon pure vanilla extract - 1 cup semi-sweet chocolate chips - 1 tablespoon coconut oil (optional) - Flaky sea salt Gathering these ingredients is the first step to making these treats rich in flavor. The Rice Krispies give a nice crunch. Marshmallows add sweetness and a soft texture. Unsalted butter helps bind everything together. Vanilla extract enhances the overall taste. The chocolate chips are key for dipping. They melt into a smooth coating. If you want a glossy finish, use coconut oil. It helps the chocolate flow better. A sprinkle of flaky sea salt adds a fun twist. This balance of flavors makes your treats really special. When you have all the ingredients, you can start your fun cooking adventure. Each bite will be a mix of sweet and salty, crunchy and smooth. Make sure to enjoy every step of the process! To start, you need to prepare your baking dish. Lightly grease a 9x13 inch dish with unsalted butter. This step is key. It helps the treats come out easily after they cool. You can also use non-stick cooking spray. This spray is great for preventing sticking. Next, we move on to melting the butter and marshmallows. In a large saucepan, melt 3 tablespoons of unsalted butter over medium heat. Keep an eye on it to avoid burning. Once the butter is melted, add the 10 oz of marshmallows. Stir them with a spatula until they melt into a smooth mixture. After the marshmallows melt, remove the pan from heat. Now, stir in 1 teaspoon of pure vanilla extract. This adds a rich flavor that makes your treats special. Now it's time to combine. Add 4 cups of Rice Krispies cereal to the melted marshmallow mix. Use a spatula to fold the cereal in gently. Make sure every piece gets coated evenly. Be careful not to crush the cereal; we want it light and crispy. Once mixed, transfer the mixture to your prepared pan. Use a greased spatula or your hands to press it down evenly. This step is crucial for compacting the treats. Allow them to cool at room temperature for about 30 minutes. This will help them set properly, making them easier to cut later. - Use microwave-safe bowls: Always use bowls that can handle heat. Glass bowls work well. They let you see the chocolate melt. - Best practices for melting chocolate: Melt chocolate in short bursts. Start with 30 seconds, then stir. Repeat until smooth. Stirring helps avoid burning. If you want a smoother mix, add coconut oil. - How to achieve a smooth chocolate coating: Make sure the chocolate is fully melted. If it’s too thick, add more coconut oil. Dip quickly to avoid a messy coating. - The right temperature for set treats: Let your Rice Krispie treats cool completely before dipping. If they are warm, the chocolate may not set well. - Presentation tips for serving: Place your treats on a nice plate. A tiered tray looks fancy. You can drizzle leftover chocolate on top for extra flair. - Creative ways to showcase the treats: Use colorful sprinkles or chopped nuts for decoration. You can even serve them in cute boxes for gifts. {{image_4}} You can easily boost the taste of your chocolate dipped Rice Krispie treats. Adding peanut butter or butterscotch can create a rich twist. Mix in half a cup of creamy peanut butter while melting the marshmallows. This will give the treats a nutty flavor that many enjoy. Butterscotch chips can also replace some of the chocolate chips for a sweet surprise. For chocolate types, you can use milk, dark, or white chocolate. Each brings its own flavor. Dark chocolate adds a rich, deep taste. Milk chocolate is creamy and sweet. White chocolate offers a smooth, sweet profile. Experiment with different combinations to find your favorite. If you need gluten-free options, look for gluten-free Rice Krispies. These are made with rice, not wheat. Check the box to ensure they meet your needs. For a vegan version, swap out the butter for coconut oil. This will still give a nice texture. Use vegan marshmallows instead of regular ones. Many brands now offer these, making it easy to enjoy the treats without animal products. You can make your treats festive for any occasion. For holidays, add colored sprinkles or edible glitter on top of the chocolate. These small touches make a big impact. For special occasions, think about flavor combos. Try adding peppermint extract for a holiday twist. You could even mix in mini marshmallows or crushed candy canes. This adds both flavor and color to your treats, making them stand out. Keep your chocolate dipped Rice Krispie treats fresh by using airtight containers. This method helps prevent them from getting stale. A good choice is a plastic or glass container with a tight lid. When stored this way, they stay tasty for up to one week. Freshness is key for the best flavor, so try to eat them soon. If you want to save some for later, freezing is a great option. First, cut the treats into squares. Then, wrap each piece in plastic wrap. Place them in a freezer-safe bag or container. They can last up to three months in the freezer. When you're ready to enjoy them, take them out and let them thaw at room temperature for about 30 minutes. This way, they taste just as good as fresh. If you're giving these treats as gifts, consider wrapping them nicely. Use clear bags tied with ribbons for a cute look. You could also use a decorative box for a special touch. For eco-friendly options, try using recycled paper or fabric wraps. This not only looks good but is kind to the planet, too. To make these treats, you need a few simple steps. First, gather your tools: a large saucepan, spatula, and a baking dish. 1. Prepare the Pan: Grease a 9x13 inch baking dish. 2. Melt the Butter and Marshmallows: Melt 3 tablespoons of butter, then add 10 oz of marshmallows. Stir until smooth. 3. Combine with Rice Krispies: Pour in 4 cups of Rice Krispies cereal. Mix gently. 4. Press into the Pan: Transfer the mixture and press it down firmly. Let it cool for 30 minutes. 5. Prepare the Chocolate Dipping: Melt 1 cup of chocolate chips in a bowl. Use a microwave. 6. Dip the Treats: Cut treats into squares and dip half into the melted chocolate. 7. Add a Twist of Flavor: Sprinkle flaky sea salt on top. 8. Set the Chocolate: Cool on parchment paper for 15-20 minutes. Yes, you can use other cereals. Some good options include: - Cornflakes - Crispy Rice - Chex These cereals will give a different texture but will still work well. You can use different types of chocolate: - Milk Chocolate: Sweet and creamy. Great for kids. - Dark Chocolate: Rich and slightly bitter. Perfect for adults. - White Chocolate: Sweet and smooth. Adds a unique flavor. Each type brings its own taste to the treats. To keep chocolate from cracking, follow these tips: - Cool Slowly: Let the chocolate set at room temperature, not in the fridge. - Store Properly: Keep the treats in an airtight container. This keeps them fresh. - Avoid Moisture: Keep them away from humidity, which can cause cracks. These steps help maintain a smooth, beautiful chocolate coating. Making Rice Krispie treats is simple and fun. You start with just three main ingredients: Rice Krispies, marshmallows, and butter. Then, you add extras like chocolate and vanilla. The steps are easy—melt, mix, press, and enjoy. You can even create unique flavors and variations. Remember to store them right for the best taste. In the end, have fun with this treat. You can get creative and share it with friends and family. Enjoy every bite!

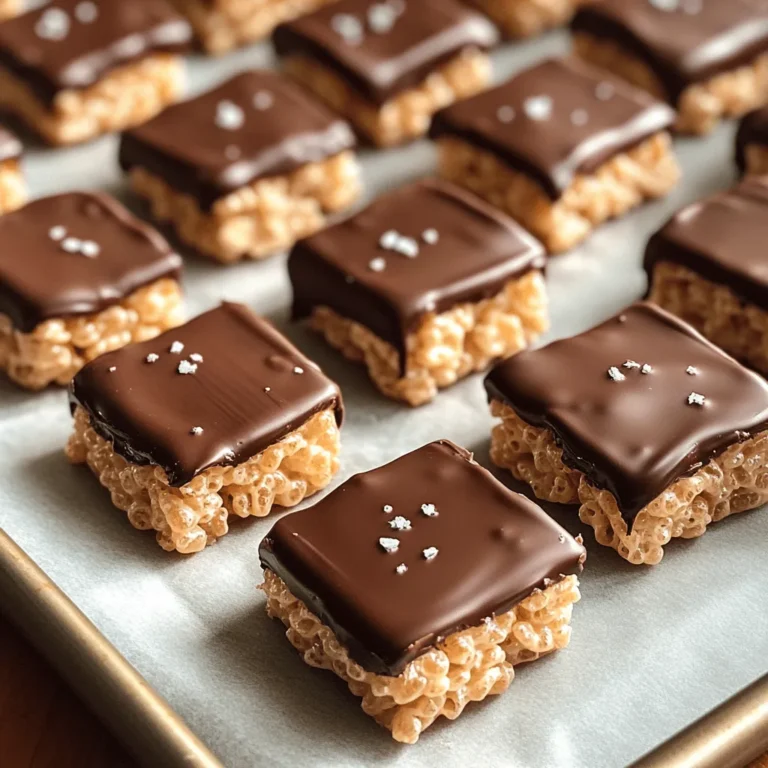
Chocolate Dipped Rice Krispie Treats Rich in Flavor

To make Caramel Pecan Monkey Bread, gather these simple ingredients: - 2 cans (16 oz each) refrigerated biscuit dough - 1 cup pecans, roughly chopped - 1/2 cup unsalted butter - 3/4 cup brown sugar, firmly packed - 1/4 cup granulated sugar - 2 teaspoons ground cinnamon - 1/2 cup caramel sauce (store-bought or homemade) - Optional: 1 teaspoon vanilla extract Each ingredient plays a key role in creating this tasty treat. The biscuit dough forms the fluffy base. The pecans add a nice crunch and nutty flavor. Butter makes everything rich, while sugars caramelize beautifully during baking. Ground cinnamon provides warmth and spice, enhancing the sweet notes. Caramel sauce is the star, bringing gooey sweetness. And if you choose to add vanilla, it boosts the overall flavor even more! - Preheat oven to 350°F (175°C). - Grease the bundt pan with cooking spray or softened butter. - Cut biscuit dough into four equal pieces. - Toss pieces in cinnamon-sugar mixture. - Layer half of the chopped pecans in the pan. - Arrange half of the biscuit pieces over pecans. - Add remaining pecans and top with remaining biscuit pieces. - Melt unsalted butter and mix in brown sugar and vanilla extract. - Pour in caramel sauce and whisk until smooth. - Drizzle caramel mixture over biscuit layers. - Bake for 30-35 minutes until golden brown. This process is easy and fun. Each step builds layers of flavor. You get to create a lovely treat that everyone will love. Enjoy the aroma of warm biscuits and caramel. This monkey bread is sure to impress! - Monitoring baking time for perfect results: Keep an eye on the monkey bread as it bakes. Set a timer for 30 minutes. Check if it’s golden brown. If it needs more time, add a few minutes. This way, you avoid overbaking. - Allowing to cool before inverting for easier removal: After baking, let the monkey bread cool for 10 minutes. This makes it easier to flip onto a plate. If you rush, it might stick to the pan. - Drizzling extra caramel for presentation: For a special touch, heat some extra caramel sauce. Drizzle it on top before serving. This adds a lovely shine and extra sweetness. - Sugaring the top for a crispy finish: Before baking, sprinkle some granulated sugar on the top layer. This gives a nice crunch when baked, making each bite even better. - Adding chocolate chips or fruit: Want to mix it up? Add chocolate chips or pieces of fruit like apples or berries. This will give your monkey bread a new twist and more flavor. - Adjusting sweetness level with less sugar: If you prefer less sweetness, cut back on the brown sugar. You can still enjoy a tasty treat without it being too sweet. {{image_4}} You can easily customize your Caramel Pecan Monkey Bread by changing some ingredients. - Using different nuts: Try using walnuts or almonds instead of pecans. Each nut brings a unique taste and crunch. - Substituting honey for caramel: If you want a different sweet twist, use honey instead of caramel. This adds a floral flavor and a sticky texture. Adding new flavors can change the whole dish. Here are some ideas: - Infusing spices: Consider adding spices like nutmeg or ginger. They can give warmth and depth to the bread. - Adding extracts: You can also include drops of almond or maple extract. This enhances sweetness and adds a lovely aroma. The temperature you serve your monkey bread can change how it tastes. - Enjoying warm versus chilled versions: Warm monkey bread is gooey and comforting. Chilled versions are firmer and easier to slice. - How serving temperature affects taste experience: Warm bread lets the caramel ooze out, making each bite a treat. Chilled bread allows the flavors to meld, creating a different but tasty experience. To keep your Caramel Pecan Monkey Bread fresh, you should refrigerate it. Wrap the bread tightly in plastic wrap or aluminum foil. This will help prevent it from drying out. Your leftovers will stay fresh for up to three days in the fridge. After that, the flavor and texture may change. When you want to enjoy your leftovers, you can reheat them easily. For the best results, use an oven. Preheat your oven to 350°F (175°C). Place the monkey bread in an oven-safe dish and cover it with foil. Heat for about 10 to 15 minutes until warm. If you need a quick option, the microwave works too. Just place a piece of monkey bread on a microwave-safe plate. Heat it for about 15-20 seconds. Check if it’s warm enough, and enjoy! You can freeze Caramel Pecan Monkey Bread if you want to save some for later. You can freeze it before or after baking. If freezing before baking, wrap the bundt pan in plastic wrap and place it in the freezer. When you’re ready to bake, just remove it and follow the baking instructions. If you freeze it after baking, make sure it’s completely cool first. Wrap it tightly and place it in a freezer-safe bag. It can last for up to three months in the freezer. To thaw, simply move it to the fridge overnight. For best texture, reheat it in the oven after thawing. This will help restore its delicious gooeyness! Monkey bread is a fun, pull-apart bread. It uses biscuit dough, baked with sugar and cinnamon. This dish is sweet, gooey, and often topped with caramel. You can eat it warm and share it with friends. It’s perfect for breakfast or dessert! Yes, you can prepare monkey bread ahead. You can cut the biscuit dough and mix it with sugar and cinnamon. Layer it in the bundt pan, then cover it tightly. Chill it in the fridge overnight. In the morning, just bake it! Absolutely! You can use gluten-free biscuit dough. Many brands offer gluten-free options now. Just check the labels to ensure they are safe. The rest of the ingredients are naturally gluten-free, so you’re good to go! You can serve monkey bread with coffee or hot chocolate. It pairs well with fresh fruit, too. Consider adding whipped cream or ice cream for extra sweetness. Everyone loves a warm, gooey treat! If your monkey bread is dry, try adding more caramel sauce. Drizzle it over the warm bread after baking. You can also serve it with a scoop of ice cream. This adds moisture and keeps it delicious! This recipe for Caramel Pecan Monkey Bread combines simple steps with tasty results. You start with biscuit dough, layer it with pecans, and drizzle a rich caramel sauce. Remember to follow baking tips for the best outcome and consider fun variations to make it your own. Enjoy it warm or chilled, and store leftovers properly to keep them fresh. This dish is perfect for sharing. Dive into this delightful treat and impress your friends!

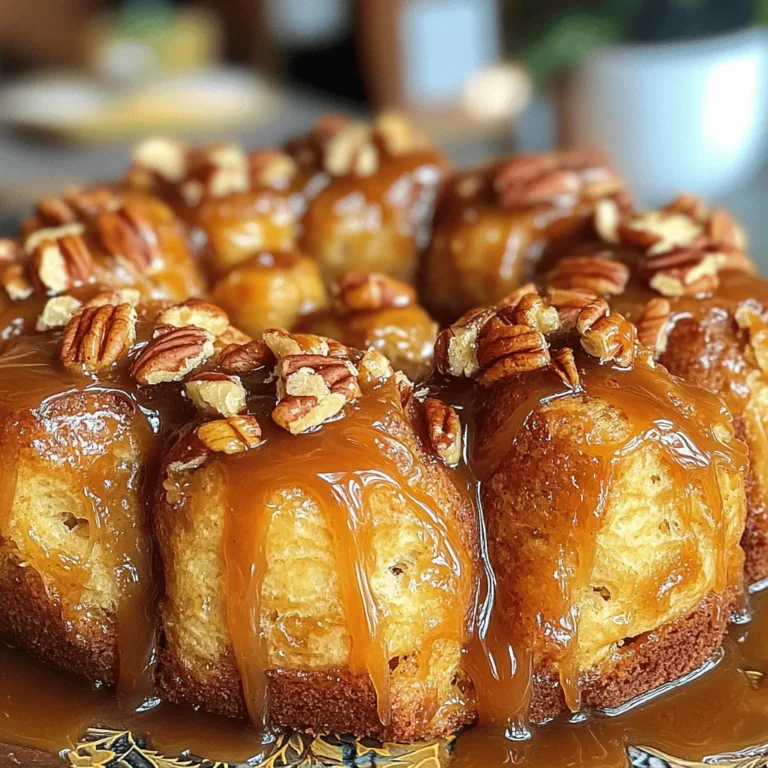
Caramel Pecan Monkey Bread Irresistible Treat Recipe

- 1.5 lbs boneless, skinless chicken breast - Fresh herbs and seasonings - Vegetables for grilling The star of this dish is the chicken breast. I prefer using boneless and skinless for easy cooking. It cooks quickly and stays juicy. Fresh herbs add a burst of flavor that elevates the chicken. Rosemary, thyme, and parsley work great together. Don't forget the colorful veggies! Red and yellow bell peppers, along with red onion, add color and taste. - 3 tablespoons extra virgin olive oil - Juice and zest of 2 medium lemons - 4 cloves fresh garlic, finely minced - Salt and freshly ground black pepper, to taste The marinade is key. I mix olive oil, lemon juice, and zest in a bowl. It gives a bright taste. Minced garlic adds depth. Adding salt and pepper balances the flavors. Letting the chicken soak in this mix makes it tender and tasty. - Wooden or metal skewers - Grill or stovetop grill pan For skewers, you can use either wooden or metal. If you go with wooden, soak them in water for 30 minutes. This helps them not burn on the grill. A grill or stovetop grill pan works well for cooking. Preheat your grill to medium-high for the best results. - In a large bowl, combine: - 3 tablespoons extra virgin olive oil - Juice and zest of 2 medium lemons - 4 cloves fresh garlic, finely minced - 1 tablespoon fresh rosemary, finely chopped - 1 tablespoon fresh thyme leaves, chopped - 1 tablespoon fresh parsley, finely chopped - Salt and freshly ground black pepper, to taste Whisk these ingredients together until they blend well. The aroma of lemon and herbs will make your mouth water. - Coat 1.5 lbs of chicken pieces in the marinade. Make sure every piece gets some flavor. - Cover the bowl with plastic wrap or a lid. Refrigerate for at least 30 minutes. For the best flavor, marinate overnight. The longer you wait, the tastier it gets! - Grab your skewers. If you use wooden skewers, soak them for 30 minutes first. This helps prevent burning. - Start threading the chicken and veggies onto the skewers. Alternate between chicken, red bell pepper, yellow bell pepper, and onion. - Leave small gaps between pieces. This helps them cook evenly. - Preheat your grill to medium-high heat. If you use a stovetop grill pan, heat it until hot. - Place the skewers on the grill and cook for about 10-15 minutes. Turn them occasionally. - Check the chicken's internal temperature. It should reach 165°F (75°C) to be safe to eat. - Once done, let the kabobs rest for a few minutes before serving. This helps keep them juicy. To get that perfect char on your kabobs, follow a few simple steps. First, preheat your grill to medium-high heat. This ensures even cooking. Place your kabobs on the grill and let them sear. Avoid moving them too much at first. This helps develop those tasty grill marks. Turning the kabobs is crucial. I suggest flipping them every few minutes. This keeps the chicken juicy and prevents burning. Aim for a cooking time of about 10 to 15 minutes. Check that the chicken reaches an internal temperature of 165°F. This guarantees that your kabobs are cooked through and safe to eat. Want to kick up the flavor? You can add extra spices like paprika or cumin for depth. A pinch of smoked paprika brings a nice, warm flavor. If you like heat, consider adding crushed red pepper flakes. For a touch of sweetness, try mixing in a bit of honey or brown sugar. These options create a balance that enhances the overall taste. Presentation matters when serving kabobs. Start by placing them on a large platter. Garnish with fresh lemon wedges and a sprinkle of herbs for color. You can also add a side of tzatziki sauce for a cool contrast. A vibrant mixed salad pairs nicely and adds freshness to the meal. These small touches make your dish look and taste gourmet. {{image_4}} You can swap chicken for shrimp or tofu in this recipe. - Shrimp: Use peeled and deveined shrimp. They cook fast, just 3-5 minutes on the grill. - Tofu: Choose firm tofu. Cut it into cubes and press it to remove extra water. Grill for about 8-10 minutes. Both options add unique flavors and textures. Feel free to play around! The right veggies make kabobs even better. Try these choices: - Zucchini: Cut into thick rounds for grilling. - Mushrooms: Whole baby bellas or halved portobellos work well. - Cherry tomatoes: Add sweet bursts of flavor. Seasonal veggies bring variety. Use squash in summer or root veggies in fall. You can mix and match as you like! Changing the marinade can transform the dish. Explore these ideas: - Asian-inspired: Add soy sauce, ginger, and sesame oil for a twist. - Mediterranean: Use yogurt, lemon, and cumin for a creamy flavor. - Spicy: Mix in chili paste or hot sauce for heat. These variations can take your kabobs on a world tour! To keep your kabobs fresh, place them in an airtight container. This helps prevent moisture loss. You can also cover them tightly with plastic wrap. For best taste, eat leftover kabobs within three days. After that, the flavors may fade. When you want to enjoy your kabobs again, use a medium heat. You can reheat them on the grill or in a pan. Make sure to turn them often. This keeps them from drying out. If you prefer, you can also use the microwave. Heat them in short bursts to avoid sogginess. Enjoy your tasty kabobs just like the first time! You can check the internal temperature of the chicken. The safe temperature for cooked chicken is 165°F (75°C). Use a meat thermometer to check the thickest part of the chicken. If it reads 165°F, your kabobs are done! This ensures that the chicken is safe to eat while still juicy and tender. Always be sure to check each skewer, as cooking times can vary. Yes, you can grill kabobs in the oven! Preheat your oven to 400°F (200°C). Line a baking sheet with foil for easy cleaning. Place a wire rack on top of the sheet. Arrange the kabobs on the rack, ensuring they don’t touch. Bake for about 15-20 minutes, turning halfway through. This method gives you a nice char without needing a grill. Here are some tasty sides to serve: - Couscous salad with fresh vegetables - Grilled corn on the cob with butter - Tzatziki sauce for a cool dip - Mixed green salad with vinaigrette - Rice pilaf for a hearty option For beverages, consider serving: - Lemonade for a refreshing drink - White wine, like Sauvignon Blanc - Sparkling water with lemon slices You can find the complete cooking guide for Lemon Herb Grilled Chicken Kabobs [here](#). This article covered how to make tasty Lemon Herb Grilled Chicken Kabobs. We explored key ingredients, marinade tips, and grilling steps. Now, you can enjoy kabobs with fresh flavors and easy techniques. Try different proteins and veggies to keep it fun. With practice, you’ll grill perfect kabobs every time. Don’t forget to share with friends and family. Happy grilling!

Lemon Herb Grilled Chicken Kabobs Flavorful Delight

PREV 1 … 11 12 13 … 18 NEXT
feastful focus

explore

DessertsDinnerAppetizersDrinks

Our Policies

  • Cookie Policy
  • Copyright Policy
  • Disclaimer
  • GDPR Policy
  • Terms Of Use
Back to Top
  • About
  • Contact Us
  • Privacy Policy
© 2025 feastful focus