FREE DINNER EBOOK! Get your copy!
  • Cookie Policy
  • GDPR Policy
  • Disclaimer
  • Terms Of Use
  • Visit my other site: Fun Cookie Recipes
feastful focus
  • Home
  • Dinner
  • Desserts
  • Drinks
  • Appetizers
  • Contact
  • About
  • Privacy Policy
  • Home
  • Dinner
  • Desserts
  • Drinks
  • Appetizers
  • Contact
  • About
  • Privacy Policy
  • Cookie Policy
  • GDPR Policy
  • Disclaimer
  • Terms Of Use
Visit my other site: Fun Cookie Recipes

HOME / CATEGORIES /

Latest

To make cozy chicken and rice soup, gather these tasty ingredients: - 1 pound boneless, skinless chicken thighs, diced into bite-sized pieces - 1 cup long-grain rice, thoroughly rinsed under cold water - 1 medium onion, finely chopped - 2 cloves garlic, minced or pressed - 3 medium carrots, peeled and sliced into thin rounds - 2 celery stalks, sliced into half-moons - 6 cups low-sodium chicken broth for rich flavor - 1 teaspoon dried thyme for aroma - 1 teaspoon dried oregano for earthiness - 1 bay leaf for depth - 2 tablespoons olive oil to sauté - Salt and freshly ground black pepper to taste - Fresh parsley, finely chopped (for a vibrant garnish) - Juice of 1 fresh lemon (to brighten the flavors) Using fresh ingredients makes a big difference. Here are some tips: - Choose chicken thighs that are firm and pink. They give the soup a rich taste. - Use long-grain rice for a fluffy texture. Avoid sticky rice. - Fresh herbs like thyme and oregano add more flavor than dried ones. If you can, use them! - Look for low-sodium chicken broth. It helps control the salt in your soup. If you have allergies, you can still enjoy this soup. Here are some swaps: - Use turkey instead of chicken for a lean option. - If you are gluten-free, choose rice instead of pasta. Make sure to check broth labels for gluten. - For a dairy-free option, skip cream and butter. The soup tastes great without them! - If you can’t have onions or garlic, try using leeks or shallots for a milder flavor. Feel free to explore and adapt the recipe using the full recipe as your guide. To make Cozy Chicken & Rice Soup, you need to follow a few simple steps. First, warm two tablespoons of olive oil in a large pot over medium heat. Next, add one pound of diced chicken thighs. Season the chicken with salt and pepper. Cook it for about 5 to 7 minutes until it turns golden brown. Once done, take the chicken out and set it aside. Now, in the same pot, add one finely chopped onion, three sliced carrots, and two sliced celery stalks. Sauté these veggies for about 5 minutes until they soften. After that, add two minced garlic cloves and cook for another 1 to 2 minutes until they smell great. Then, add one cup of rinsed long-grain rice to the pot, followed by six cups of low-sodium chicken broth. Sprinkle in one teaspoon each of dried thyme and oregano, along with one bay leaf. Stir everything well. Next, return the browned chicken to the pot. Bring the mix to a gentle boil, then lower the heat. Cover the pot and let it simmer for 20 to 25 minutes. This allows the rice to cook fully and absorb the flavors. Once it's cooked, take out the bay leaf. Stir in the juice of one fresh lemon to brighten the taste. The total cooking time for this soup is about 45 minutes. You should cook the chicken for 5 to 7 minutes initially. After sautéing the veggies, the soup needs to simmer for about 20 to 25 minutes. Keeping the heat low during simmering helps the rice cook evenly. Following the right order in cooking is crucial. Sautéing the chicken first gives it flavor. Next, the veggies add depth to the soup. Adding the rice and broth later allows the rice to soak up all the flavors. This order ensures that each ingredient shines while creating a warm and cozy soup. If you change the order, you might miss out on some tasty notes. The Full Recipe gives you all the details to follow! To boost flavors in your Cozy Chicken & Rice Soup, think about adding herbs. Fresh herbs like thyme or parsley can lift the taste. A splash of lemon juice brightens the dish too. For warmth, try adding a pinch of cayenne pepper. It gives a gentle kick without overpowering the soup. Also, to deepen the flavor, sauté your chicken until golden brown. This browning creates a rich base for your soup. One common mistake is not rinsing the rice. Rinsing removes extra starch and keeps your soup from getting too thick. Another mistake is adding too much salt too early. Always taste and adjust the seasoning at the end. Overcooking the chicken can make it tough. Cook until just done, then remove it before adding other ingredients. Lastly, don’t skip the bay leaf. It adds depth to the flavor but remember to take it out before you serve. Serve your soup hot in a large bowl. Add a sprig of fresh parsley on top for color. A slice of lemon on the side gives a refreshing touch. Pair it with crusty bread for a complete meal. This soup works well as a starter for a cozy dinner. You can also enjoy it as a hearty lunch. For a special twist, sprinkle some grated cheese on top before serving. For the full recipe, check out my Cozy Chicken & Rice Soup details. {{image_4}} You can boost the health of your soup by adding more veggies. Try green beans, peas, or corn. These veggies add color and crunch. You can also include leafy greens like spinach or kale. Just stir them in during the last five minutes of cooking. This way, they stay vibrant and fresh. More vegetables mean more vitamins, making your meal even better! If you want to change the rice, you have good options. Quinoa is a great swap. It cooks quickly and adds protein. Or try farro for a nutty taste. You can even use cauliflower rice for a low-carb choice. Just adjust the cooking time based on what grain you pick. Each option gives a new twist to your Cozy Chicken & Rice Soup. Want an easy clean-up? Make this a true one-pot meal. Cook everything in the same pot. Just add your chicken, veggies, and broth before the rice. This method saves time and keeps all the flavors together. You can enjoy your soup without worrying about washing many dishes. It’s a win-win for a cozy night in. For more detailed cooking steps, check the Full Recipe. After enjoying your cozy chicken and rice soup, store any leftovers in a few simple steps. First, let the soup cool down to room temperature. Then, pour it into an airtight container. This helps keep the flavors fresh. Label the container with the date. You can store it in the fridge for up to three days. If you want to save some for later, freezing is a great option. Use freezer-safe containers or heavy-duty freezer bags. Make sure to leave some space at the top of the container, as the soup will expand when frozen. You can safely freeze the soup for up to three months. When you're ready to enjoy it, just take it out and thaw it in the fridge overnight. Reheating your soup is easy. If you stored it in the fridge, you can reheat it on the stove. Pour the soup into a pot and heat over medium-low heat. Stir often until it's hot. If you froze it, first thaw it in the fridge. Then, follow the same stovetop method. You can also use a microwave if you're in a hurry. Just heat it in short bursts, stirring in between, until warm. Enjoy your comforting meal again! To make Cozy Chicken & Rice Soup gluten-free, use gluten-free chicken broth. Most brands have options that are safe. You can also check the labels to confirm. The rice you use is naturally gluten-free. Stick to the long-grain rice from the recipe. This way, you enjoy a comforting bowl without worry. Yes, you can use leftover chicken. Just shred or chop it into bite-sized pieces. Add it to the pot when you would normally return the chicken. This saves time and cuts down on waste. The flavors will blend well, making it just as tasty. The best rice for this soup is long-grain rice. It cooks well and stays fluffy. You can also use jasmine or basmati rice for a fragrant twist. Just remember to rinse it under cold water first. This removes excess starch and helps prevent clumping. This blog post covered the main ingredients needed for Cozy Chicken & Rice Soup. You learned quality tips, how to pick substitutes for allergens, and the cooking steps. We discussed how to avoid common mistakes and enhance the soup’s flavor. There are many ways to adapt this dish, and I provided storage tips for leftovers. Remember, making adjustments to fit your needs is great. Now, you can enjoy a warm bowl of this soup any time!

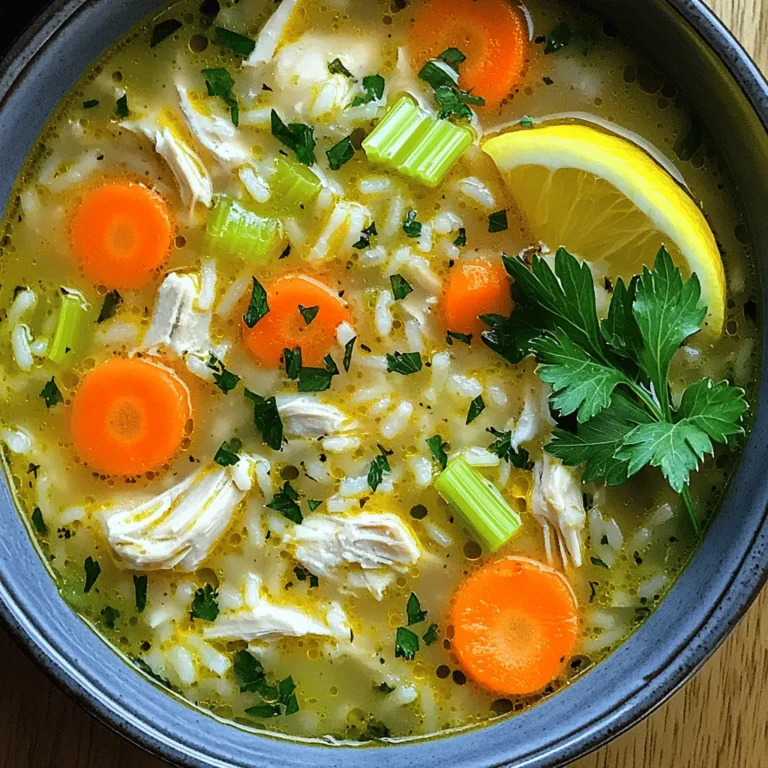
Cozy Chicken & Rice Soup Comforting and Simple Meal

- Large shrimp: Use 1 pound of large, peeled, and deveined shrimp. Freshness is key. Look for shrimp that smell like the sea, not fishy. If you can, buy shrimp from a trusted fishmonger or grocery store. - Garlic: Four cloves of fresh garlic are a must. Minced garlic packs a punch. Fresh garlic gives the best flavor. Avoid jarred garlic; it just doesn’t compare. - Pasta: I recommend using 8 ounces of linguine or spaghetti. Both pair well with the shrimp and sauce. They soak up the flavors nicely. - Other key ingredients: - 1/4 cup unsalted butter - 2 tablespoons olive oil - Zest of 1 lemon - 1/4 cup fresh lemon juice - 1/2 teaspoon red pepper flakes (adjust to taste) - Salt and pepper to taste - 1/4 cup fresh parsley, chopped - Grated Parmesan cheese for serving (optional) - Variations in pasta types: You can swap linguine for fettuccine or even gluten-free pasta. Each option brings a new twist to the dish. - Alternative herbs and spices: Try basil or dill if you want a different flavor. They can add fresh notes to your scampi. - Substitutes for butter and oil: For a lighter version, use olive oil or a plant-based butter. This keeps the flavor while cutting calories. For the full recipe, check out the [Full Recipe]. Cooking the pasta: To cook your pasta just right, start by boiling salted water. Use a large pot so the pasta can move freely. Add the linguine or spaghetti and cook until al dente. This means it should be firm when you bite it. Check the package for exact timing. Before you drain, save about 1 cup of the pasta water. This water helps make your sauce smooth later. Sautéing the garlic and shrimp: In a big skillet, melt the butter with olive oil over medium-high heat. Add minced garlic and red pepper flakes when the butter is melted. Cook for just about 1 minute. You want the garlic to smell good and turn golden, but not burned. Then, add the shrimp to the skillet. Season with salt and pepper. Cook them for 2-3 minutes on each side until they look pink and opaque. Don't overcook them; they should be tender. Adding lemon and adjusting the sauce consistency: Once your shrimp are ready, stir in the lemon zest and fresh lemon juice. If it looks too dry, use some of that reserved pasta water. Add it slowly until you get a smooth sauce that clings to the shrimp. Tossing pasta with shrimp: Now, add the drained pasta to the skillet. Toss everything together well. Make sure the pasta is coated in that tasty shrimp and sauce mix. If you want it creamy, add more pasta water until you reach the right texture. The flavors should be evenly spread throughout the dish. Check the Full Recipe for more details. To avoid overcooked shrimp, watch the timing closely. Cook shrimp for about 2-3 minutes on each side. They should turn pink and opaque. If you see them curl up, they are done. Keep a close eye; shrimp can go from perfect to rubbery fast. Balancing flavors is key for great scampi. Use fresh garlic for a sharp taste. Add salt and pepper to enhance the dish. Adjust red pepper flakes to your heat preference. Taste the sauce before serving. If it lacks flavor, add more lemon juice or seasoning. For a beautiful plate, serve the scampi in shallow bowls. Twirl the pasta into nests. Place shrimp on top for a stunning look. A sprig of parsley adds a pop of color. A sprinkle of lemon zest also brightens the dish. Garnishing can elevate your meal. Fresh parsley is a classic choice. You can also use lemon slices for a vibrant touch. Grated Parmesan cheese gives a rich finish. These small details make your dish appealing and flavorful. {{image_4}} You can easily change up your lemon garlic shrimp scampi to make it even better. Adding vegetables can boost flavor and nutrition. Spinach adds a nice touch of green. Cherry tomatoes bring sweetness and color to the dish. You might also consider adding cream for a richer sauce. This will make your scampi feel extra special. Just stir in a bit of cream after you cook the shrimp. It will balance the zesty lemon and garlic well. If you need gluten-free options, you can switch the pasta. Use gluten-free spaghetti or even zucchini noodles for a fresh twist. This way, everyone can enjoy the dish without worry. For a lighter meal, try using less butter and oil. You can also cut back on the pasta. Instead, serve more shrimp and veggies. This keeps the flavors strong while making it healthier. To store leftover scampi, let it cool first. Place it in an airtight container. This helps keep it fresh. You can store it in the fridge for up to 3 days. After that, the shrimp might lose its texture and flavor. When reheating scampi, use the stove for the best results. Place it in a skillet over low heat. Add a splash of water or broth to keep it moist. Stir often to prevent sticking. Avoid using the microwave as it can make shrimp rubbery. For a great taste, reheat it slowly. This helps keep the sauce smooth and the shrimp tender. If you want to avoid common reheating pitfalls, check it often. Stop reheating as soon as it’s warm. Enjoy your meal again with the same great flavors from the Full Recipe! What is the best type of shrimp to use for scampi? I recommend using large, fresh shrimp. Look for shrimp that are firm and have a mild sea scent. Fresh shrimp gives the best taste and texture. If fresh shrimp is hard to find, frozen shrimp is also a good choice. Just ensure they are peeled and deveined. Can I make Lemon Garlic Shrimp Scampi ahead of time? You can prepare the pasta and sauce in advance. Cook the shrimp just before serving. This keeps the shrimp tender and juicy. If you store it, the shrimp may become rubbery. To save time, prep your ingredients earlier in the day. What sides pair well with Lemon Garlic Shrimp Scampi? A fresh salad works great. You can also serve it with garlic bread or steamed vegetables. These sides complement the flavors without overpowering the meal. Try a light white wine to enhance the dining experience. How do I make the dish spicier or milder? To spice it up, add more red pepper flakes. You can also toss in fresh chili peppers. If you prefer it milder, use less red pepper or omit it entirely. Adjusting the spice lets you cater to your taste. Can I use frozen shrimp, and how should I prepare them? Yes, frozen shrimp work well. Thaw them in the fridge overnight or run them under cold water. Ensure they are peeled and deveined before cooking. This saves time and keeps the dish easy to prepare. Breakdown of calories, fat, and macros per serving One serving has about 400 calories. It contains 20 grams of fat and 30 grams of protein. The dish is rich in flavor but should be enjoyed in moderation. Considerations for dietary restrictions (e.g., shellfish allergy) If you have a shellfish allergy, avoid this dish. You can substitute shrimp with chicken or tofu for a similar style. Adjust cooking times based on your chosen protein. This way, you can still enjoy a delicious meal. Lemon garlic shrimp scampi is a simple yet delicious dish. You learned about key ingredients like fresh shrimp and garlic. I shared tips for perfecting your cooking timing and combining flavors. Variations let you customize the recipe to your taste. Proper storage ensures you enjoy leftovers without losing flavor. As you try this recipe, I hope you enjoy the process and the flavors. It’s an easy dish to impress anyone at your dinner table. Happy cooking!

Lemon Garlic Shrimp Scampi Easy and Flavorful Meal

- 2 cups cooked jasmine or basmati rice - 2 cups fresh broccoli florets - 1 cup sharp cheddar cheese - 1 cup cream cheese - 1/2 cup sour cream - 1/2 cup vegetable broth - Garlic powder, onion powder, black pepper, salt, and olive oil I love using simple ingredients to make Cheesy Broccoli Rice Casserole. First, you need two cups of cooked rice. I prefer jasmine or basmati rice. Both give a lovely texture and flavor. Next, grab two cups of fresh broccoli florets. Lightly steam them until they turn bright green. This helps keep them crisp. Now, let's talk cheese. I use one cup of sharp cheddar cheese. It melts perfectly and adds a great taste. For the creamy base, you’ll need one cup of cream cheese, softened. This makes the casserole rich. Also, add half a cup of sour cream for tanginess. For more flavor, use half a cup of vegetable broth. It adds depth without overpowering the dish. Don’t forget the spices! You need garlic powder, onion powder, freshly ground black pepper, and salt. A drizzle of olive oil adds moisture and helps the flavors blend. With these ingredients, you’ll create a comforting meal that is easy to make and loved by all. {{ingredient_image_2}} - Preheat the oven to 350°F (175°C). This helps cook the casserole evenly. - In a large bowl, mix the cooked rice, broccoli, sharp cheddar, cream cheese, sour cream, and vegetable broth. Add garlic powder, onion powder, black pepper, and salt. Stir until everything is creamy and well combined. - Grease a 9x13 inch baking dish with olive oil. This step prevents sticking. - Pour the rice and broccoli mixture into the greased dish. Spread it out evenly with a spatula. - In a small bowl, mix the breadcrumbs with the remaining tablespoon of olive oil. Toss them to coat. This will give your topping a nice crunch. - Sprinkle the breadcrumb mixture evenly over the casserole. - Bake the casserole in the preheated oven for 25-30 minutes. Look for a golden brown top and bubbling cheese. This shows it’s ready to eat. You can swap cream cheese with Greek yogurt. This will still give you creaminess but with less fat. If you need a sour cream alternative, try using plain yogurt. It adds a nice tang. For cheese, sharp cheddar reigns supreme, but you can mix it up! Try gouda for a smoky taste or mozzarella for a milder flavor. A blend of cheeses also works great! Make sure your broccoli is steamed just right. Steam it until it turns bright green but still stays crisp. Overcooking makes it mushy, and we want that crunch! Let your casserole rest for about five minutes after baking. This helps the flavors mix well. Plus, it makes serving easier. If you skip this step, it might fall apart. For a cozy feel, serve the casserole right from the baking dish. If you want to impress, slide it onto a large platter. A sprinkle of parsley or chives on top adds a lovely green touch. Pair this dish with a simple green salad or crusty bread. A light white wine can also elevate your meal. Enjoy every bite! Pro Tips Perfectly Steamed Broccoli: To achieve the ideal bright green color and crisp-tender texture, steam the broccoli florets for just 2-3 minutes. This ensures they retain their vibrant color and nutrients. Cheese Variations: Experiment with different types of cheese like mozzarella or gouda for a unique flavor profile. Mixing cheeses can also enhance the creaminess of the casserole. Breadcrumb Topping: For added flavor, mix in some grated Parmesan cheese or Italian herbs into the breadcrumb topping. This will elevate the crunch with an extra layer of taste. Resting Time: Allow the casserole to rest for at least 5 minutes after baking. This helps the dish set, making it easier to serve and enhancing the overall flavor. {{image_4}} You can make this casserole lighter. Try using whole grain rice. It adds fiber and nutrients. You can also swap in low-fat dairy. Use low-fat cream cheese and sour cream. This keeps the creamy texture while cutting calories. To enhance the flavor, add proteins. Cooked chicken or shrimp works well. They add heartiness and make it a full meal. You can also add different veggies. Chopped bell peppers or carrots add color and crunch. This makes the dish more exciting. Change up the recipe with seasonal veggies. In winter, try using root vegetables like carrots or squash. In summer, fresh zucchini or corn adds brightness. Seasonal options keep the meal fresh and exciting all year long. You can store leftover Cheesy Broccoli Rice Casserole in the fridge for up to four days. To keep it fresh, place it in an airtight container. This helps prevent moisture loss and keeps the flavors intact. If you plan to eat it later, make sure to cool it down before sealing it. To freeze the casserole, let it cool completely first. Then, cover it tightly with plastic wrap or foil. You can also use a freezer-safe container. It will stay good for about three months. When you’re ready to enjoy it, thaw it in the fridge overnight. This helps keep the texture nice. When reheating, the goal is to keep it creamy and avoid dryness. The best way is to use the oven. Preheat it to 350°F. Place the casserole in an oven-safe dish. Add a splash of vegetable broth to keep it moist. Cover it with foil and bake for about 20 minutes. You can also microwave it, but stir it every so often to heat evenly. Yes, you can make this dish ahead of time. Start by preparing the casserole as normal. After mixing all the ingredients, cover the dish with foil. You can store it in the fridge for up to two days. When you are ready to bake, just add a few extra minutes to the cooking time. This makes it great for busy nights or special occasions. Cheesy Broccoli Rice Casserole pairs well with many dishes. You can serve it with grilled chicken for protein. A simple green salad makes a fresh side. For a heartier meal, try some roasted veggies or a nice piece of fish. These sides balance the creamy casserole and add more color to your plate. Yes, frozen broccoli works great in this casserole. Just make sure to thaw it first and drain any excess water. This helps prevent the casserole from becoming too soggy. Frozen broccoli is often pre-blanched, so it cooks quickly and saves you time. It’s a convenient option when fresh broccoli isn’t available. This blog post shared how to make a delicious Cheesy Broccoli Rice Casserole. We covered the key ingredients like rice, broccoli, and cheese. You learned step-by-step cooking methods, helpful tips, and tasty variations. Remember to store your leftovers right, so they stay fresh. This dish is easy and versatile. You can enjoy it any time. I hope you feel excited to try this recipe. Happy cooking!

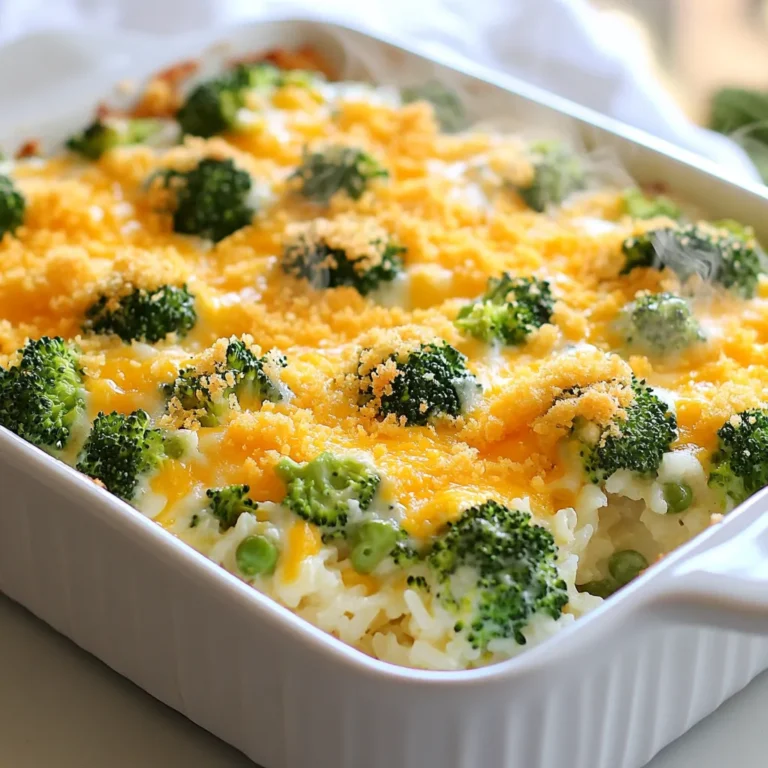
Cheesy Broccoli Rice Casserole Easy Comfort Meal

To make a great Beef Madras, you need fresh and quality ingredients. Here’s what you will need: - 500g beef, cut into bite-sized cubes - 2 tablespoons vegetable oil - 1 large onion, finely diced - 3 garlic cloves, minced - 1-inch piece of fresh ginger, grated - 400g canned chopped tomatoes - 400ml coconut milk - 2 green chilies, slit lengthwise - Salt, to taste - Fresh coriander leaves, for garnish - Cooked basmati rice or warm naan, for serving The key to a tasty Beef Madras lies in the spices. Here’s a list of spices you will need: - 2 tablespoons Madras curry powder - 1 teaspoon ground turmeric - 1 teaspoon ground cumin - 1 teaspoon ground coriander - 1 teaspoon chili powder (adjust to your spice preference) These spices build layers of flavor and give your curry that authentic taste. To make your meal complete, serve Beef Madras with delicious sides. Here are my top picks: - Fluffy basmati rice - Warm naan bread These sides soak up the rich sauce and balance the spice. Enjoy your meal! {{ingredient_image_2}} 1. Start by cutting the beef into bite-sized cubes. 2. Dice the onion finely and set it aside. 3. Mince the garlic and grate the ginger. 4. Gather all your spices: Madras curry powder, turmeric, cumin, coriander, and chili powder. 5. Open the canned tomatoes and coconut milk. 6. Slit the green chilies lengthwise for added heat. These steps set you up for success. A well-prepped kitchen makes cooking smoother and more fun. 1. Heat the vegetable oil in a large pot over medium heat. 2. Add the diced onions and sauté for 5-7 minutes. Look for a golden color. 3. Stir in the minced garlic and grated ginger. Cook for 1-2 minutes until fragrant. 4. Add the spices next. Toast them for about 1 minute to release their oils. 5. Now, add the beef cubes. Brown each piece for 5-6 minutes. 6. Pour in the chopped tomatoes. Let it simmer for 10 minutes to thicken. 7. Add the coconut milk and slit green chilies. Stir well and bring to a gentle simmer. 8. Season with salt. Cover and reduce heat to low. Cook for 1.5 to 2 hours. This slow cooking is key. It helps the beef soak up all the rich flavors from the spices. - Check the sauce as it cooks. If it’s too thick, add a splash of water or more coconut milk. - Stir occasionally to prevent sticking. This keeps the dish from burning. - After cooking, let it sit off the heat for a few minutes. This helps the flavors blend. A well-balanced sauce will coat the beef nicely, making each bite a delight. Enjoy the rich, comforting taste of your Beef Madras! To get the best flavor in your Beef Madras, use a heavy pot. A cast-iron pot is great for even heat. Start by sautéing onions until they are soft and golden. This builds a strong base for your curry. Toast the spices after adding them. This step helps bring out the full flavor. When you brown the beef, do it in batches. This prevents steaming and ensures a nice crust. Spice levels can change with your taste. Start with the chili powder, using less if you prefer mild. You can always add more later. For extra heat, add more green chilies or use a hotter chili powder. If it’s too spicy, add more coconut milk. This will balance the heat and add creaminess. Tender beef is key to a great Beef Madras. Choose cuts like chuck or brisket, which become tender with slow cooking. Cut the beef into small cubes for faster cooking. Marinating the beef in yogurt for a few hours can help, too. If you’re short on time, simply simmer the beef longer. The slow cooking process will break down tough fibers, making it fork-tender. Pro Tips Choose Quality Beef: Opt for cuts like chuck or brisket for a tender and flavorful result as they become succulent when slow-cooked. Marinate for Depth: If time allows, marinate the beef in yogurt and spices overnight to enhance flavor and tenderness. Adjust the Heat: Customize the spice level by adding more or less chili powder or by including fresh green chilies based on your preference. Let it Rest: Allow the dish to rest off the heat for a few minutes before serving, which helps the flavors meld beautifully. {{image_4}} You can switch up some ingredients in Beef Madras for new tastes. Try using lamb or chicken instead of beef. This will change the flavor but keep the essence of the dish. You can also use sweet potatoes or chickpeas for a twist. If you want more heat, add extra chili powder or fresh green chilies. For a richer flavor, consider adding some tamarind paste or a dash of fish sauce. These small changes can make your curry unique and fun. Making a Beef Madras vegan is easy and tasty. Replace the beef with firm tofu or seitan. These options soak up the spices well. Use coconut cream instead of coconut milk for a richer taste. Add more vegetables like bell peppers, carrots, or peas for extra color and nutrition. This version still has all the warmth and spice of a classic Beef Madras, plus it's friendly for those who avoid meat. Different areas put their spin on Beef Madras. In some parts, people use coconut or curry leaves for an extra kick. Others might add tamarind or lime juice for a tangy flavor. In southern India, you might find the dish with more heat and curry leaves. Each region brings its own flair to the recipe, which makes it exciting to explore. Don't be afraid to try these local touches and make the dish your own! To store leftover Beef Madras, let it cool first. Then, place it in an airtight container. Keep it in the fridge if you plan to eat it within three days. If you want to save it longer, freezing is a great option. When reheating, use low heat on the stove. Add a splash of water or coconut milk to keep it moist. Stir often to ensure even heating. You can also microwave it, but cover the dish to keep moisture in. Heat in short bursts, stirring in between. To freeze Beef Madras, use a freezer-safe container. Divide it into portions for easier use later. Make sure to leave some space at the top of the container for expansion. Label the container with the date. It can last up to three months in the freezer. When ready to use, thaw it in the fridge overnight before reheating. This keeps the flavor fresh and delicious. Beef Madras comes from South India. It is named after the city of Madras, now called Chennai. This dish reflects the rich culture and flavors of Indian cuisine. It evolved from the need to use local spices and meats. People made it to suit their taste, making it unique. Yes, you can use various cuts of beef for this dish. Chuck, brisket, or round are great options. These cuts have enough fat and flavor to make the curry rich. Just remember to cut the beef into small pieces for even cooking. Tender cuts like sirloin work too, but they cook faster. You can easily adjust the spice level. To make it spicier, add more chili powder or fresh green chilies. You can also use a hot curry powder. If you prefer it milder, reduce the chili powder and use sweet paprika instead. Adding coconut milk will also help tone down the heat. Beef Madras combines rich spices and tender meat for a warm dish. We explored essential ingredients, preparation steps, and tips for great results. You can also discover variations to suit your taste. Remember, storing leftovers right keeps them tasty for later. Whether you prefer spicy or mild, adjust the flavors to fit your palate. Now, it’s time to enjoy your delicious Beef Madras and share it with friends!

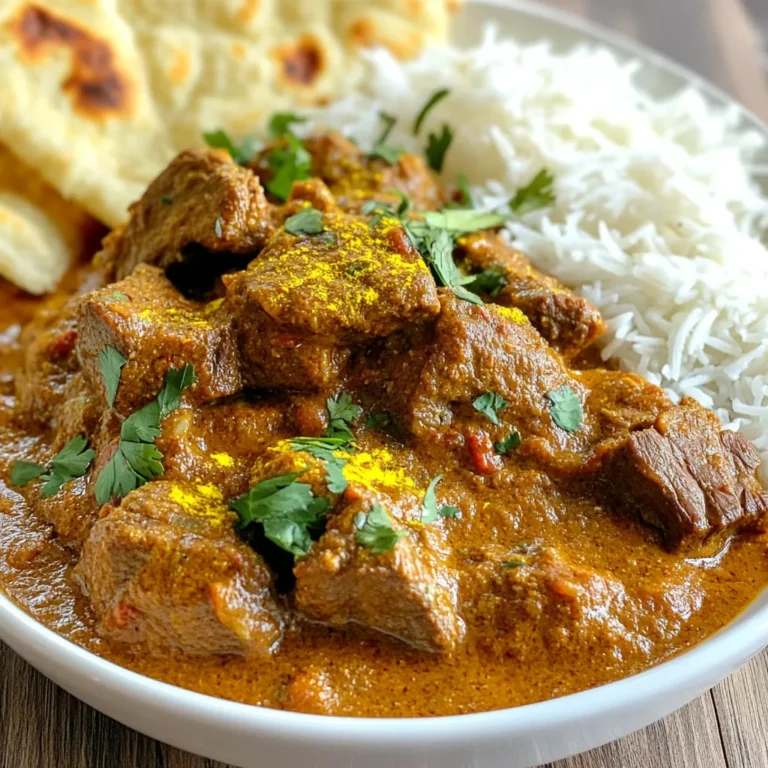
Authentic Beef Madras Flavorful Curry Recipe Guide

To make loaded potato soup, you need fresh and simple ingredients. Here’s what you’ll need: - 4 large russet potatoes, peeled and diced into 1-inch cubes - 1 medium onion, finely chopped - 3 cloves garlic, minced - 4 cups vegetable broth, homemade or store-bought - 1 cup heavy cream for richness - 1 cup shredded sharp cheddar cheese, plus extra for garnishing - 1/2 cup crispy shallots for topping - 1/4 cup green onions, finely chopped for garnish - 2 tablespoons olive oil for sautéing - Salt and freshly cracked pepper to taste - Pinch of smoked paprika, optional for adding a hint of smokiness These ingredients make a warm and creamy soup. Each one plays a role in creating a rich flavor and smooth texture. The russet potatoes give the soup its heartiness. The onion and garlic add depth to the taste. The vegetable broth serves as the base, while heavy cream and cheddar cheese provide the creamy comfort we crave. Don’t forget the crispy shallots and green onions on top for crunch and freshness! {{ingredient_image_2}} First, grab a large pot or Dutch oven. Pour in two tablespoons of olive oil and heat it over medium heat. When the oil is hot, add one finely chopped onion. Cook it for about five minutes. You want it to be soft and clear. Next, add three minced garlic cloves to the pot. Sauté for one more minute. You will smell that wonderful garlic aroma! Now, mix in four large russet potatoes. Make sure to peel and dice them into one-inch cubes. After adding the potatoes, pour in four cups of vegetable broth. Turn the heat up to high until it boils. Once boiling, reduce the heat to low and let it simmer. This should take about 20 to 25 minutes. Check the potatoes with a fork. They should be fork-tender and break apart easily. Now, take out your immersion blender. Blend the soup right in the pot. You can blend it all for a smooth texture or just half for some chunks. Once blended, it’s time to stir in one cup of heavy cream. Follow that with one cup of shredded sharp cheddar cheese. Heat the soup on low until the cheese melts. Finally, season with salt, cracked pepper, and a pinch of smoked paprika if you like. Serve it hot and enjoy! To boost the taste of your loaded potato soup, you can adjust the seasoning. Start with salt and pepper after blending. Taste the soup and add more if needed. A pinch of smoked paprika adds a nice smoky flavor. Try adding herbs like thyme or rosemary for a fresh twist. To get the right thickness, blend the soup well. If you like a chunkier texture, blend only half the soup. This way, you keep some potato pieces for a hearty feel. If it’s too thick, add more broth or cream until it’s just right. For a fun twist, serve the soup in rustic bread bowls. This adds warmth and a unique touch. You can easily make these bowls by hollowing out small loaves of bread. Garnishing is key to making the soup look inviting. Top each bowl with extra cheddar cheese. Add crispy shallots for crunch. Finally, sprinkle chopped green onions for color. This makes your soup not just tasty but also beautiful. Pro Tips Choose the Right Potatoes: Russet potatoes are ideal for this soup due to their starchy texture, which creates a creamy consistency when cooked and blended. Enhance Flavor with Broth: For deeper flavor, consider using homemade vegetable broth or adding a dash of soy sauce to the store-bought broth. Experiment with Toppings: Feel free to get creative with toppings! Try adding crumbled bacon, sour cream, or fresh herbs for an extra layer of flavor. Storage Tips: This soup stores well in the fridge for up to 3 days. Reheat gently on the stove, adding a splash of broth or cream if it thickens too much. {{image_4}} If you want a vegetarian version, you can swap out the heavy cream and cheese. Use coconut cream instead of heavy cream. It adds a rich taste without dairy. For cheese, try nutritional yeast or a dairy-free cheese. These options give the soup a nice flavor and keep it vegetarian-friendly. For a dairy-free treat, use almond milk or oat milk in place of heavy cream. These milks create a creamy texture without dairy. You can also add pureed cashews for even more creaminess. Just soak cashews in water, blend, and mix them into your soup. Want to spice it up? Add fresh herbs like thyme or rosemary while cooking. For a kick, try a dash of cayenne pepper or chili powder. Smoked paprika adds a nice smoky flavor too. You can even toss in some cooked bacon bits for a savory twist. To store leftovers, let the soup cool to room temperature. Once cooled, transfer it to an airtight container. Be sure to leave some space at the top for expansion. You can keep loaded potato soup in the fridge for up to three days. Always check for freshness before reheating. If it smells off or looks strange, toss it. For freezing potato soup, first cool it completely. Use freezer-safe containers or heavy-duty freezer bags. Leave space at the top for expansion. This soup can last up to three months in the freezer. When you are ready to eat, thaw the soup in the fridge overnight. To reheat, warm it slowly on the stove over low heat. Stir often to keep it smooth. If it seems thick, add some broth or water. This way, you can enjoy creamy comfort again! Yes, you can make loaded potato soup ahead of time. To prepare it in advance, follow these tips: - Cook the soup as directed and let it cool completely. - Store it in an airtight container in the fridge for up to three days. - Reheat gently on the stove, adding a splash of broth or cream if needed. - For best texture, avoid adding toppings until you serve. You can customize this soup with various toppings and mix-ins. Here are some ideas: - Crispy bacon bits for a savory crunch. - Sour cream for extra creaminess. - Fresh herbs like parsley or chives for a bright note. - Roasted vegetables for added flavor. - A drizzle of hot sauce for a spicy kick. Loaded potato soup lasts about three to four days in the fridge. To keep it fresh: - Store it in a sealed container. - Always cool the soup before refrigerating. - If you notice any off smells or changes in color, discard it. - Reheat thoroughly before serving again. This blog post covered making a delicious loaded potato soup. We discussed essential ingredients, helpful steps, and great tips to enhance it. I shared ways to make it vegetarian or dairy-free and how to store leftovers properly. Remember, your soup can be simple or fancy. Play with seasonings and toppings to make it yours. Enjoy each warm and creamy spoonful. Your kitchen will smell amazing, and you’ll want to share this recipe. Experiment and have fun with it!

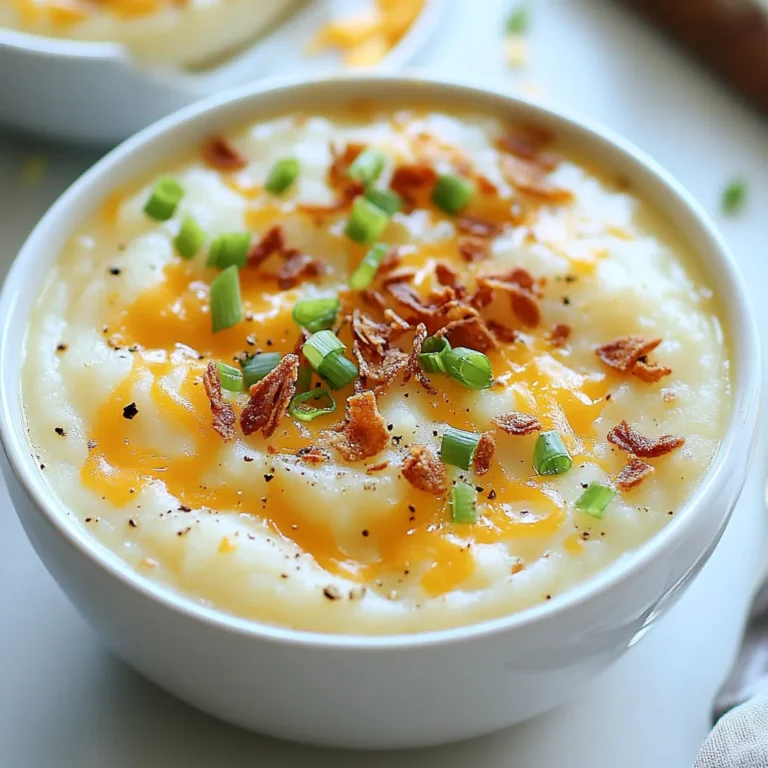
Loaded Potato Soup Creamy Comfort in a Bowl

- 2 cups cooked chicken breast, shredded - 1 cup plain Greek yogurt - 1/2 cup cucumber, peeled and diced - 1/2 cup cherry tomatoes, halved - 1/4 cup red onion, finely chopped - 1/4 cup Kalamata olives, pitted and sliced - 2 tablespoons fresh dill, finely chopped - 1 tablespoon freshly squeezed lemon juice - Salt and freshly ground black pepper to taste - 1/4 teaspoon garlic powder This Greek yogurt chicken salad is both healthy and filling. It packs protein from the chicken and yogurt. Greek yogurt has less fat than mayo. This salad is also low in carbs. The fresh vegetables add fiber and vitamins. Each serving helps keep you satisfied and energized. Choose chicken that is cooked and shredded. Look for firm cucumbers with smooth skin. Select bright cherry tomatoes without blemishes. Red onions should feel heavy and firm. For olives, pick those packed in brine. Fresh dill should smell strong and vibrant. Always check the expiration dates on yogurt. Fresh ingredients give the best flavor and nutrition. {{ingredient_image_2}} Start by gathering all your ingredients. You need cooked chicken breast, Greek yogurt, cucumber, cherry tomatoes, red onion, Kalamata olives, fresh dill, lemon juice, garlic powder, salt, and pepper. Make sure your chicken is shredded and your veggies are chopped. This makes mixing easier. In a large bowl, mix the shredded chicken with the Greek yogurt. Stir until it’s creamy. Next, add the diced cucumber, halved cherry tomatoes, finely chopped red onion, and sliced Kalamata olives. Gently mix everything together. You want the chicken and yogurt to coat the veggies evenly. Now, add the fresh dill, lemon juice, garlic powder, and a pinch of salt and pepper. Stir gently again. It’s important to taste your salad. If you want more flavor, add extra lemon juice or salt. Once you’re happy with the taste, cover the bowl with plastic wrap. Chill in the fridge for at least 30 minutes. This lets the flavors blend well. Enjoy your tasty Greek Yogurt Chicken Salad! To save time, use store-bought rotisserie chicken. It cuts your prep time in half. Shred the chicken while still warm for easier handling. Prepare the salad in advance. Let it chill for at least 30 minutes to blend flavors. This makes it perfect for busy days. To boost creaminess, mix in more Greek yogurt. A little extra yogurt can enhance the texture. You can also blend in a touch of avocado for richness. This adds a healthy fat too. If you like a hint of sweetness, add a small spoon of honey. Serve your chicken salad on a bed of greens for a fresh touch. It also works great as a sandwich filling in pita bread. For a crunchy element, add nuts or seeds on top. You can even pair it with a side of whole-grain crackers. Enjoy your meal with a sprinkle of fresh herbs for added flavor. Pro Tips Chill for Flavor: Allowing the chicken salad to chill for at least 30 minutes in the refrigerator not only enhances the flavors but also improves the overall texture. Customize Your Veggies: Feel free to add other vegetables like bell peppers or carrots for added crunch and nutrition. Herb Variations: If you don’t have fresh dill, try using fresh parsley or basil for a different flavor profile. Protein Alternatives: This recipe works great with canned tuna or chickpeas for a quick and easy variation. {{image_4}} You can customize your Greek yogurt chicken salad with different vegetables. Try adding bell peppers for crunch. Carrots add a nice sweetness. You can also use sweet corn for a pop of color. Spinach or arugula can make it greener and fresher. Just chop them up and mix them in. Get creative and use what you have! Not a fan of chicken? No problem! You can swap chicken for tuna or chickpeas. Canned tuna saves time and is full of protein. Chickpeas are great for a vegetarian option. Both add flavor and texture. You can even try diced hard-boiled eggs for a twist. Each option makes the salad unique. Boost the flavor with some tasty add-ins. Try a spoonful of Dijon mustard for tang. A splash of hot sauce adds heat if you like spice. You can also mix in some feta cheese for a salty kick. Fresh herbs like parsley or basil give it a bright touch. Experiment and find your favorite flavor! To keep your Greek yogurt chicken salad fresh, store it in the fridge. Place it in a bowl and cover it tightly. You can use plastic wrap or a lid. The salad stays good for 3 to 4 days. Always check for any off smells or changes in color before eating. You can freeze Greek yogurt chicken salad, but it may change in texture. The yogurt can become watery when thawed. If you want to freeze it, store it in an airtight container. It’s best to eat it within 1 to 2 months. When ready to eat, let it thaw in the fridge overnight. Use glass or plastic containers with tight lids for storage. They help keep the salad fresh. Glass containers are great because they won’t stain. Look for containers that are BPA-free. If you are freezing, ensure they can handle cold temperatures. To make this chicken salad dairy-free, you can swap Greek yogurt for dairy-free yogurt. Look for brands made from almond, coconut, or soy. Make sure it is plain and unsweetened. You can also use mashed avocado for creaminess. It adds a nice flavor and healthy fats. Yes, you can prepare Greek Yogurt Chicken Salad in advance. It tastes even better after chilling. Make it at least 30 minutes before serving. You can store it in the fridge for up to three days. Just keep it in an airtight container. Some great sides for Greek Yogurt Chicken Salad include: - Fresh leafy greens - Whole grain pita bread - Crunchy carrot sticks - Sliced bell peppers - A light fruit salad These sides add color and nutrients to your meal. This blog post covered key ingredients and how to prepare a tasty Greek yogurt chicken salad. We looked at fresh ingredient tips, step-by-step preparation, and time-saving tricks. I shared ideas for variations and best practices for storage. Remember, good food starts with quality. Enjoy creating your own delicious chicken salad, and don’t hesitate to make it your own!

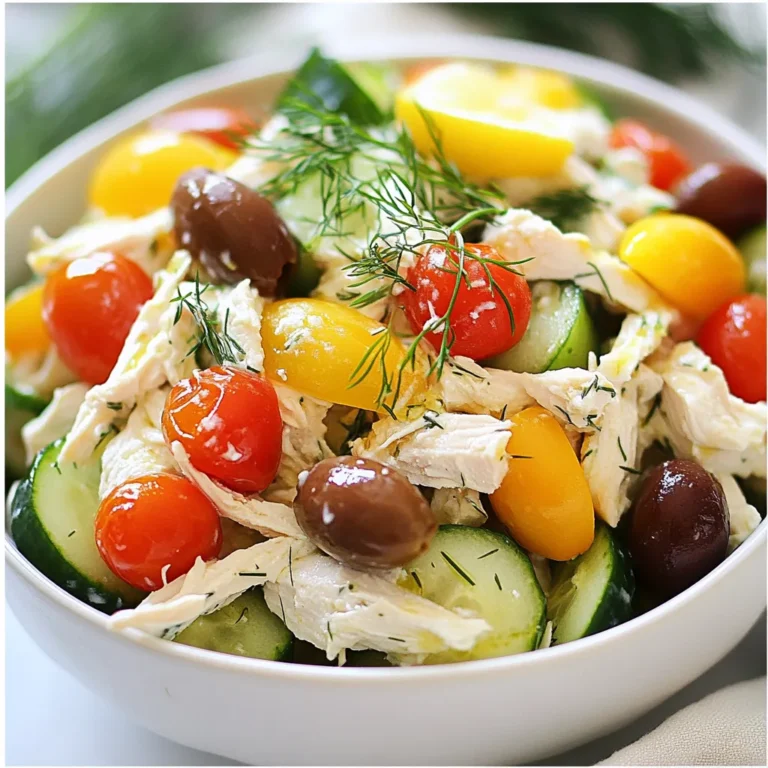
Greek Yogurt Chicken Salad Healthy and Tasty Meal

- 4 boneless, skinless chicken breasts - 1 cup fresh spinach, finely chopped - 1 cup canned artichoke hearts, drained and roughly chopped - 1 cup cream cheese, softened - ½ cup sour cream - 1 cup shredded mozzarella cheese - 2 cloves garlic, minced - 1 teaspoon onion powder - Salt and pepper to taste - 2 tablespoons olive oil - ¼ teaspoon red pepper flakes (optional) - Fresh parsley, chopped For this creamy spinach artichoke chicken, I use simple and fresh ingredients. The chicken breasts give a nice base. The spinach and artichokes add color and flavor. Cream cheese and sour cream create a rich sauce. Shredded mozzarella melts beautifully on top. Fresh garlic and onion powder enhance the taste. Salt and pepper make everything pop. Olive oil helps to sear the chicken. Red pepper flakes give a hint of heat, but you can skip them if you prefer mild dishes. Lastly, fresh parsley brightens up the dish, adding a touch of color and freshness. {{ingredient_image_2}} - Preheat oven to 375°F (190°C). - In a bowl, mix cream cheese and sour cream until smooth. - Fold in spinach, artichokes, garlic, onion powder, salt, pepper, and red pepper flakes. - Heat olive oil in an oven-safe skillet over medium-high heat. - Sear chicken breasts for about 5 minutes on each side. - Once browned, remove chicken and set aside. - Pour the creamy spinach-artichoke mixture into the skillet. - Nestle chicken breasts back in the skillet and top with mozzarella cheese. - Cover the skillet with a lid or foil. - Bake for 20-25 minutes until chicken reaches 165°F (75°C). - For a crispy finish, uncover and broil for 2-3 minutes. How to avoid overcooking the chicken To avoid dry chicken, watch the cooking time closely. Sear each side for about five minutes. This creates a nice golden crust. Use a meat thermometer to check doneness. The chicken should reach 165°F (75°C) inside. If you have a thick piece, it may need a bit longer. Always remember to let it rest before serving. Tips for achieving the best creamy texture For a smooth creamy texture, make sure the cream cheese is soft. Let it sit at room temperature before mixing. When you blend it with sour cream, stir well until there are no lumps. Adding the spinach and artichokes should be done gently. This keeps the mixture airy and light. If you want extra creaminess, consider adding a splash of milk or heavy cream. What to serve with Creamy Spinach Artichoke Chicken This dish pairs great with fluffy rice or pasta. The sauce soaks into the grains beautifully. You can also serve it with roasted vegetables for a balanced meal. A fresh salad on the side adds crunch and color. Try a simple garden salad or a Caesar salad for a nice touch. Garnishing ideas with fresh herbs Fresh parsley adds a bright touch. Sprinkle it on before serving for a pop of color. You might also try basil or chives for a different flavor. Just chop them finely and sprinkle on top. This makes the dish look fancy and fresh! Pro Tips Use Fresh Ingredients: Whenever possible, opt for fresh spinach and artichoke hearts for a vibrant flavor and better texture in your dish. Perfectly Cooked Chicken: Use a meat thermometer to ensure your chicken reaches an internal temperature of 165°F (75°C) for juicy and tender results. Customize the Heat: Adjust the amount of red pepper flakes to suit your taste, or substitute with fresh jalapeños for a different twist. Rest Before Serving: Allow the dish to rest for a few minutes after baking; this helps the flavors meld and makes for easier serving. {{image_4}} You can swap chicken for other proteins. Try using turkey or pork. If you want to go meatless, mushrooms work great. They add a nice texture and soak up flavors well. You can use portobello or cremini mushrooms for a hearty bite. To add more flavor, consider using spices like garlic powder, paprika, or even a dash of lemon zest. Fresh herbs like thyme or basil can elevate the dish. For the creaminess, try different cheeses. Creamy goat cheese or sharp cheddar gives a unique twist. Just remember to adjust the salt since some cheeses are saltier. To keep your Creamy Spinach Artichoke Chicken fresh, store it in an airtight container. Make sure to cool it down first before sealing it up. This helps lock in flavors and moisture. Place the container in the fridge right away. Your leftovers will stay good for about 3 to 4 days. When you're ready to enjoy your leftovers, use the oven or a microwave to reheat. For the oven, preheat it to 350°F (175°C). Place the chicken in a baking dish and cover it with foil. This keeps the chicken moist while it warms up. Bake for about 15 to 20 minutes or until it’s hot. In the microwave, use a microwave-safe dish and cover it loosely. Heat in short bursts of 1 to 2 minutes. Stir halfway through to ensure even heating. If you want to keep it creamy, add a splash of water or broth. This will help prevent it from drying out. Enjoy your tasty dish again! How do I know when the chicken is cooked? You can check the chicken with a meat thermometer. It should reach 165°F or 75°C. This ensures that it is safe to eat. If you don't have a thermometer, cut into the chicken. The meat should be white, not pink. Can I make this dish ahead of time? Yes, you can prepare the creamy spinach-artichoke mixture a day before. Just store it in the fridge. You can also sear the chicken ahead of time. When ready, combine and bake it as directed. Is it possible to use frozen spinach? Absolutely! Frozen spinach works well. Just make sure to thaw and drain it first. This helps avoid excess water in the dish. What can I substitute for mozzarella cheese? You can use provolone, gouda, or cheddar cheese. Each gives a different flavor. Choose one that you enjoy! Is this dish suitable for meal prep? Yes, this dish is great for meal prep. Store portions in airtight containers. It stays fresh in the fridge for about 3-4 days. Just reheat when ready to eat. This blog post showed you how to make Creamy Spinach Artichoke Chicken. You learned about the essential ingredients and step-by-step instructions. I shared tips to perfect your dish and suggestions for leftovers. You can even try fun variations with different proteins or flavors. Cooking should be enjoyable and rewarding. I hope you feel ready to create this dish. Enjoy the rich flavors and share it with friends and family!

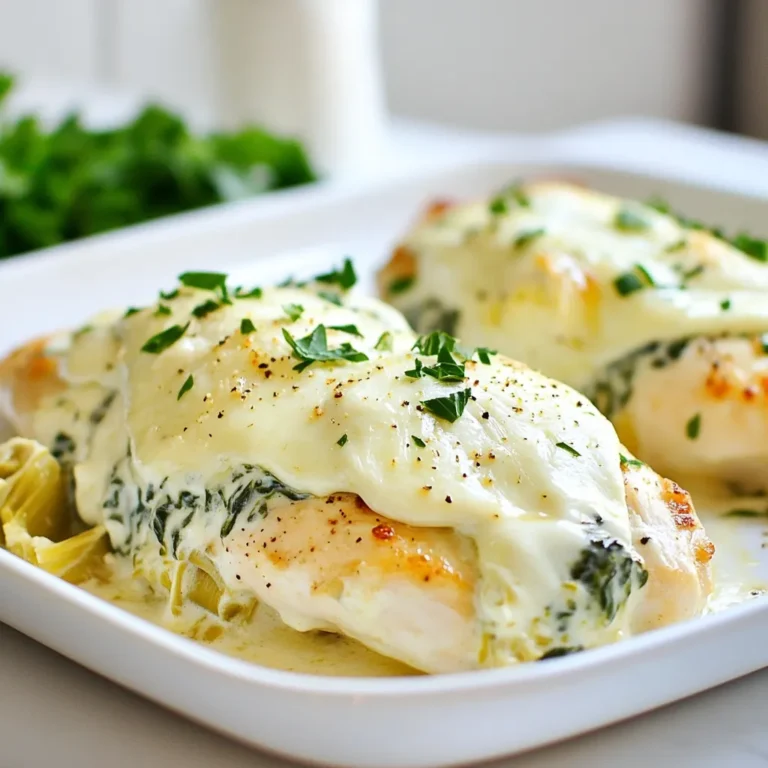
Creamy Spinach Artichoke Chicken Delightful Dish

- 2 cups cooked quinoa - 1 pound boneless, skinless chicken thighs, diced - 2 cups corn kernels - 1 medium red bell pepper, diced - 1/4 cup red onion, finely chopped - 1 ripe avocado, diced - 1 teaspoon chili powder - 1/2 teaspoon ground cumin - Juice of 1 lime - Optional: Tangy yogurt sauce (1/2 cup yogurt, juice of 1 lime, 1/4 teaspoon garlic powder, pinch of salt) The Flavor-Packed Street Corn Chicken Bowl is full of fresh and tasty ingredients. For the main part, I use quinoa, chicken thighs, and corn kernels. Quinoa is a great base. It adds protein and fiber. Chicken thighs bring a juicy texture and rich taste. Corn kernels add sweetness and crunch. Next, I add colorful veggies. Diced red bell pepper gives a nice pop of color and flavor. The red onion adds a slight bite that balances the dish. Lastly, diced avocado makes it creamy and smooth. For seasonings, I keep it simple yet bold. Chili powder brings warmth, while cumin adds depth. Fresh lime juice brightens everything. If you want, try the optional yogurt sauce for an extra tangy kick. These ingredients work together to create a satisfying bowl. Each bite is a burst of flavor. You will love how easy it is to put together! {{ingredient_image_2}} Sautéing chicken gives it a nice flavor. Start by heating olive oil in a large skillet over medium-high heat. Once the oil is hot, add diced chicken thighs. Sprinkle chili powder, cumin, salt, and pepper on the chicken. Cook for about 6-8 minutes. The chicken is ready when it reaches 165°F and is golden brown. After cooking, let the chicken rest for a moment. This keeps it juicy. Next, it's time for the veggies. In the same skillet, add corn kernels without cleaning it. Sauté the corn over medium heat for about 3-5 minutes. Stir occasionally to get a nice char. When the corn starts to brown, add diced red bell pepper and chopped red onion. Cook for 1-2 minutes. The bell pepper should be soft but still crunchy. Now, we build the bowl. Begin with cooked quinoa as the base. Spread it evenly at the bottom of a large serving bowl. Next, layer the sautéed chicken mixture on top of the quinoa. Then, add the charred corn, bell pepper, and onion mix. Scatter diced avocado over everything. Finish by sprinkling crumbled queso fresco on top. Squeeze fresh lime juice over the bowl for a tangy kick. Finally, add chopped cilantro for a bright touch. For a beautiful display, serve in shallow dishes. Add lime wedges and extra cilantro on the side for a colorful touch. Enjoy this tasty meal! Suggested Seasoning Adjustments For a richer taste, try adding smoked paprika or garlic powder. These spices bring extra depth. You can also adjust the chili powder for more heat or sweetness. Taste as you go to find your perfect mix. Choosing Fresh vs. Frozen Ingredients Fresh corn is sweet and juicy. If it’s out of season, frozen corn works well too. Choose frozen kernels that are bright and intact for the best flavor. Canned corn can be used but rinse it to reduce salt. Fresh veggies like bell peppers and onions add crunch. Skillet vs. Grill Cooking Methods Using a skillet gives you control over heat and timing. It’s easy to get that golden brown color on your chicken. Grilling adds a smoky flavor, so try both methods to see which you prefer. Timing for Perfect Texture Cook chicken until it reaches 165°F. This ensures it’s safe and juicy. For corn, sauté until it starts to char. This adds a nice flavor. Bell peppers should be soft but still crisp when done. Pairing Side Dishes This bowl is filling on its own, but you can serve it with a simple salad or tortilla chips. A fresh salsa or guacamole adds a nice touch. Creative Serving Ideas Serve in shallow bowls to show off the layers. Garnish with extra cilantro and lime wedges on the side. You can also use tortilla bowls for added crunch. Enjoy making it your own! Pro Tips Cook Quinoa Perfectly: To achieve fluffy quinoa, rinse it under cold water before cooking to remove bitterness and use a 2:1 water-to-quinoa ratio. Marinate for Flavor: For added depth, marinate the diced chicken in lime juice, chili powder, and cumin for at least 30 minutes before cooking. Customize Your Veggies: Feel free to swap out the bell pepper and onion for other favorites like zucchini or cherry tomatoes to suit your taste. Make It Ahead: This dish can be prepped in advance! Store each component separately and combine when ready to serve for optimal freshness. {{image_4}} Substituting Chicken with Other Meats You can swap chicken for other proteins. Try diced pork or shrimp for a change. Ground turkey or beef adds a nice twist too. Just adjust cooking times for each meat. Vegetarian/Vegan Options For a veggie option, use black beans or chickpeas. Tofu or tempeh works well too. Cook them with the same spices for great flavor. This makes the dish hearty and satisfying. Different Grains to Use Quinoa is great, but you can use brown rice or farro instead. Both give a nice texture. For a lighter option, try cauliflower rice. It’s low in carbs but still filling. Customizable Toppings and Additions Feel free to mix in other veggies. Cherry tomatoes, spinach, or jalapeños can add color and taste. You can also use different cheeses, like feta or cheddar. Go wild with your favorite toppings! How to Add Heat Want more spice? Add diced jalapeños or a pinch of cayenne pepper. You can also use hot sauce as a drizzle. Adjust to your taste for the perfect kick. Mild Variants of This Dish If you like it mild, skip the chili powder. Use sweet paprika instead for flavor without the heat. You can also increase lime juice for a fresh taste without spice. - Best Practices for Refrigeration: Place any leftovers in an airtight container. Make sure to cool the bowl to room temperature before sealing. Store it in the fridge for up to three days. This keeps the flavors fresh and safe to eat. - Freezing Instructions: If you want to save the bowl for longer, you can freeze it. Use freezer-safe bags or containers. Remove as much air as possible before sealing. The bowl can freeze well for up to three months. Just remember, the texture of some veggies may change after thawing. - Tips for Keeping Ingredients Fresh: When you reheat, do so slowly. This helps keep flavors intact. If possible, reheat only the portion you plan to eat. This way, the rest stays fresh longer. - Methods for Reheating the Bowl: You can use a microwave or a skillet. For the microwave, cover the bowl with a damp paper towel. Heat in short bursts, stirring in between. For a skillet, add a splash of water to the pan and cover it. Heat on low until warmed through. - Duration for Best Quality: For the best taste, eat leftovers within three days if refrigerated. If frozen, aim to consume within three months for best quality. - Signs of Spoilage: Look for off smells, changes in color, or a slimy texture. If you notice any of these signs, it's best to discard the leftovers. Always trust your senses when it comes to food safety. A Street Corn Chicken Bowl is a fun and tasty meal. It mixes chicken, corn, quinoa, and fresh toppings. This dish comes from the popular street food called elote, which features grilled corn on the cob. People love this bowl for its vibrant colors and bold flavors. The blend of spices adds a kick, while the creamy avocado and cheese balance it out. You get a complete meal in one bowl! You can make this recipe ahead of time. It is great for meal prep! Cook the quinoa and chicken, then store them separately. Keep the veggies in a sealed container in the fridge. You can mix everything together just before serving. This way, it stays fresh and tasty. Reheat the chicken and quinoa when you are ready to eat. You can serve several dishes with a Street Corn Chicken Bowl. Consider adding tortilla chips for crunch. A fresh green salad pairs well, too. You might also like grilled veggies or a zesty salsa on the side. For a fun twist, try some black beans or refried beans. These sides will enhance the meal and make it even more filling. This article covered how to make a Street Corn Chicken Bowl. We discussed the main ingredients like quinoa and chicken thighs, along with various vegetables. You learned the steps to cook chicken and veggies, plus how to layer your bowl for a nice look. I shared tips for flavor and cooking, along with storage advice. Try different proteins and spices to make this dish yours. Enjoy creating your unique version of this fun meal!

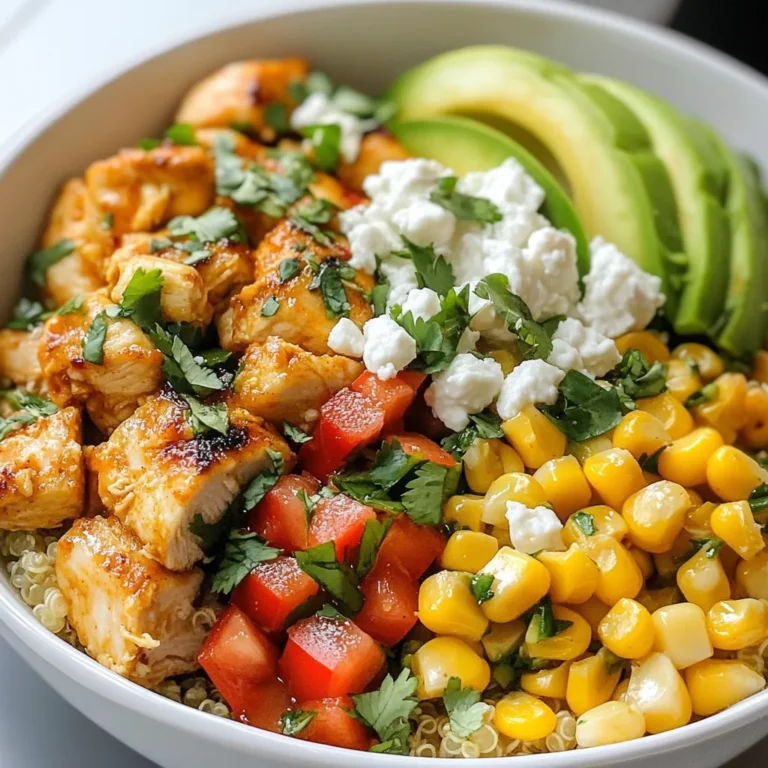
Flavor-Packed Street Corn Chicken Bowl Simple Recipe

- 2 cups cooked white rice - 1 lb boneless, skinless chicken thighs, diced - 1 cup corn kernels (fresh, frozen, or canned) - 1 red bell pepper, diced - 1 small red onion, finely chopped - 2 cloves garlic, minced - 1 teaspoon smoked paprika - 1 teaspoon ground cumin - 2 tablespoons olive oil - 1 tablespoon fresh lime juice - 1/4 cup fresh cilantro, chopped - 1/2 cup feta cheese, crumbled - Salt and pepper to taste - Optional: slices of avocado, lime wedges, and tortilla chips for serving I love using brands that focus on quality. For chicken, I recommend buying organic or free-range options if available. They taste better and are often more humane. For corn, I prefer frozen kernels. They are sweet and easy to use. If you can't find feta cheese, queso fresco works well too. It gives a similar creamy flavor. When choosing fresh ingredients, look for bright colors and firm textures. For peppers, they should feel heavy and have smooth skin. Corn should smell sweet and have a nice golden color. For herbs like cilantro, check that the leaves are vibrant and not wilting. Fresh garlic should be firm with no soft spots. Always check expiration dates on packaged items for the best taste. {{ingredient_image_2}} First, heat 1 tablespoon of olive oil in a large skillet over medium heat. Once hot, add the diced chicken thighs. Season the chicken with smoked paprika, cumin, salt, and pepper. Cook for 5-7 minutes until the chicken turns golden brown. When done, take the chicken out and set it aside. Next, in the same skillet, add the other tablespoon of olive oil. Toss in the chopped red onion and minced garlic. Stir often for about 2-3 minutes until the onions become translucent. Now, add the diced red bell pepper and corn kernels. Sauté this mix for another 3-4 minutes. You want the vegetables to soften and their flavors to come alive. Return the cooked chicken to the skillet. Stir to mix it with the veggies. Drizzle fresh lime juice over everything and mix well to combine all the flavors. To serve, divide the cooked white rice into serving bowls. Top each bowl with the chicken and vegetable mix. Make sure to distribute it evenly. Finally, garnish with fresh cilantro and crumbled feta cheese. For extra flair, add slices of avocado and lime wedges. Serve with tortilla chips for a nice crunch. Prep time is about 15 minutes, and the total cooking time is 30 minutes. Use medium heat to cook the chicken and vegetables. Stir often to prevent sticking and burning. Make sure the chicken is cooked through. The internal temperature should reach 165°F. This ensures it is safe and tender. One mistake is overcooking the chicken. Watch it closely so it stays juicy. Another mistake is not seasoning enough. Seasoning brings out the flavors. Don’t skip the salt and pepper. Lastly, avoid cooking on high heat. This can burn the garlic and onion. Medium heat gives the best results. To make the best chicken, use boneless, skinless thighs. They stay juicy and tender. Season the chicken well with smoked paprika and cumin. This adds depth to the taste. Cook the chicken over medium heat to avoid burning. Make sure all pieces are golden brown. This should take about 5-7 minutes. Remove the chicken once it's fully cooked. This keeps it moist and flavorful. Brighten up your dish with fresh lime juice. It adds a zesty kick! Use fresh corn kernels if you can. They give a sweet crunch. Adding diced red bell pepper boosts color and nutrition. Don’t skip the feta cheese; it adds creaminess. You can also mix in some avocado slices for extra richness. For a spicy twist, add jalapeños or chili powder. To serve, start with a base of cooked white rice. This helps soak up all the flavors. Top the rice with the chicken and veggie mix. Make it look colorful! Sprinkle fresh cilantro on top for a pop of green. Crumbled feta cheese adds a nice finish. Serve with lime wedges and tortilla chips on the side. This gives your dish a fun crunch! Pro Tips Use Fresh Corn: Fresh corn adds a sweet and crisp texture to the dish. If using frozen or canned corn, make sure to drain and rinse it to remove any excess sodium. Marinate the Chicken: For even more flavor, consider marinating the chicken thighs in lime juice, garlic, and spices for 30 minutes before cooking. Customize Your Toppings: Feel free to add your favorite toppings such as jalapeños, sour cream, or hot sauce to customize your bowls to your taste. Serve with Tortilla Chips: The crunch of tortilla chips complements the creamy feta and the tender chicken, making for a delightful textural contrast in each bite. {{image_4}} You can easily make this dish vegetarian or vegan. Swap the chicken for diced firm tofu or tempeh. Both add great texture and soak up flavors well. Use vegetable broth instead of chicken broth for a richer taste. Instead of feta cheese, try a vegan cheese or avocado for creaminess. This makes the dish plant-based while still being filling and tasty. If you want to change the protein, there are many choices. Shrimp or fish can add a fun twist. Cook the shrimp until pink, or grill the fish for a smoky flavor. You can also use beans, like black beans or chickpeas. They add protein and fiber, making the dish hearty and satisfying. For a spicy kick, add jalapeños or a dash of hot sauce. You can mix in some chili powder or cayenne pepper when cooking the chicken. If you prefer a sweet touch, add a tablespoon of honey or maple syrup. This balance of sweet and savory will delight your taste buds. Feel free to experiment with spices and toppings to find your perfect flavor. To store leftovers, let the bowls cool first. Place the rice and chicken mix in airtight containers. Keep the toppings, like cilantro and feta, separate. This keeps everything fresh. Store in the fridge for up to three days. For freezing, use freezer-safe containers. Cool the dish before placing it inside. Don’t freeze the fresh toppings—add those later. The bowls can last up to three months in the freezer. When ready to eat, thaw in the fridge overnight. Reheat leftovers in a microwave or on the stove. If using a microwave, cover the bowl to keep moisture. Heat in intervals of 1-2 minutes, stirring in between. On the stove, warm over low heat until hot. Add a splash of lime juice for extra flavor. Enjoy your tasty meal! You can serve many tasty sides with these bowls. Here are some ideas: - Slices of avocado add creaminess. - Lime wedges brighten the dish. - Tortilla chips give a crunchy texture. - A fresh salad can balance the meal. - Mexican-style beans offer extra protein. These sides make your meal more fun and flavorful. Meal prep is easy with this recipe. Here are some quick tips: - Cook the chicken and veggies ahead of time. - Store them in separate containers. - Cook the rice in advance too. - Keep all items in the fridge. When ready to eat, just heat and combine. This saves time during busy days. Yes, you can make this dish ahead of time. Here’s how: - Prepare the chicken and veggies a day before. - Store them in the fridge in an airtight container. - Cook the rice fresh for best taste. You can also freeze the chicken and veggies. Just thaw them in the fridge overnight before reheating. This dish tastes great even after a day or two! In this post, we covered the key elements for cooking amazing Street Corn Chicken Rice Bowls. We discussed essential ingredients, cooking steps, and common mistakes to avoid. I shared tips for perfecting flavors and presentation. Then, we explored variations for different diets and preferences. Finally, we talked about how to store leftovers and reheating tips. By using this guide, you can make a great dish that everyone will love!

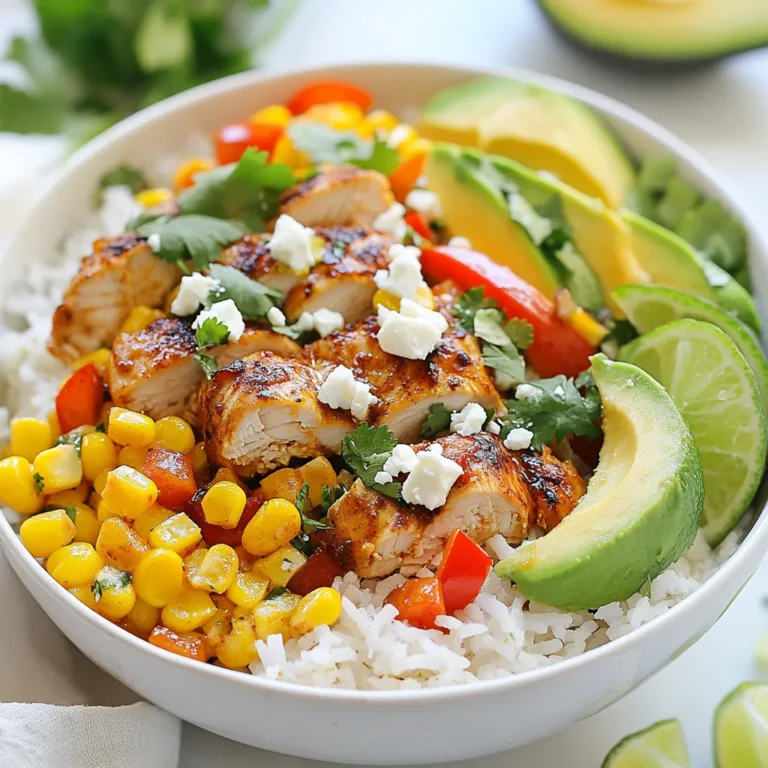
Savory Street Corn Chicken Rice Bowls Delight

- 1 lb sirloin steak, cut into bite-sized cubes - 4 tablespoons unsalted butter - 4 cloves garlic, finely minced - 1 teaspoon fresh rosemary, chopped (or ½ teaspoon dried) - 1 teaspoon fresh thyme, chopped (or ½ teaspoon dried) For this dish, I start with sirloin steak. It is tender and has great flavor. Cut it into small cubes. This helps it cook evenly and quickly. Next, I use unsalted butter. It adds richness and helps the garlic cook perfectly. Speaking of garlic, I use four cloves. Minced garlic gives a strong, savory taste. Fresh herbs like rosemary and thyme bring a nice aroma and depth to the dish. - Salt and freshly ground pepper to taste - 1 tablespoon olive oil - Fresh parsley, finely chopped (for garnish) Seasoning is key. I use salt and freshly ground pepper. This enhances the steak's taste. Olive oil helps to sear the meat in the skillet. Finally, I garnish with fresh parsley. It adds color and a fresh touch to the dish. When you plate it, the bright green looks beautiful against the rich steak. {{ingredient_image_2}} First, you need to dry the steak cubes. Use paper towels to pat them dry. This step helps the meat sear nicely. If the beef is wet, it will steam instead of brown. Next, season the steak cubes with salt and pepper. Make sure to coat every piece well. Proper seasoning brings out the best flavor in your steak bites. Now, let’s heat the skillet. Place a large skillet on medium-high heat and add olive oil. Wait until the oil shimmers. This means it's hot enough for the steak. Carefully add the seasoned steak cubes in a single layer. Do not overcrowd the pan; this helps with browning. Sear the steak for about 2-3 minutes without stirring. You want a golden crust on the bottom. Once the first side is browned, use tongs to flip the steak bites. Cook for another 2-3 minutes until both sides are seared. Now, reduce the heat to medium. Add the butter, minced garlic, chopped rosemary, and thyme to the skillet. This will add rich flavor to the steak. To check for doneness, insert a meat thermometer into the thickest piece. For medium-rare, aim for about 130°F (54°C). If the steak is not done, cook for another minute or two. Once cooked, remove the skillet from heat. Sprinkle freshly chopped parsley over the steak bites for a pop of color. Serve hot and enjoy this delicious dish! To get that nice, brown crust on your steak bites, use a hot skillet. I like to heat my skillet over medium-high heat. When the oil shimmers, it's ready. - Skillet tips for browning: Make sure your skillet is very hot. This helps to sear the meat quickly. If your pan is not hot enough, the steak will steam instead of brown. - Avoiding overcrowding: Cook the steak in batches. If you put too many pieces in at once, they won’t sear well. Leave space between the cubes to let the heat move around. Garlic and herbs are key to this dish, but feel free to mix it up! - Other herbs to experiment with: You can try adding oregano or basil for a twist. Fresh herbs bring bright flavors to your steak. - Adjusting seasoning to taste: Always taste your steak bites as you cook. You can add more salt or pepper if needed. A little extra seasoning can make a big difference! How you serve your steak bites can make them even more appealing. - Ideal pairings and sides: Try serving these bites with a fresh salad or some roasted vegetables. A creamy mashed potato also makes a great side. - Presentation ideas: Arrange the steak on a nice platter. Add toothpicks for easy eating. Drizzle some garlic butter sauce on top for a fancy touch. Fresh parsley adds a pop of color, too! Pro Tips Pat the Steak Dry: Ensuring the steak is dry before seasoning helps achieve a perfect sear, locking in the juices and enhancing flavor. Don’t Overcrowd the Pan: Cooking the steak bites in a single layer allows for even browning; overcrowding can lead to steaming instead of searing. Watch the Garlic: Add the garlic only after the steak has been seared to prevent burning, which can make it taste bitter. Use a Meat Thermometer: For perfect doneness, use a meat thermometer to check the internal temperature, ensuring juicy and tender steak bites. {{image_4}} You can use other cuts of steak for this recipe. Sirloin is great, but you can also try ribeye or filet mignon. Each cut has its own taste and texture. - Ribeye: This cut has more fat, giving it a rich flavor. It stays juicy but can be a bit greasy. - Filet Mignon: Known for its tenderness, this cut cooks quickly. It lacks fat, so add a bit more butter for flavor. Adding sauces or marinades can change the taste of your steak bites. Here are a few ideas: - Teriyaki Sauce: This adds a sweet and salty touch. Marinate the steak for 30 minutes before cooking. - Chimichurri: This herb sauce brings a fresh and zesty flavor. Drizzle it on top before serving. If you like heat, consider using spices: - Cayenne Pepper: A little goes a long way. It adds warmth without overpowering. - Red Pepper Flakes: Sprinkle these in the skillet while cooking for a nice kick. You can make this dish fit different diets too. - Gluten-Free Options: All the main ingredients are naturally gluten-free. Just check any sauces for hidden gluten. - Vegetarian or Vegan Alternatives: Swap steak for mushrooms or tofu. Use vegan butter for the sauce to keep it plant-based. Feel free to get creative! Your garlic butter steak bites can be just how you like them. To keep your garlic butter steak bites fresh, you can store them easily. - Refrigeration guidelines: Place the cooled steak bites in an airtight container. They will stay good for about 3 to 4 days in the fridge. Make sure to let them cool before sealing, to avoid moisture buildup. - Freezing the steak bites: If you want to keep them longer, freezing is a great option. Use a freezer-safe bag or container. Label it with the date. They can last up to 3 months in the freezer. To prevent freezer burn, remove as much air as possible. Reheating your steak bites correctly keeps them tasty and juicy. - Best practices for reheating: The best way to reheat is in a skillet. Heat the skillet over low to medium heat. Add a little butter or olive oil. This helps regain moisture and flavor. Stir gently and heat until warm. - Avoiding loss of flavor or texture: Avoid using a microwave, as it can make the steak chewy. If you must use a microwave, cover the steak bites with a damp paper towel. This helps keep them moist, but the texture may still change. Always aim for gentle reheating to keep that delicious garlic butter taste. How do I know when steak bites are done? To check if steak bites are done, use a meat thermometer. For medium-rare, aim for about 130°F (54°C). If you don’t have a thermometer, cut a piece in half. The inside should be warm and red, not cold or grey. Can I use frozen steak for this recipe? Yes, you can use frozen steak, but thaw it first. Defrost it in the fridge overnight. This step helps achieve a nice sear. Cooking frozen steak directly can lead to uneven cooking and less flavor. What if I don’t have a skillet? If you lack a skillet, use a grill or a broiler. A grill works well and adds a smoky taste. A broiler can also cook the steak bites quickly. Just watch them closely to prevent burning. How to achieve medium-rare steak? For medium-rare steak, sear the bites for 2-3 minutes on each side. After flipping, reduce heat, add butter, and let them cook for another 1-2 minutes. Check the internal temperature to ensure it reaches 130°F (54°C). Can I use butter alternatives? You can use olive oil or ghee if you need a butter substitute. They will add different flavors but still keep your steak juicy. Try using flavored oils for an extra kick. Best herbs for garlic butter steak bites? Rosemary and thyme are great choices for these steak bites. You can also try oregano or sage for a twist. Fresh herbs enhance the dish’s flavor and aroma beautifully. You learned how to make tasty steak bites with simple ingredients. We discussed preparing the steak, cooking techniques, and tips for the perfect sear. Don't forget to explore different cuts and flavors to make it your own. Proper storage and reheating are key for enjoying leftovers. Experiment with herbs or sauces to create new dishes, too. Enjoy your cooking journey, and let your steak bites shine at every meal!

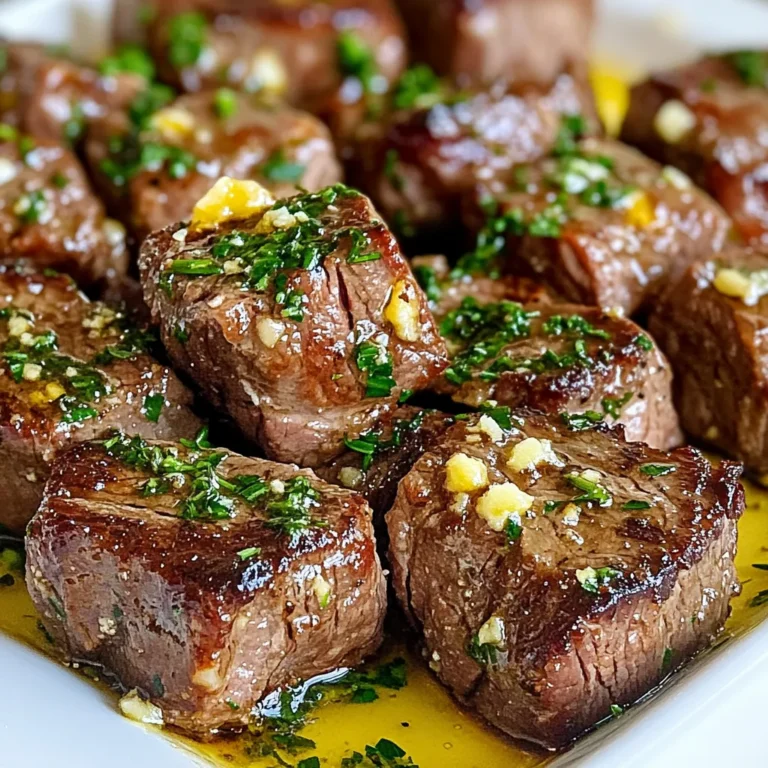
Garlic Butter Steak Bites Savory Flavor for Dinner

PREV 1 … 13 14 15 … 18 NEXT
feastful focus

explore

DessertsDinnerAppetizersDrinks

Our Policies

  • Cookie Policy
  • Copyright Policy
  • Disclaimer
  • GDPR Policy
  • Terms Of Use
Back to Top
  • About
  • Contact Us
  • Privacy Policy
© 2025 feastful focus