FREE DINNER EBOOK! Get your copy!
  • Cookie Policy
  • GDPR Policy
  • Disclaimer
  • Terms Of Use
  • Visit my other site: Fun Cookie Recipes
feastful focus
  • Home
  • Dinner
  • Desserts
  • Drinks
  • Appetizers
  • Contact
  • About
  • Privacy Policy
  • Home
  • Dinner
  • Desserts
  • Drinks
  • Appetizers
  • Contact
  • About
  • Privacy Policy
  • Cookie Policy
  • GDPR Policy
  • Disclaimer
  • Terms Of Use
Visit my other site: Fun Cookie Recipes

HOME / CATEGORIES /

Latest

- 2 medium zucchinis - 1 cup panko breadcrumbs - 1/2 cup freshly grated Parmesan cheese - 1 teaspoon garlic powder - 1 teaspoon dried oregano - 1/2 teaspoon fine sea salt - 1/4 teaspoon freshly cracked black pepper - 2 large eggs - Cooking spray or olive oil for greasing The main ingredients bring the dish to life. Zucchini is fresh and light, while panko breadcrumbs add crunch. Parmesan cheese gives a rich flavor that everyone loves. Next, the seasoning ingredients are vital. Garlic powder adds a savory kick. Dried oregano brings a nice herbal touch. Sea salt and black pepper enhance all the other flavors. The binding ingredient is just as important. Beating the eggs helps the crumbs stick to the zucchini. This makes sure each slice has a crispy coat. For extra crispiness, you can use cooking spray or olive oil. A light spray or drizzle helps achieve that golden brown look. It makes the zucchini even more tempting! {{ingredient_image_2}} Start by preheating your oven to 425°F (220°C). This high heat helps the zucchini get crispy. Next, line a baking sheet with parchment paper. This makes cleanup easy and helps the zucchini not stick. In a shallow bowl, combine 1 cup of panko breadcrumbs with the seasonings. Add 1/2 cup of grated Parmesan cheese, 1 teaspoon of garlic powder, 1 teaspoon of dried oregano, 1/2 teaspoon of fine sea salt, and 1/4 teaspoon of black pepper. Mix it well. This coating adds crunch and flavor to the zucchini. In another bowl, crack 2 large eggs and whisk them until they are frothy. This frothiness helps the coating stick to the zucchini slices. Take each zucchini slice and dip it into the beaten eggs. Let any extra egg drip back into the bowl. Then, dredge it in the breadcrumb mixture. Press down gently to coat well. Repeat this for all the slices. Lay the coated zucchini slices on the prepared baking sheet in a single layer. Make sure they do not overlap. This helps them cook evenly and stay crispy. Now, place the baking sheet in your preheated oven. Bake the zucchini for 20-25 minutes. Halfway through, turn the slices to ensure they brown evenly. They should turn a lovely golden brown when done. Once baked, let them cool slightly on the sheet before serving. This enhances their crunchiness. To get that perfect crunch, you need olive oil or cooking spray. These help the zucchini brown nicely. When you coat the slices, don’t skip this step. A light spray or drizzle makes a big difference. It creates a beautiful golden crust that makes the zucchini so tempting. For a stunning presentation, serve your crispy zucchini on a bright platter. Add a lemon wedge for color and a fresh taste. You can also drizzle balsamic reduction over the top. This adds sweetness and a touch of elegance. Your friends and family will love this tasty side dish. Crispy baked Parmesan zucchini pairs well with many dishes. Try it next to grilled chicken or fish for a healthy meal. It also goes great with pasta dishes, adding a nice crunch. You can even serve it as a snack with your favorite dip. Enjoy the flavors together for a delightful experience! Pro Tips Choose Fresh Zucchini: Look for firm, unblemished zucchinis with vibrant color to ensure the best flavor and texture. Adjust the Seasoning: Feel free to customize the seasoning mix according to your taste. Adding spices like paprika or cayenne can give it a nice kick! Use a Cooling Rack: For extra crispiness, place the zucchini on a cooling rack set over a baking sheet while baking to allow air circulation around them. Serve Immediately: These zucchini slices are best enjoyed fresh out of the oven while they are still warm and crispy. {{image_4}} You can spice up your crispy baked Parmesan zucchini. Try adding paprika for a smoky flavor. If you want heat, sprinkle in some cayenne pepper. These spices add depth and make each bite exciting. Mix them into the breadcrumb mixture for even flavor. Parmesan cheese is great, but you can change it up. Cheddar cheese gives a sharp taste. Mozzarella offers a creamy texture. You can even mix different cheeses for a unique flavor. Experimenting with cheese keeps your dish fresh and fun. If you need a gluten-free option, use gluten-free breadcrumbs. They work just as well as regular panko. This way, everyone can enjoy this crunchy treat. Just follow the same steps, and you’ll have a tasty dish for all. To store leftovers, let the zucchini cool. Place the slices in an airtight container. Be sure to keep them in the fridge. They will last for about three days. This method keeps them fresh and tasty. For the best crispy results, use the oven to reheat. Preheat your oven to 400°F (200°C). Arrange the zucchini on a baking sheet in a single layer. Bake for about 10 minutes. This method ensures they stay crispy and delicious. You can freeze these zucchini slices for longer storage. First, let them cool completely. Then, place them in a single layer on a baking sheet. Freeze them for about an hour until firm. Once frozen, transfer them to a freezer bag. They will stay fresh for up to three months. When you're ready to enjoy, thaw them in the fridge overnight before reheating. You can use regular breadcrumbs, but the texture will change. Panko gives a light and crunchy feel. Regular breadcrumbs are finer and may make the zucchini less crispy. If you want that perfect crunch, stick with panko. To make this dish vegan, swap the eggs for a flax egg or aquafaba. Use a plant-based cheese instead of Parmesan. Nutritional yeast can also add a cheesy flavor. These changes keep the dish tasty while being vegan-friendly. These zucchini slices pair well with many dishes. Try serving them with grilled chicken or fish for a complete meal. They also work great with dips like marinara or ranch. You can also add them to salads for a crunchy twist. You can boost the flavor with extra herbs and spices. Try adding paprika or cayenne for heat. Fresh herbs like basil or thyme can also add a fresh taste. Experiment with your favorite seasonings to make it your own. Yes, you can use bigger zucchini, but be aware of the size. Larger zucchini might need more cooking time, so keep an eye on them. The texture will also change; they may be less crisp and more watery. For best results, stick to medium-sized zucchini. This recipe gives you a tasty way to enjoy zucchini. We covered the key ingredients, from fresh zucchinis to the right seasonings. I shared tips for getting that perfect crunch and ways to enhance the flavor. Don’t forget the fun variations to personalize your dish. You can store and reheat leftovers easily. Remember, crispy baked Parmesan zucchini goes great with many meals. Try this dish at your next meal for a delightful treat. Enjoy every bite!

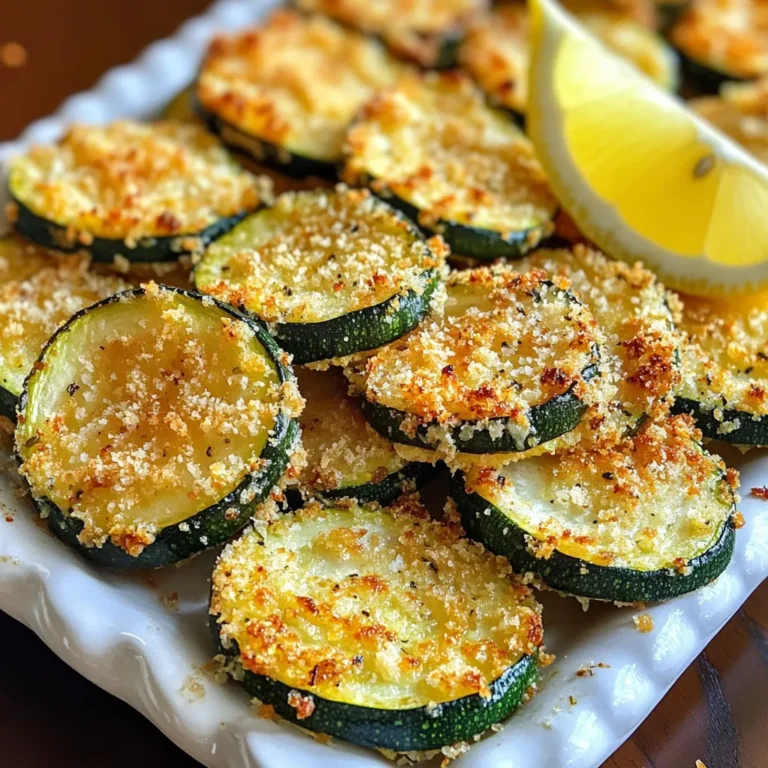
Crispy Baked Parmesan Zucchini Tasty Side Dish Delight

- 1 cup quinoa, thoroughly rinsed - 2 cups vegetable broth - 2 boneless, skinless chicken breasts - 2 tablespoons extra-virgin olive oil - 2 tablespoons freshly squeezed lemon juice - 1 tablespoon lemon zest (grated from one lemon) - 1 teaspoon dried oregano - 1 teaspoon dried thyme - Salt and freshly ground black pepper, to taste - 1 cup cherry tomatoes, halved - 1 cucumber, diced into bite-sized pieces - 1 bell pepper, diced (choose red or yellow for a vibrant color) - 1/4 cup fresh parsley, finely chopped - Optional: crumbled feta cheese for garnishing Quinoa is a super grain. It is full of protein and fiber. Quinoa helps you stay full longer. It has all nine essential amino acids. This makes it a great choice for meals. Chicken breasts are lean protein. They help build and repair your body. They are low in fat and high in nutrients. This meal keeps your energy up and helps you feel strong. Lemons add bright flavor. They are high in vitamin C. This vitamin helps your body fight off germs. Lemon juice can boost iron absorption too. Fresh vegetables like cucumbers and bell peppers are low in calories. They provide vitamins and minerals. They also add crunch and color to your bowl. You can swap quinoa for brown rice if you prefer. Brown rice has a similar texture but a different taste. For a gluten-free option, try using millet. If you don’t have chicken, you can use tofu or chickpeas. Both provide great protein. For a fresh twist, try adding arugula or spinach instead of parsley. If you want a creamier taste, use goat cheese instead of feta. You can easily adjust the recipe to fit your tastes. {{ingredient_image_2}} To cook quinoa, start by rinsing 1 cup of quinoa under cold water. This step removes any bitter taste. In a medium saucepan, add 2 cups of vegetable broth and bring it to a boil. Once it boils, add the rinsed quinoa. Lower the heat to a simmer. Cover the pot and let it cook for about 15 minutes. Check the quinoa; it should be fluffy, and the liquid should be gone. After cooking, take the pot off the heat, keep it covered, and let it sit for 5 more minutes. Finally, fluff the quinoa with a fork. Next, we marinate the chicken. In a small bowl, mix together 2 tablespoons of olive oil, 2 tablespoons of lemon juice, 1 tablespoon of lemon zest, 1 teaspoon of dried oregano, 1 teaspoon of dried thyme, salt, and pepper. This mix adds a lot of flavor. Place 2 boneless, skinless chicken breasts in a zip-lock bag or a dish. Pour the marinade over the chicken, seal it, and let it sit. You can marinate it at room temperature for 30 minutes or in the fridge for up to 2 hours for more flavor. To cook the chicken, heat a non-stick skillet over medium heat. Add the marinated chicken breasts. Cook them for about 6 to 7 minutes on each side. You want them to be golden-brown and cooked through. Once ready, take the chicken out and let it rest for a bit before slicing it into thin strips. While the chicken cooks, it's time to prepare the veggies. Take 1 cup of cherry tomatoes and cut them in half. Dice 1 cucumber into small pieces and chop 1 bell pepper. You can choose red or yellow for a pop of color. Place all the chopped vegetables in a bowl and set them aside. They will add crunch and freshness to your bowl. To make your quinoa fluffy, rinse it well. Rinsing removes the bitter coating called saponin. Use a 2:1 ratio of vegetable broth to quinoa. This gives the quinoa a rich flavor. When cooking, let it boil first. Then, lower the heat and cover it. Let it simmer until all the liquid is gone. Afterward, let it sit covered for five minutes. Finally, fluff it gently with a fork. Marinating the chicken is key. Use olive oil, lemon juice, and zest for bright flavor. Dried oregano and thyme add an herby touch. Allow the chicken to soak up these flavors for at least 30 minutes. For an extra kick, consider adding a pinch of red pepper flakes to the marinade. This small change can elevate the dish. If you want more crunch, toss in some nuts or seeds when serving. Serve the quinoa bowl warm or at room temperature. Arrange the chicken and veggies nicely on top. Drizzle any leftover marinade over the top for added taste. If you like, sprinkle some crumbled feta cheese for creaminess. You can also add sliced avocado or roasted chickpeas for more variety. This dish is perfect for lunch or dinner and is easy to customize. Pro Tips Marination Time: The longer you marinate the chicken, the more flavorful it will become. Aim for at least 1 hour for the best taste. Perfectly Fluffy Quinoa: To ensure fluffy quinoa, rinse it well before cooking to remove any bitterness from the saponins. Fresh Herbs: Using fresh herbs instead of dried can elevate the flavor profile of your dish. Consider adding fresh oregano and thyme if available. Customizable Bowl: This bowl is highly customizable! Feel free to swap in your favorite vegetables or proteins for a personal touch. {{image_4}} If you want a vegetarian or vegan twist, swap the chicken for chickpeas or tofu. Chickpeas add protein and fiber. Tofu offers a nice texture and absorbs flavors well. You can marinate the tofu just like the chicken. Just remember to cook it until golden and crispy. This keeps it satisfying and full of taste. You can easily switch the protein in this bowl. Try grilled shrimp or seared salmon for a seafood option. If you're looking for something different, consider using tempeh for a nutty flavor. Each option gives a new spin to the dish while keeping it delicious and nutritious. Want to mix things up? Change the herbs in the marinade. Try basil or cilantro for fresh tastes. You can also add a kick with red pepper flakes or a splash of hot sauce. For a tangy twist, replace lemon with lime juice. These small changes can create a completely new dish that excites your taste buds! To keep your Lemon Herb Quinoa Chicken Bowl fresh, store leftovers in an airtight container. This helps to keep the flavors locked in. Place the bowl in the fridge if you plan to eat it within a few days. The dish should stay good for up to three days. If you want to store it longer, consider freezing it. Just make sure to separate the chicken from the veggies and quinoa. This prevents sogginess when you thaw it later. When you’re ready to enjoy leftovers, reheat the quinoa chicken bowl gently. You can use a microwave or a skillet. If using the microwave, put it on medium heat for about 1-2 minutes. Stir halfway through to heat evenly. For the skillet, add a splash of water and cover it. Heat over low heat for about five minutes. This keeps the quinoa fluffy and the chicken tender. Meal prepping this dish can save you time during busy weeks. Cook a big batch of quinoa and chicken at once. Store them in separate containers. You can mix and match the veggies each day for variety. Chop up your favorite veggies and keep them ready in the fridge. This way, you can quickly assemble your bowl whenever you’re hungry. Add a squeeze of fresh lemon juice just before serving for that zesty touch! Yes, you can! If you want a different grain, try brown rice or farro. Both grains work well and add unique flavors. Just remember that cooking times may change. Brown rice takes about 45 minutes, while farro cooks in about 30 minutes. Adjust your cooking method to ensure everything is ready at the same time. To make this recipe gluten-free, use gluten-free grains. Quinoa is already gluten-free, which is great! Ensure your vegetable broth is also gluten-free. Check the labels on all ingredients to avoid hidden gluten. If you want to add more flavor, consider using fresh herbs or gluten-free sauces. You can serve this bowl with a side salad or roasted vegetables. A simple green salad with lemon dressing pairs well. You could also add some warm pita bread for extra texture. For a fun twist, try serving it with tzatziki sauce for a cool and creamy dip. In this post, we explored key ingredients for a Lemon Herb Quinoa Chicken Bowl. You learned about their nutritional benefits, substitutions, and how to cook each part. I shared tips for perfect texture and flavor, plus variations for different diets. Proper storage and meal prep ideas ensure your dish stays fresh and tasty. Experiment with these ideas. Enjoy finding new ways to make this bowl your own!

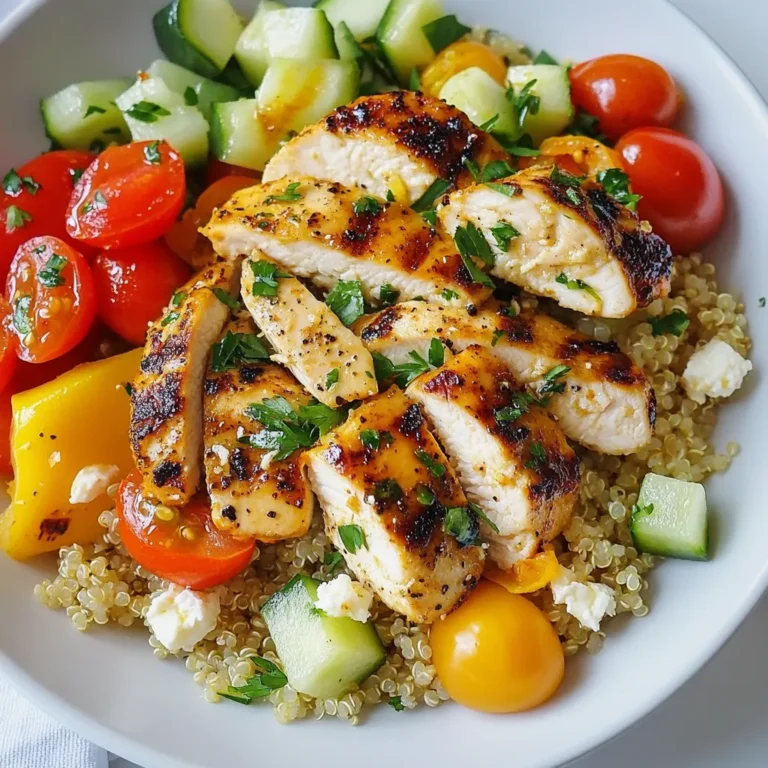
Lemon Herb Quinoa Chicken Bowl Tasty and Nutritious

- 1 lb sirloin steak, cut into bite-sized cubes - 1/4 cup honey - 1/4 cup soy sauce - 2 tablespoons sesame oil - 3 cloves garlic, minced - 1 teaspoon freshly grated ginger - 1 tablespoon cornstarch - 2 tablespoons water - 1/4 teaspoon freshly ground black pepper These ingredients come together to create a sweet and sticky sauce that coats each steak bite. The sirloin steak provides a tender base, while honey adds sweetness. Soy sauce brings umami, and sesame oil gives a rich flavor. Garlic and ginger offer a nice zing. Finally, cornstarch thickens the sauce into a glossy coating. - 1 green onion, finely sliced - A sprinkle of sesame seeds Using green onions adds a fresh crunch. Sesame seeds give a nutty finish and a delightful visual touch. These garnishes enhance the dish, making it appealing and flavorful. - For a gluten-free option, use tamari instead of soy sauce. - You can replace honey with maple syrup or agave for a different sweetness. If you're looking for a lower-sugar option, these substitutes work well. Each choice can change the flavor slightly but still keep the dish tasty. Experiment and find what you love best! {{ingredient_image_2}} Preparing the marinade To start, take a medium bowl. Combine 1/4 cup honey, 1/4 cup soy sauce, and 2 tablespoons sesame oil. Add 3 cloves of minced garlic, 1 teaspoon of grated ginger, and 1/4 teaspoon of black pepper. Whisk it well until everything mixes smoothly. Tossing steak in marinade Next, add 1 pound of sirloin steak cubes to the bowl. Gently toss the steak in the marinade until every piece gets a nice coat. Cover the bowl with plastic wrap. Duration and tips for marinating Let it sit in the fridge for at least 30 minutes. You can marinate it for up to 2 hours to deepen the flavor. This soak is key for making your steak bites tender and tasty. Heating the skillet Heat a large skillet or wok over medium-high heat. Make sure it's hot before adding the steak. This step helps to sear the meat nicely. Cooking time and techniques After marinating, take the steak from the marinade but keep the marinade for later. Place the steak in the hot skillet. Cook them for 3-4 minutes. Stir frequently to ensure they brown evenly and reach your preferred doneness. Use of marinade Once the steak is cooked, pour the reserved marinade over the bites. Let it come to a gentle simmer to enhance the flavors. Preparing the cornstarch slurry In a small bowl, mix 1 tablespoon of cornstarch with 2 tablespoons of water. Stir until it is smooth. This mixture will help thicken your sauce. Combining sauce and steak bites Gradually add the cornstarch slurry to the skillet. Stir it in while cooking for 1-2 minutes. This process will thicken the sauce and give it a glossy, sticky texture. Watching for desired texture Keep an eye on the sauce as it thickens. You want it to cling to the steak bites well. When it reaches the right consistency, remove the skillet from heat. Enjoy your sweet and sticky steak bites! - Achieving the right doneness: I like my steak medium-rare, which means an internal temp of 130°F. Use a meat thermometer for best results. Cook longer for medium or well-done steak. - Tips for even cooking: Cut your steak into uniform cubes to ensure even cooking. This will help all pieces cook at the same rate. - Adding spice with chili flakes: If you like heat, add chili flakes to the marinade. This gives your steak a nice kick. Start with a small amount and adjust to taste. - Alternative marinades: Try using teriyaki sauce or a mix of balsamic vinegar and honey for a different flavor. Each option gives a unique twist to the steak bites. - Plating ideas: Serve the steak bites on a stylish platter. Use toothpicks for easy eating. This makes it fun for guests. - Suggested accompaniments: Pair with a fresh salad or steamed veggies. They balance the sweet flavors of the steak bites and add color to your plate. Pro Tips Marination Time: Allow the steak to marinate for at least 2 hours if possible; this enhances the flavor and tenderness of the meat. High Heat for Searing: Make sure your skillet or wok is properly preheated to achieve a nice sear on the steak bites, locking in the juices. Thickening the Sauce: Stir the cornstarch slurry continuously as you add it to the marinade to prevent lumps and ensure a smooth, glossy sauce. Serving Suggestion: For an impressive presentation, serve the steak bites on a platter with toothpicks and a side of the reserved dipping sauce. {{image_4}} If you want to switch things up, try different meats. You can use flank steak or ribeye for a more tender bite. If you're looking for a lighter option, chicken works great. Cut the chicken into pieces like the steak. Tofu is also a fantastic choice for a vegetarian version. Just press the tofu to remove water and cut it into cubes. Marinade the tofu just like the steak for the best flavor. You can easily change the flavor of your steak bites. For a sweet and spicy kick, add some chili flakes or hot sauce to the marinade. This will bring heat and depth. If you prefer herbs, try adding fresh rosemary or thyme. These herbs will add a savory touch. You could even mix in citrus juice for a bright flavor. Sweet and sticky steak bites make great appetizers. Serve them on a platter with toothpicks for easy eating. You can also serve them as a main dish. Just add rice or a fresh salad on the side. This will balance the rich flavors. You can drizzle extra sauce over the top for a nice touch. To keep your sweet and sticky steak bites fresh, store them in the fridge. Place them in an airtight container. They will stay good for up to three days. If you want to keep them longer, consider freezing. Use a freezer-safe bag or container. They can last for up to three months in the freezer. When reheating, aim to maintain the sticky texture. The best method is to use the stove. Heat a skillet on low heat. Add a bit of oil to prevent sticking. Place the steak bites in the pan. Stir gently until warmed through. Avoid using high heat; this can dry them out. For microwave reheating, use a covered dish. Heat in short bursts and check often. Stored leftovers last about three days in the fridge. After this period, the risk of spoilage increases. Signs of spoilage include an off smell and discoloration. If the steak looks slimy or has changed color, it’s best to throw it away. Always trust your senses; if it seems off, do not eat it. For sweet and sticky steak bites, I recommend using sirloin steak. Sirloin is tender and flavorful. You can also try flank or tenderloin for a different taste. Both cuts provide a nice texture. They work well with the sweet marinade. Yes, you can make this recipe gluten-free. Simply substitute soy sauce with tamari. Tamari is made without wheat. It gives a similar taste. You can also use coconut aminos as another option. Both will keep your dish tasty and gluten-free. To reduce sweetness, cut back on honey. You can use half the amount. Another option is to add more soy sauce. This will balance the flavors. You can also use a sugar substitute like stevia or monk fruit. These replacements can help maintain sweetness without the sugar. Sweet and sticky steak bites go well with many sides. Here are some ideas: - Steamed rice or jasmine rice - Roasted vegetables like broccoli or carrots - A fresh salad with a light dressing - Garlic bread for a tasty contrast - Noodles tossed in sesame oil and veggies These sides will enhance your meal and complement the steak bites perfectly. In this blog post, I shared how to create delicious sweet and sticky steak bites. You learned about key ingredients like sirloin steak, honey, and soy sauce. I also provided tips for marinating, cooking, and thickening your sauce for the best texture. Don't forget to explore ingredient substitutes and variations, plus how to store and reheat leftovers. With these easy steps, you can impress your guests or enjoy a tasty meal at home. Now, it's your turn to try this recipe and make it your own!

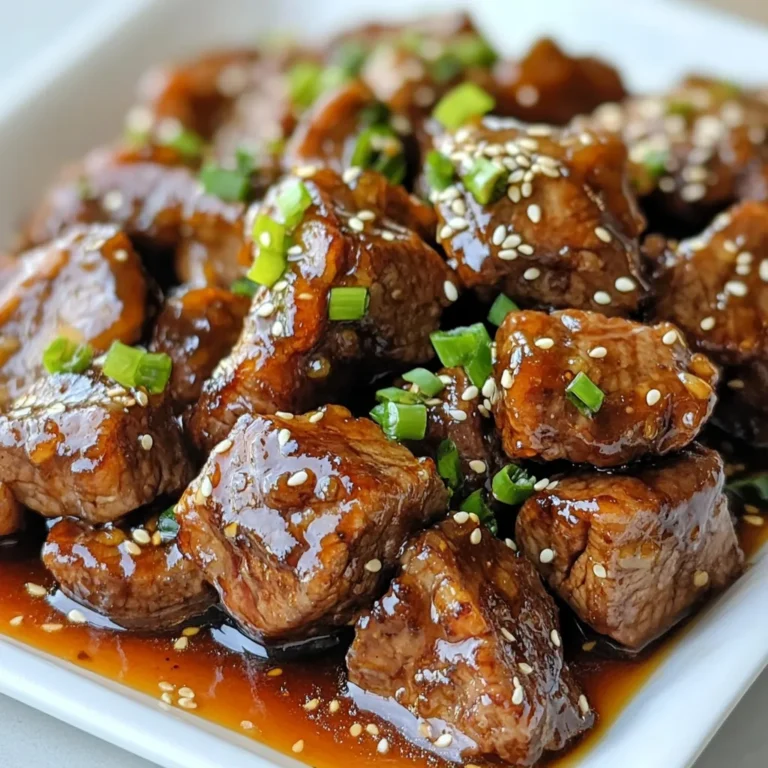
Sweet and Sticky Steak Bites Savory and Flavorful Treat

In Garlic Chili Oil Noodles, each ingredient plays an important role: - 200g noodles: You can use spaghetti, udon, or rice noodles. Cooking times vary: - Spaghetti: about 8-10 minutes - Udon: about 5-7 minutes - Rice noodles: about 4-6 minutes - 4 tablespoons extra virgin olive oil: This oil adds richness and helps cook the garlic. - 6 cloves garlic: Finely minced, garlic gives the dish its strong, savory flavor. - 2 teaspoons red chili flakes: Adjust the amount to control heat. They add a spicy kick. - 1 tablespoon soy sauce: This sauce gives the noodles umami flavor. - 1 tablespoon sesame oil: It adds a nutty taste and enhances the dish's aroma. - 2 spring onions: Thinly sliced, both white and green parts add freshness and crunch. - 1 tablespoon fresh cilantro: It gives a bright, herbal note to the dish. - Salt: Use to taste, enhancing all flavors. - Lime wedges: They add freshness and acidity when squeezed over the noodles. Soy sauce and sesame oil are key in this recipe. - Soy sauce: It brings saltiness and depth, balancing the heat from the chili flakes. - Sesame oil: This oil adds a rich, nutty flavor, rounding out the dish nicely. Chili flakes can vary in heat. You might choose fresh chilies for a different flavor or more heat. They can add color and freshness, enhancing the dish even further. Garnishes make your dish pop! - Herbs: Fresh cilantro and green onions not only add flavor but also color. - Lime wedges: These are a must. Squeezing lime over the noodles brightens the flavors and adds zest. This simple touch elevates your meal. {{ingredient_image_2}} To cook the noodles, start with a large pot of salted water. Bring the water to a rolling boil. Add your choice of noodles. Cook them according to the package instructions until they are al dente. Al dente means they should be firm to the bite, not mushy. Once the noodles are ready, carefully drain them in a colander. Be sure to save about ½ cup of the pasta water. This water will help adjust the sauce later. For the garlic chili oil, heat a large skillet over medium heat. Pour in the extra virgin olive oil. Once warm, add the finely minced garlic. Sauté the garlic gently for about 2 minutes. Watch closely to avoid burning it. Burnt garlic tastes bitter and ruins the dish. Next, stir in the red chili flakes. Let them cook for one more minute. This infuses the oil with rich flavors and heat. Now it’s time to combine the ingredients. Keep the heat at medium-high. Add the drained noodles directly into the skillet. Pour in the soy sauce and sesame oil. Toss the noodles well in the garlic chili oil. Make sure every noodle gets coated. If the mixture looks dry, add small splashes of the reserved pasta water. Stir until you reach your desired sauce consistency. Toss in the sliced white parts of the spring onions and the chopped cilantro. Mix well and taste. Adjust seasoning with salt as needed. To adjust the spice levels in your garlic chili oil noodles, start with less chili. You can always add more later. If you want a milder taste, use only one teaspoon of red chili flakes. For a kick, go up to three teaspoons. To enhance the garlic flavor without overcooking, sauté the minced garlic over medium heat. Cook it until it's fragrant and light golden, about two minutes. If it turns dark brown, it will taste bitter. You want to keep that fresh garlic flavor shining through. For a beautiful serving, use wide, shallow bowls. This way, the noodles spread out nicely. Add a sprinkle of extra red chili flakes on top for color and spice. You can also zest lime on the dish for a bright look and taste. Garnish with the green parts of the spring onions and more cilantro. This not only adds color but makes the dish smell great. A mix of green and white looks appealing against the noodles' color. If you want to serve more people, it's easy to scale this recipe. Just double or triple the ingredients. Keep the same cooking times for the noodles, but check them for doneness. For meal prep, cook a big batch and store it in the fridge. Heat it up in a pan with a splash of water to keep it moist. This makes it easy to enjoy your flavorful noodles later in the week. Pro Tips Use Fresh Ingredients: Always opt for fresh garlic and herbs for maximum flavor. Fresh ingredients elevate the dish significantly compared to dried alternatives. Adjust Spice Level: The amount of red chili flakes can be adjusted to fit your personal taste. Start with less if you're unsure, as you can always add more heat later. Reserve Pasta Water: This starchy water is a great tool for adjusting the sauce consistency. It helps the sauce cling better to the noodles and enhances the flavors. Experiment with Noodles: Don't hesitate to try different types of noodles, such as soba or egg noodles, to give your dish a new twist and texture. {{image_4}} You can easily adapt Garlic Chili Oil Noodles to fit different diets. For gluten-free options, use rice noodles or gluten-free spaghetti. These noodles cook well and still hold flavor. If you follow a vegan or vegetarian diet, skip the soy sauce with gluten. Use a gluten-free soy sauce or tamari instead. You can also enhance the dish with more vegetables, like carrots or bell peppers, for added texture and nutrients. If you want to change the taste, try different oils. Instead of olive oil, use avocado oil for a rich, buttery flavor. Peanut oil can add a nutty twist. Just remember, each oil will give a unique taste to your dish. To add protein, toss in cooked chicken, shrimp, or tofu. You can also add vegetables like broccoli or snap peas. This addition boosts flavor and makes the meal more filling. Many cultures have similar noodle dishes. For instance, in Italy, aglio e olio uses garlic and olive oil like this recipe. In China, you might find a spicy noodle dish with similar flavors. Noodle dishes often celebrate togetherness and comfort. They connect people through shared meals. Enjoying noodles with loved ones can make any day special. Each region’s twist on noodles reflects its unique culture and ingredients. To keep your garlic chili oil noodles fresh, store them in the fridge. Use an airtight container to prevent moisture loss. I recommend glass or BPA-free plastic containers. This helps retain the flavors and keeps the noodles safe to eat later. You can freeze garlic chili oil noodles if you have leftovers. First, let them cool down to room temperature. Then, place them in a freezer-safe bag or container. Remove as much air as possible before sealing. When you are ready to eat, thaw the noodles in the fridge overnight. To reheat, warm them in a skillet over low heat. Add a splash of water to help steam them back to life. Garlic chili oil noodles last about 3 to 4 days in the fridge when stored properly. Always check for signs of spoilage before eating. Look for any off smells, discoloration, or mold. If you see any of these signs, it’s best to throw them away. Keeping an eye on freshness helps you enjoy this tasty dish safely. You can use many types of noodles. Spaghetti, udon, or rice noodles work best. Spaghetti cooks in about 8-10 minutes. Udon usually takes around 10-12 minutes. Rice noodles need just 5-7 minutes. Just follow the package instructions for the best texture. To change the spice level, adjust the chili flakes. Start with less if you prefer milder heat. You can always add more if you want it spicier. A pinch of fresh chili can also boost the flavor. Find what works for you. Yes, you can prepare these noodles in advance. Cook and cool the noodles, then store them in an airtight container. Keep the garlic chili oil separate to maintain freshness. When ready to eat, reheat everything together in a skillet. These noodles go well with many side dishes. Try serving them with stir-fried veggies or grilled chicken. You can also pair them with tofu for a vegetarian option. A simple salad can balance the meal nicely. To make this dish gluten-free, choose gluten-free noodles like rice or quinoa noodles. Ensure your soy sauce is gluten-free too. There are many brands available. Check labels carefully to avoid gluten. Enjoy your meal without worries! In this post, we explored the essential ingredients and steps for Garlic Chili Oil Noodles. We delved into alternative noodles, the roles of seasonings, and garnishing tips. Cooking techniques helped ensure al dente noodles, while flavor enhancements made each bite exciting. Final thoughts: This dish is flexible, allowing for personal touches and dietary swaps. Whether you adjust spice levels or try regional variations, enjoy your cooking journey!

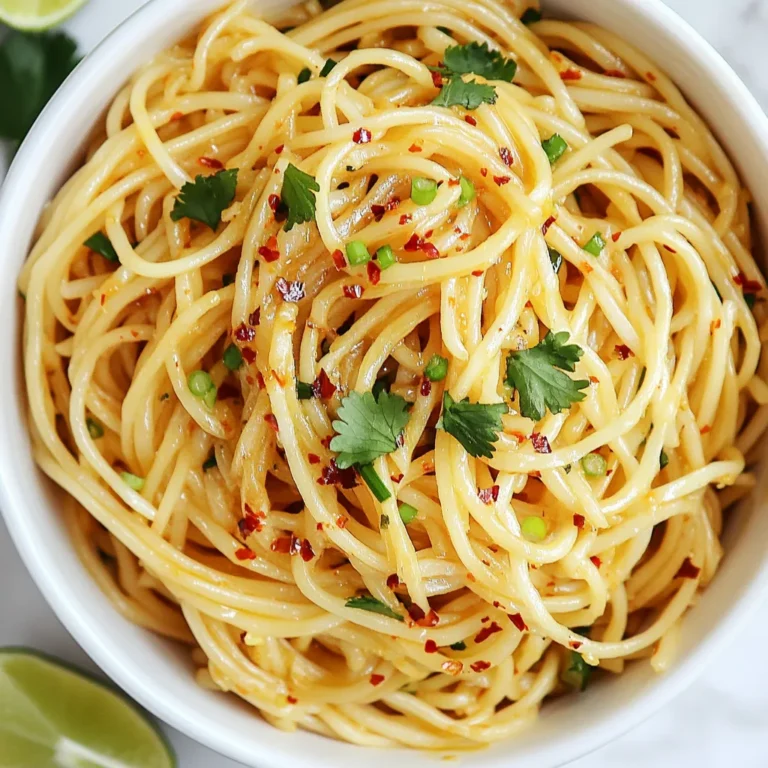
Garlic Chili Oil Noodles Quick and Flavorful Meal

- 4 boneless, skinless chicken breasts - 1 cup fresh spinach, finely chopped - 1 cup canned artichoke hearts, well-drained and coarsely chopped - 1 cup cream cheese, softened - 1/2 cup sour cream - 1/2 cup freshly grated Parmesan cheese - 1 teaspoon garlic powder - 1 teaspoon onion powder - 1 teaspoon lemon juice - Salt and pepper to taste - 2 tablespoons olive oil - 1/4 teaspoon red pepper flakes (optional) Each ingredient plays a vital role in this dish. The chicken gives a hearty base. Spinach adds color and nutrition. Artichokes bring a unique texture and taste. Cream cheese, sour cream, and Parmesan create that creamy sauce we all love. Garlic and onion powders boost flavor, while lemon juice adds brightness. Olive oil helps to cook the chicken just right. Finally, red pepper flakes can add a bit of heat. You can adjust this to your liking. Let’s gather these ingredients for a meal that’s not just tasty but also fun to make! {{ingredient_image_2}} - Preheat oven to 375°F (190°C). - Season chicken breasts with salt, pepper, garlic powder, and onion powder. - Heat olive oil in a large skillet over medium heat. - Sear chicken in the skillet until golden brown on both sides. - This should take about 4–5 minutes per side. - Remove chicken from the skillet and set aside. - In the same skillet, add chopped spinach. - Sauté the spinach until it wilts, which takes about 2 minutes. - In a large bowl, combine cream cheese, sour cream, and Parmesan. - Add lemon juice and, if desired, red pepper flakes. - Mix until creamy and smooth. - Gently fold in the wilted spinach and artichokes. - Place the seared chicken in a baking dish. - Spread the creamy spinach and artichoke mixture over each chicken breast. - Bake for 20-25 minutes until the top is golden and bubbly. - Let it cool for a few minutes before serving. This dish is rich and creamy, making it a crowd-pleaser. Enjoy every bite! - Ensure chicken is fully cooked with no pink inside. - Use fresh ingredients for optimal flavor. Cooking chicken well is key. Always check the center. Use a meat thermometer to reach 165°F (75°C). This way, you enjoy safe eating. Fresh spinach and artichokes add a bright taste. They bring life to your dish. - Serve with quinoa or roasted vegetables. - Garnish with fresh parsley for presentation. Pair this dish with fluffy quinoa or colorful roasted veggies. They balance the rich chicken. A sprinkle of parsley makes it look fancy. It adds a pop of color and freshness. - Overcrowding the skillet while searing. - Not allowing the dish to cool before serving. Avoid putting too much chicken in the skillet. This can cause steaming instead of searing. Let the dish cool a bit before serving. This helps the flavors blend. Plus, it makes for easier eating! Pro Tips Use Fresh Ingredients: Fresh spinach and artichokes yield a brighter flavor and better texture than canned or frozen options. Perfectly Cooked Chicken: Use a meat thermometer to ensure chicken reaches an internal temperature of 165°F (75°C) for safe consumption. Customize the Spice: Adjust the amount of red pepper flakes based on your heat preference; omit for a milder version. Let It Rest: Allow the dish to cool for a few minutes before serving to help the flavors meld and improve overall taste. {{image_4}} You can make this dish even better with simple swaps. Try using Greek yogurt instead of sour cream. This change adds creaminess while cutting fat. You can also swap chicken for turkey. Turkey keeps the dish light and tasty. Want to add some punch? Add sun-dried tomatoes for a tangy twist. They bring a rich flavor that pairs well with spinach and artichokes. You can also toss in herbs like basil or thyme. These herbs boost the overall taste and add freshness. You can change how you cook the chicken for a new experience. Try preparing it in a slow cooker. This method makes the chicken super tender and juicy. If you want a smoky taste, grill the chicken instead. Grilling gives it a nice char that adds depth to the dish. After enjoying your creamy spinach artichoke chicken, store any leftovers in an airtight container. This helps keep the dish fresh and tasty. You can safely eat leftovers for 3 to 4 days. Remember to check for any signs of spoilage before serving. If you want to save some for later, freezing is a great option. Freeze the dish before baking it. This makes meal prep easy. Use a freezer-safe container to store it. It can last for up to 3 months in the freezer. Just label the container with the date for easy tracking. When it's time to enjoy your frozen meal, you can reheat it in the oven. This method helps keep the texture nice. If you're in a hurry, the microwave works too. Add a splash of water to keep it moist while reheating. Enjoy every bite of this creamy delight! Yes, but ensure it's fully thawed before cooking. This step helps the chicken cook evenly. If you skip thawing, the chicken may not cook through. It pairs well with rice, pasta, or salads. Each option adds a nice balance to the dish. Rice absorbs the creamy sauce well, while pasta adds heartiness. Yes, use dairy-free cream cheese and sour cream alternatives. Many brands offer great taste without dairy. You can still enjoy a creamy texture while being dairy-free. Check that the internal temperature reaches 165°F (75°C). A meat thermometer is a great tool for this. Proper cooking ensures safety and juiciness in your chicken. You can adjust spice levels by omitting or adding red pepper flakes. If you like spice, add more. If not, leave them out for a mild flavor. This recipe for creamy spinach artichoke chicken is simple and tasty. It combines healthy ingredients like chicken, spinach, and artichoke. I showed you step-by-step instructions to make it easy. Cooking tips help avoid mistakes and keep the flavor fresh. You can also try variations or freeze leftovers for later. Enjoy this dish with sides for a complete meal. With these tips, you'll impress everyone at the table!

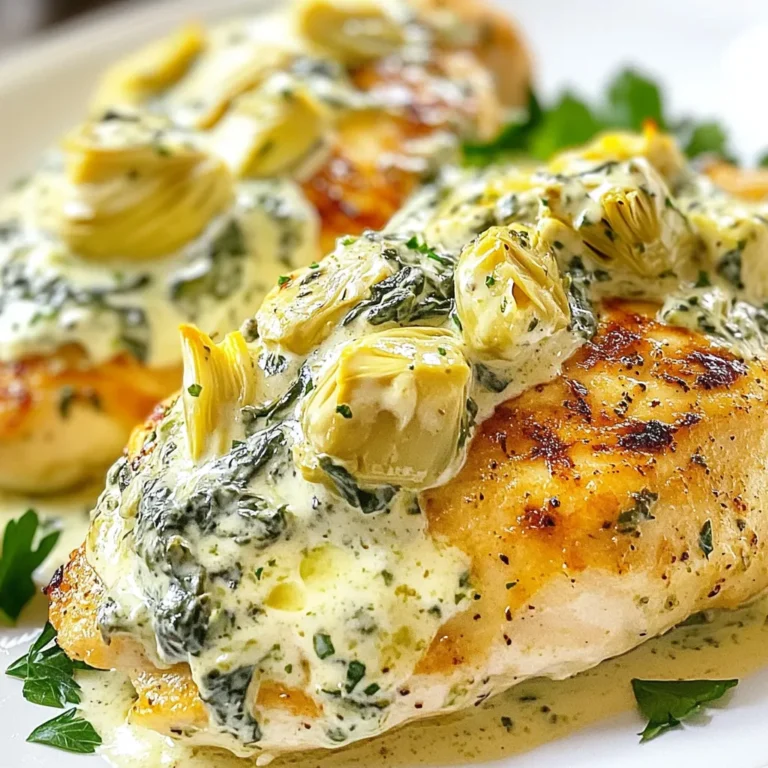
Creamy Spinach Artichoke Chicken Flavorful Delight

- 8 oz (227 g) pasta (penne or fusilli) - 1 lb (450 g) ground beef (preferably lean) - 4 cloves garlic, finely minced - 1 medium onion, diced finely - 1 red bell pepper, diced into bite-sized pieces - 1 cup cherry tomatoes, halved - 2 cups fresh baby spinach In this dish, the pasta forms the base, and I love using penne or fusilli. They hold sauce well, making each bite tasty. Lean ground beef is my choice for a healthier meal. It cooks up well and keeps the dish light. Next, I add aromatics and veggies. Garlic brings bold flavor, while onion and bell pepper give sweetness. Fresh cherry tomatoes add juiciness, and baby spinach boosts nutrition. - 1 teaspoon dried oregano (or Italian seasoning) - 1 teaspoon smoked paprika - 2 tablespoons extra virgin olive oil - Salt and freshly ground black pepper, to taste Seasoning is key! I often use dried oregano for its earthy taste. Smoked paprika adds a rich, warm flavor. Extra virgin olive oil is my go-to for cooking. It has a fruity taste that enhances the meal. I always add salt and pepper to boost the flavors. - Grated Parmesan cheese - Fresh basil leaves Garnishes make a dish pop! I love adding freshly grated Parmesan cheese for creaminess. It melts slightly and adds a nice touch. Fresh basil leaves are also great. They give a burst of freshness and color on top. Don't skip these final touches; they elevate the dish! {{ingredient_image_2}} Start by filling a large pot with water. Add a good amount of salt. Bring the water to a rolling boil. Once it boils, add 8 oz of pasta. Cook it for 8-10 minutes for an al dente texture. This means it should be firm but not hard. When done, drain the pasta. Be sure to save about a cup of the pasta water for later. In a large skillet, heat 2 tablespoons of extra virgin olive oil over medium heat. When the oil shimmers, add 1 lb of ground beef. Use a spatula to break it up as it cooks. Brown the beef for about 5-7 minutes. It should look fully cooked and brown. Season it with salt and pepper. If there is too much fat, drain some but keep a little for flavor. Now, add 1 medium diced onion, 4 cloves of minced garlic, and 1 diced red bell pepper to the skillet. Sauté these together for about 3-4 minutes. Stir often. The onions should turn translucent, and the garlic will smell fragrant. Be careful not to burn the garlic; it can get bitter if overcooked. Next, stir in 1 cup of halved cherry tomatoes and 2 cups of fresh baby spinach. Add 1 teaspoon of dried oregano and 1 teaspoon of smoked paprika for flavor. Cook this mix for another 3-4 minutes. The spinach should wilt, and the tomatoes should soften. This creates a colorful and tasty mix. Add the drained pasta to the skillet. Toss everything together gently. Make sure the pasta is coated well with the beef and veggies. If the dish feels dry, splash in some of the reserved pasta water. This helps achieve a creamy texture. Taste your dish. Adjust the seasoning by adding more salt or pepper if needed. You can also add more smoked paprika for extra flavor. Make it to your liking before serving. To get perfect pasta, use a large pot. Fill it with water and add a lot of salt. This helps the pasta taste better. Bring the water to a rolling boil before adding the pasta. Cooking it al dente means it will be firm but not hard. This usually takes about 8-10 minutes. Don’t forget to drain the pasta, but keep some water for later. When cooking beef, choose lean ground beef for less fat. Heat olive oil in a large skillet. Once it shimmers, add the beef. Break it apart with a spatula as it cooks. Sauté until it turns brown, which takes about 5-7 minutes. Season with salt and pepper for flavor. If there’s too much fat, drain some but keep a little for taste. To boost flavor, consider adding spices like red pepper flakes or fresh herbs like thyme. These can give the dish more depth. You can also add half a teaspoon of garlic powder for extra garlic taste. For a creamier texture without heavy cream, add a splash of the reserved pasta water. This will help bind the ingredients together and make it rich. For serving, you can do it straight from the skillet. This gives a rustic and cozy feel. If you prefer a fancier look, plate individual servings. Add a sprinkle of extra basil leaves on top. This not only looks nice but also adds fresh flavor. Don’t forget to finish with some grated Parmesan cheese to impress your guests! Pro Tips Quality of Beef: Use lean ground beef to reduce excess grease while still maintaining flavor. Consider grass-fed beef for added richness. Perfect Pasta: Always salt your pasta water generously; it enhances the flavor of the pasta itself. Aim for a taste similar to seawater. Fresh Ingredients: Opt for fresh garlic and vegetables whenever possible, as they will enhance the overall taste and nutritional value of your dish. Leftovers Storage: Store any leftovers in an airtight container in the fridge for up to 3 days. Reheat gently on the stove, adding a splash of water to loosen the sauce. {{image_4}} You can swap the ground beef for chicken or turkey. This change keeps the dish light and tasty. Use the same cooking steps. Ground chicken works well for this recipe. If you want a vegetarian option, try using plant-based proteins. Options like lentils or chickpeas add good flavor and texture. They also make the dish hearty without meat. If you need a gluten-free option, choose gluten-free pasta. Many types are available, so you can find one you like. Remember to adjust the cooking time as needed. You can also try different pasta shapes. Fusilli and penne work great, but shapes like farfalle or rotini can add fun to the dish. Adding seasonal vegetables can boost the flavor and nutrition. You can try zucchini, bell peppers, or even asparagus. These veggies add color and taste. For more greens, consider using kale or arugula. They mix well with the other ingredients and add a nice crunch. Store your Garlic Beef Pasta Skillet in an airtight container. Let it cool to room temperature first. Properly stored, it lasts up to three days in the fridge. If you want to keep it fresh longer, make sure to consume it within that period. To freeze this dish, let it cool completely. Then, transfer it to a freezer-safe container. You can also use freezer bags for easy storage. Label it with the date. It keeps well for up to three months. For reheating, thaw it in the fridge overnight. You can warm it in a skillet over medium heat or in the microwave. Get creative with your leftovers! You can turn it into a pasta salad by adding some olives and a splash of vinaigrette. Another option is to mix it into a soup for extra flavor. For quick reheating, use the microwave in 30-second intervals. Stir in a splash of water or broth to keep it moist. Enjoy your tasty creations! It takes about 30 minutes to make this dish. You will spend around 10 minutes prepping the ingredients. The cooking time is about 20 minutes. This quick time makes it great for busy nights. Yes, you can swap out some veggies! Consider using zucchini, mushrooms, or broccoli. These choices add flavor and color too. You can also mix in frozen peas if you want. Just make sure to adjust cooking times a bit for the new veggies. Absolutely! You can make this dish ahead of time. It keeps well in the fridge for up to 3 days. Just store it in an airtight container. You can easily reheat it in the microwave or on the stovetop. To spice things up, try adding red pepper flakes. You can also use diced jalapeños for a fresh kick. For a richer flavor, consider a dash of hot sauce. Start with a little, and taste as you go for the right heat level. This dish pairs well with a simple side salad. A green salad with a light vinaigrette works great. You can also serve it with garlic bread for a tasty side. Another option is roasted vegetables, which add more texture and flavor. This blog post covered all you need for a tasty Garlic Beef Pasta Skillet. We explored key ingredients, cooking steps, and useful tips to boost flavor and presentation. Remember, you can customize the recipe with different proteins and veggies or store leftovers for later. Cooking should be fun and creative. Enjoy making this dish with your unique touches! I hope you feel inspired to get started in the kitchen.

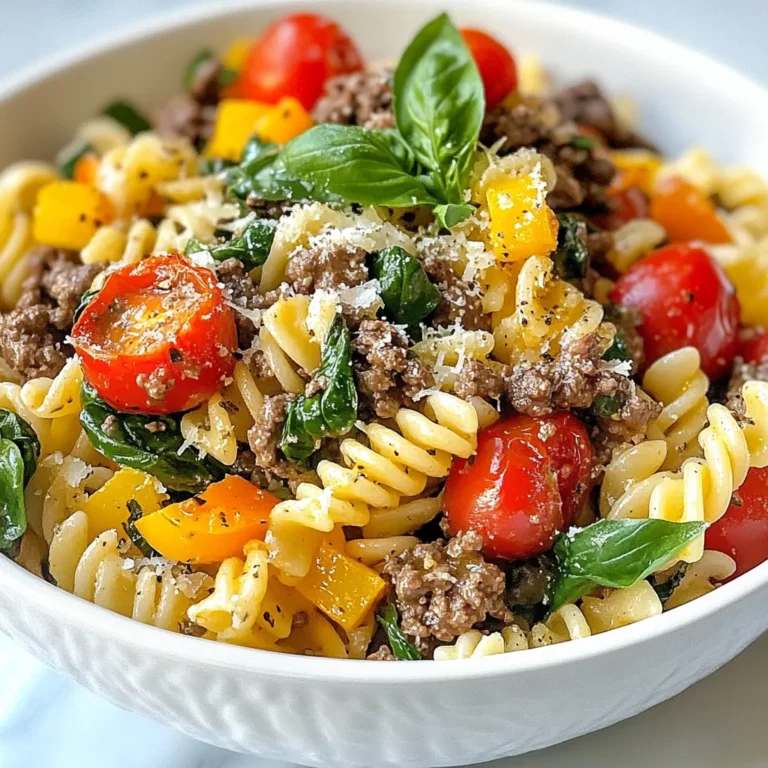
Garlic Beef Pasta Skillet Easy and Flavorful Dish

- 4 large flour tortillas - 2 cups fresh spinach, roughly chopped - 1 cup mushrooms, sliced (button or cremini) The main ingredients make this dish colorful and healthy. The flour tortillas provide a soft base. Fresh spinach adds nutrients and a vibrant green color. Mushrooms bring a nice umami flavor. - 1 cup shredded mozzarella cheese - 1/2 cup feta cheese, crumbled Cheese makes every quesadilla better. Mozzarella melts beautifully, giving a gooey texture. Feta adds a salty kick that pairs well with the veggies. Together, they create a cheesy delight. - 1/4 cup red onion, finely chopped - 2 cloves garlic, minced - 1 tablespoon olive oil - 1 teaspoon ground cumin - Salt and pepper to taste - Optional garnish: Fresh cilantro, chopped Seasonings add depth to the dish. Red onion gives a sweet crunch. Garlic adds a savory aroma. Olive oil keeps everything from sticking. Cumin brings warmth and earthiness. Don’t forget salt and pepper for balance. Fresh cilantro can brighten the dish when sprinkled on top. {{ingredient_image_2}} 1. Heat the olive oil in a large skillet over medium heat. 2. Add the finely chopped red onion and sauté it for 2-3 minutes. This makes the onion soft and fragrant. 3. Next, add the sliced mushrooms and minced garlic. Cook this mixture for 5-7 minutes. You want the mushrooms to turn golden brown. 4. Stir in the chopped spinach and sprinkle in the ground cumin. Cook for another 2 minutes. The spinach will wilt down. 5. Season your filling with salt and pepper to taste. Remove the skillet from the heat and set it aside. 1. Heat a separate skillet over medium heat. Place one tortilla in it. 2. Sprinkle half of the shredded mozzarella cheese over one half of the tortilla. This will create a cheesy base. 3. Spoon a generous amount of the spinach and mushroom filling on top of the mozzarella. 4. Crumble feta cheese over the filling. Finish by adding the remaining mozzarella on top. 5. Carefully fold the tortilla in half. 1. Cook one side for about 3-4 minutes. You want it to turn golden brown. 2. Gently flip the quesadilla and cook the other side for another 3-4 minutes. Ensure the cheese is melted and both sides are crispy. 3. Remove the quesadilla from the skillet. Let it cool for a minute, then slice it into wedges. 4. Repeat this with the remaining tortillas and filling. Adjust the heat if needed to avoid burning. To make the best quesadilla, adjust the heat. If it’s too high, you risk burning the tortilla. A medium heat works well. I also recommend using a nonstick skillet. This choice makes flipping much easier, and you avoid sticking. To boost flavor, try different herbs and spices. Adding a pinch of smoked paprika or onion powder can elevate your quesadilla. If you like some heat, consider adding jalapeños. They give a nice kick that pairs well with the cheese. For a beautiful presentation, serve your quesadillas with salsa or guacamole on the side. These dips add flavor and color. You can also garnish with fresh cilantro. It adds a nice pop of green and makes the dish more appealing. Pro Tips Choose Fresh Ingredients: Always opt for fresh spinach and mushrooms to enhance the flavor and texture of your quesadillas. Perfectly Toasted Tortillas: Ensure your skillet is preheated before adding the tortillas to achieve that perfect golden brown and crispy texture. Experiment with Cheese: Feel free to mix different types of cheese, such as Monterey Jack or cheddar, for a unique flavor twist. Garnish for Presentation: Don’t skip the garnish! Fresh cilantro and a side of salsa or guacamole elevate the dish both in taste and presentation. {{image_4}} You can change the cheese to suit your taste. Swap mozzarella for cheddar or pepper jack. This adds a nice kick. If you want something different, try goat cheese. It gives a tangy twist that pairs well with the spinach and mushrooms. Feel free to add more vegetables to your quesadilla. Bell peppers or zucchini work great. They bring extra color and flavor. You can also substitute spinach with kale or arugula. Both options add a unique taste and are packed with nutrients. If you want more protein, add cooked chicken or turkey. This makes the quesadilla heartier. For a smoky flavor, incorporate bacon bits. They add a delicious crunch and depth to the dish. Store any leftover quesadillas in an airtight container. This keeps them fresh. They taste best if consumed within three days. After that, the texture may change. To freeze, wrap each quesadilla in plastic wrap. Then, place them in a freezer bag. You can store them for up to two months. When ready to eat, just thaw and reheat. For the best taste, reheat in an oven or skillet. This keeps the quesadilla crispy. If you're in a hurry, use a microwave. However, be aware that it may lose its crunch. Yes, you can prepare the filling and assemble the quesadillas in advance. Just keep the filling in the fridge. You can also store the fully assembled quesadillas in an airtight container. They will stay fresh for a few days. When you are ready to eat, just heat them in a skillet until warm and crispy. This makes meal prep easy and quick. Consider serving your quesadillas with salsa, guacamole, or a side salad. These sides add great flavor and texture. Salsa brings a zesty kick, while guacamole adds creaminess. A fresh salad can balance the meal and add crunch. Get creative with your sides to make your meal even more fun! To make these quesadillas vegan, use vegan cheese instead of mozzarella and feta. You can find great options made from nuts or soy. Also, omit any dairy ingredients like butter. This way, you keep all the tasty flavors while making it plant-based. Enjoy your delicious vegan quesadillas! Spinach mushroom quesadillas are easy to make and delicious. You need fresh ingredients and simple steps for great flavor. Remember to play with your favorite herbs, cheese, and veggies. Store leftovers in the fridge or freezer to enjoy later. Be creative and share this tasty dish with friends or family. With these tips, you can make a meal that everyone will love. Enjoy your cooking adventure!

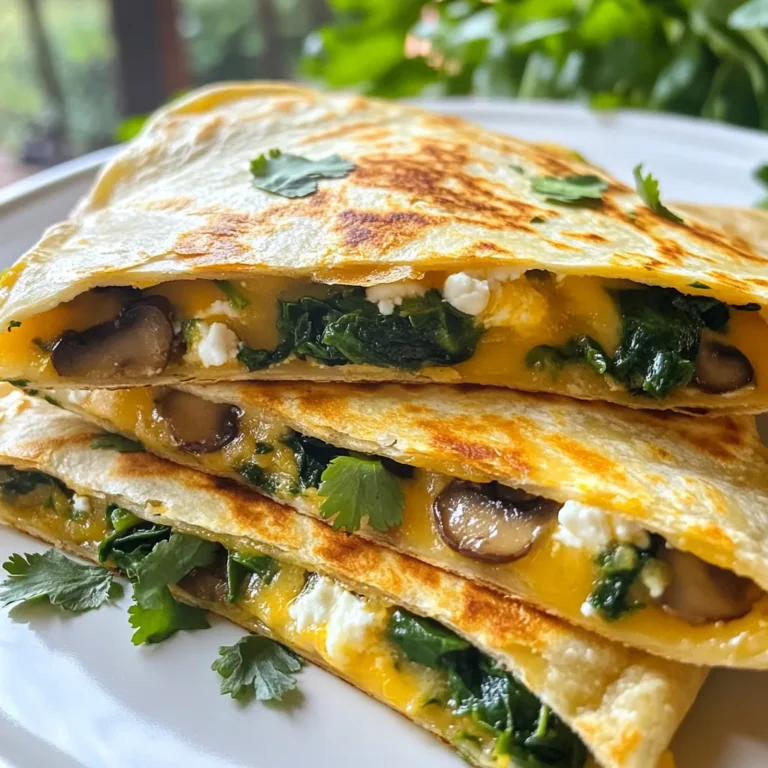
Spinach Mushroom Quesadilla Delicious and Easy Meal

To make a tasty Chicken Wild Rice Casserole, gather these simple ingredients: - 2 cups cooked wild rice - 1 lb. boneless, skinless chicken breasts, diced into 1-inch pieces - 1 medium onion, finely chopped - 2 cups fresh mushrooms, sliced - 2 cloves garlic, minced - 1 cup frozen peas (no need to thaw) - 1 cup cream of chicken soup (store-bought or homemade) - 1 cup low-sodium chicken broth - 1 teaspoon dried thyme - 1 teaspoon dried parsley - Salt and black pepper to taste - 1 cup shredded sharp cheddar cheese - ½ cup seasoned breadcrumbs These ingredients mix well to create a rich and creamy dish. The wild rice adds a nutty taste, while the chicken gives protein. Fresh mushrooms and peas add color and flavor. Cream of chicken soup and broth create a smooth base. Thyme and parsley enhance the aroma. The cheese and breadcrumbs on top add a nice crunch. All these elements work together for a comforting meal. {{ingredient_image_2}} - Step 1: Preheat the oven Set your oven to 375°F (190°C). This helps the casserole cook evenly. - Step 2: Cook the chicken Heat a splash of olive oil in a large skillet. Add 1 lb. of diced chicken breasts. Season with salt, pepper, thyme, and parsley. Cook for about 5-7 minutes until browned and cooked through. Remove the chicken and set it aside. - Step 3: Sauté the aromatics In the same skillet, add 1 medium onion, finely chopped, and 2 cloves of minced garlic. Cook for about 3-4 minutes until the onion is soft and fragrant. - Step 4: Cook the mushrooms Add 2 cups of sliced fresh mushrooms to the skillet. Cook for 5-6 minutes until the mushrooms are tender and most liquid evaporates. - Step 5: Combine all ingredients In a large bowl, mix the cooked wild rice, sautéed chicken, mushroom mix, 1 cup of frozen peas, 1 cup of cream of chicken soup, and 1 cup of low-sodium chicken broth. Stir until everything is well combined. - Step 6: Transfer to baking dish Lightly grease a 9x13 inch baking dish. Pour the wild rice mixture into the dish, spreading it evenly. - Step 7: Add toppings Sprinkle 1 cup of shredded sharp cheddar cheese over the top. Add ½ cup of seasoned breadcrumbs for a crunchy finish. - Step 8: Bake and finish Cover the dish with aluminum foil and bake for 25 minutes. After that, remove the foil and bake for another 15 minutes, until the cheese is bubbly and golden. How to perfectly cook wild rice To cook wild rice, rinse it under cold water first. Use a pot with three cups of water for every one cup of wild rice. Bring the water to a boil, add the rice, then cover and simmer for about 45 minutes. This will give you fluffy, tender grains. Tips for sautéing chicken and mushrooms When sautéing chicken, make sure your pan is hot. This helps create a nice sear. Cut the chicken into small pieces, about one inch. Cook for five to seven minutes until it is golden and fully cooked. For mushrooms, add them to the pan after the chicken. Cook them for about six minutes. This keeps them tender and flavorful. Presentation tips for serving Serve your casserole in a rustic dish. Garnish it with fresh parsley for a pop of color. You can also sprinkle some more cheese on top right before serving for added appeal. Best side dishes to pair with the casserole A light salad works well with this casserole. You can also serve it with steamed green beans or a simple vegetable medley to balance the meal. These sides add color and freshness to your plate. Alternative ingredients for dietary restrictions If you need to avoid gluten, use gluten-free breadcrumbs. For a dairy-free option, try coconut cream instead of cream of chicken soup. These swaps keep the dish tasty while meeting your needs. Vegan or vegetarian options To make this dish vegan, replace chicken with chickpeas or lentils. Use vegetable broth instead of chicken broth, and skip the cheese or use a vegan cheese alternative. These changes still give a great flavor and texture. Pro Tips Choose Quality Rice: Opt for high-quality wild rice for the best flavor and texture in your casserole. It enhances the overall dish significantly. Season the Chicken Well: Don't skip on seasoning the chicken while sautéing. It builds a flavorful base for the entire casserole. Make Ahead: This casserole can be prepared ahead of time. Assemble it and store it in the refrigerator for up to a day before baking. Experiment with Vegetables: Feel free to add other vegetables like spinach or bell peppers for added nutrition and flavor. {{image_4}} You can change the taste of this casserole easily. Try adding different herbs like oregano or sage. You can also spice it up with red pepper flakes. If you like veggies, add spinach or bell peppers. They add color and nutrition. You can also mix in some carrots or zucchini for more crunch. Each herb or veggie gives the dish a new twist. Want to cook this dish differently? Use a slow cooker. Just combine all ingredients in the pot. Set it on low for about 6-8 hours. This method makes the chicken super tender. You can also use an Instant Pot. Cook on high pressure for 10 minutes. This will save time and keep the flavors rich. Cheese lovers can switch it up too. Try using mozzarella or pepper jack for a kick. If you need a dairy-free option, there are great non-dairy cheeses. Look for brands made with nuts or soy. These can melt nicely and taste great. You can also skip the cheese for a lighter dish. To store leftovers, let the casserole cool completely. Place it in an airtight container. This keeps it fresh longer. I recommend using glass or plastic containers. They seal tightly and prevent spills. To freeze the casserole, wrap it tightly in plastic wrap. Then place it in a freezer-safe bag. This helps avoid freezer burn. When you want to reheat it, take it out and let it thaw in the fridge overnight. You can then bake it at 350°F (175°C) until hot, about 30 minutes. In the fridge, Chicken Wild Rice Casserole lasts about 3 to 4 days. If you notice any off smell or mold, it’s best to toss it. Freshness is key for great taste. Always check for signs before eating leftovers. Can I make Chicken Wild Rice Casserole ahead of time? Yes, you can prepare this casserole a day before. Just mix all the ingredients and store it in the fridge. When you're ready, bake it. This helps the flavors blend well. What can I use instead of cream of chicken soup? You can use cream of mushroom soup or a homemade white sauce. Both options give a nice creaminess. You can also mix sour cream with chicken broth for a lighter version. How long does this casserole last in the fridge? The casserole lasts about 3 to 4 days in the fridge. Store it in an airtight container for best results. Always check for any signs of spoilage before eating. Can I use leftover chicken instead of raw? Absolutely! Using leftover chicken saves time. Just shred or chop the chicken and mix it in. You may want to reduce the cooking time slightly. Caloric breakdown per serving One serving of Chicken Wild Rice Casserole has about 400 calories. This number can vary based on your specific ingredients. Key nutrients in the casserole This dish is rich in protein from the chicken and wild rice. It also offers fiber, vitamins, and minerals from the vegetables. The cheddar cheese adds calcium. Gluten-free adaptations To make this casserole gluten-free, use gluten-free breadcrumbs. You can also check the soup and broth labels for gluten-free options. This way, you can enjoy it without worry. Low-calorie modifications For a lighter dish, use less cheese or a low-fat soup. You can also add more veggies, like spinach or zucchini, to increase volume without adding many calories. This keeps the dish filling and tasty! This article covered how to make a tasty Chicken Wild Rice Casserole. We looked at the ingredients, step-by-step instructions, and helpful tips. You now know how to combine flavors and explore variations. Remember to store leftovers right and reheating them well. Don't hesitate to try different herbs or veggies to customize your dish. Enjoy making this cozy meal for your family and friends. It’s simple and delicious, perfect for any occasion.

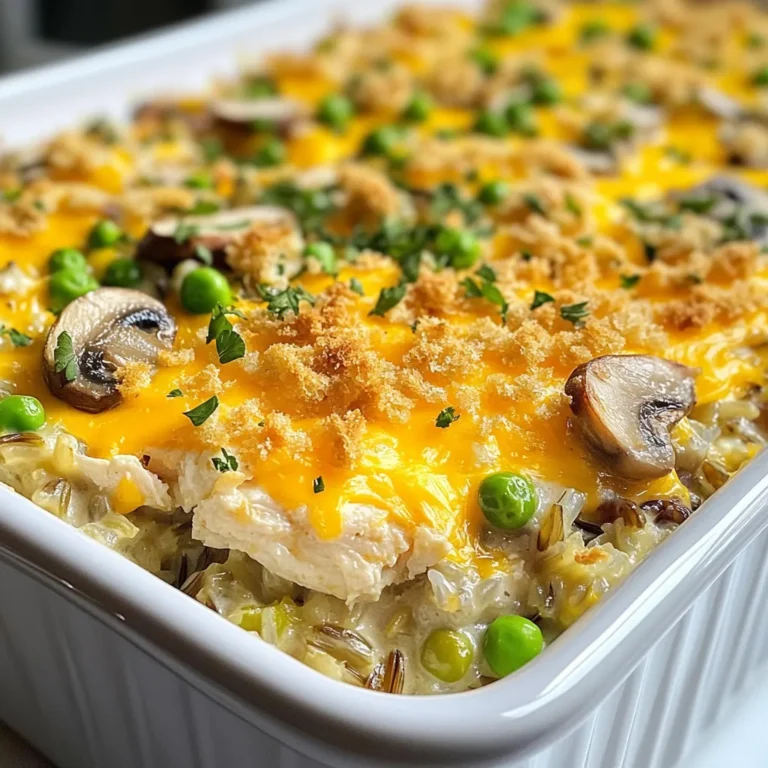
Chicken Wild Rice Casserole Flavorful and Simple Dish

- Pasta Choices: Rotini vs. Penne You can use rotini or penne for this dish. Rotini holds sauce well due to its twists. Penne has a smooth surface and a hollow center. Both are great, so choose what you like best. - Protein Options: Ground Beef vs. Turkey Ground beef gives a rich flavor, while turkey is leaner. Both options work well in this recipe. If you want a lighter meal, choose turkey. For a heartier taste, go with beef. - Vegetables: Onion, Bell Pepper, Garlic I use onion and bell pepper for sweetness. Garlic adds a nice kick. Diced onion and bell pepper should be added first. This way, they soften and blend with the meat. - Taco Seasoning: Store-bought vs. Homemade You can use store-bought taco seasoning for ease. If you prefer homemade, mix chili powder, cumin, and paprika. Homemade adds a fresh touch and lets you control flavors. - Adding Flavor: Diced Tomatoes and Chicken Broth Diced tomatoes bring acidity and moisture. Chicken broth adds depth to your dish. Use low-sodium broth to keep it healthy. Mix these with the meat and veggies for a rich base. - Creaminess: Sour Cream and Cheese Sour cream and cheese make this dish creamy. I recommend using sharp cheddar for strong flavor. Stir them in at the end for a melty, rich finish. This creates that signature cheesy texture everyone loves. {{ingredient_image_2}} Browning the Meat: Tips for Perfect Texture Start by placing your ground beef or turkey in a large skillet. Use medium heat. Break the meat into small bits with a spatula. Browning adds flavor and keeps the texture just right. Once it’s fully cooked, drain any fat. This step keeps the dish light and tasty. Sautéing Vegetables: Importance of Softening Next, add the diced onion and bell pepper to the skillet. Sauté these for about 3-4 minutes. You want them to soften. This helps release their sweet flavors. After that, toss in the minced garlic. Sauté for another minute. It will smell great! Combining Ingredients: Order of Addition Now it's time to spice things up. Sprinkle the taco seasoning over the meat and veggies. Then, pour in the diced tomatoes along with their juices. Add the chicken broth and corn. Stir everything well. This will create a flavorful base for your pasta. Cooking Pasta: Managing Cooking Time Carefully add the pasta to the skillet. Stir it in so it mixes well. Cover the skillet with a lid and lower the heat to medium-low. Cook for about 10-12 minutes. Stir once in a while. This keeps the pasta from sticking to the bottom of the pan. Melting Cheese: How to Achieve Creaminess When the pasta is al dente, take the skillet off the heat. Stir in the shredded cheddar cheese and sour cream. Mix until everything is creamy and melted. This adds richness and pulls the dish together. Seasoning to Taste: When and How Finally, taste your dish. Season it with salt and pepper as needed. If you like heat, add some jalapeño slices. They give a nice kick. Before serving, top with freshly chopped cilantro. It adds color and freshness to your meal. To keep your pasta from getting mushy, start by cooking it for only about 10 minutes. Stir it often to prevent sticking. Check for doneness by tasting a piece. It should be firm but not hard. If you see it is almost done, take it off the heat. Remember, the pasta will keep cooking even after you remove it from the heat. You can spice up your dish with a few easy swaps. Try adding cumin or chili powder for a deeper flavor. Fresh lime juice can add a zesty kick. You can also include black beans or diced zucchini for extra nutrition. If you love heat, toss in a few diced jalapeños. These small changes can make your meal unique and exciting. One-pan meals save time and effort. You cook everything in one skillet, which cuts down on dishes. This method also allows flavors to blend well. Start with the meat, then add veggies, and finish with pasta. This order keeps your food juicy and tasty without drying it out. Using one pan helps you avoid a big mess. After cooking, just let the skillet soak in warm water. You can easily scrub it clean later. If you use a nonstick skillet, it will be even simpler. This way, you can enjoy your meal without stressing over the mess. Pro Tips Cook Pasta Al Dente: For the best texture, cook the pasta until it's al dente, as it will continue to absorb flavor and moisture from the sauce while resting. Customize Your Protein: Feel free to substitute ground beef with ground turkey, chicken, or even a plant-based alternative for a healthier or vegetarian option. Add Extra Veggies: Boost the nutrition of your dish by adding more vegetables, such as zucchini, spinach, or diced carrots, along with the bell pepper. Make It Spicy: If you love heat, consider adding diced fresh jalapeños directly into the skillet or a dash of hot sauce to elevate the flavor profile. {{image_4}} Vegetarian Option: Replacing Meat You can make this cheesy taco pasta dish vegetarian. Simply replace the ground beef or turkey with black beans or lentils. Both options add protein and texture. The flavor from the taco seasoning will still shine through. This swap makes the dish hearty and satisfying without meat. Gluten-Free Pasta Choices If you need a gluten-free option, use gluten-free pasta. Many brands offer rotini or penne that fit this need. Cook it just like regular pasta. Ensure you check the cooking time, as it may differ. This way, everyone can enjoy a tasty meal without worry. Spice Levels: Adjusting Heat with Jalapeños Want some heat? Adding jalapeños can spice up your dish. You can slice them fresh or use pickled ones for a tangy twist. Just add them while cooking or as a garnish at the end. Adjust the amount based on your spice preference. It’s a simple way to make your pasta pop. Additional Ingredients: Black Beans, Zucchini For extra flavor and nutrition, mix in black beans or zucchini. Black beans add creaminess and a different texture. Chop zucchini into small pieces and add it with the other veggies. This boosts the dish’s color and taste. Plus, it makes the meal even more filling and fun! - Refrigeration: Best Practices After enjoying your cheesy taco pasta, let it cool. Store it in an airtight container. It keeps well in the fridge for 3-5 days. Make sure to label it with the date. This helps you track freshness. - Freezing Guidelines for Future Meals If you want to save it longer, freezing is a great option. Place the cooled pasta in freezer-safe bags or containers. Try to remove as much air as possible. It can last up to 3 months in the freezer. When ready to eat, just thaw it in the fridge overnight. - Methods for Best Results: Stovetop vs. Microwave For the stovetop, place the pasta in a skillet over medium heat. Add a splash of broth or water to keep it moist. Stir until heated through. This method keeps it creamy. For the microwave, transfer a portion to a microwave-safe bowl. Cover it with a lid or a damp paper towel. Heat in 30-second intervals, stirring in between. This way, it heats evenly. Can I use a different type of cheese? Yes, you can! Cheddar is great, but you can also try Monterey Jack or Pepper Jack. Each cheese brings a unique taste. Experiment with your favorites for a new twist. How long does leftovers last in the fridge? Leftovers can last about 3 to 4 days in the fridge. Be sure to store them in an airtight container. This keeps the dish fresh and tasty for later meals. What are good side dishes to serve with Cheesy Taco Pasta Skillet? I recommend a simple salad or some tortilla chips. You can also serve it with guacamole or salsa for a fun touch. These sides add crunch and flavor to your meal. Can I double the recipe? Absolutely! Just double all the ingredients and use a larger skillet. This way, you can feed more people or have extra for meal prep. What to do if the pasta absorbs too much liquid? If your pasta soaks up too much liquid, add a bit of broth or water. Stir it in slowly until you reach the desired creaminess. This keeps your dish flavorful without being dry. You now have a clear plan for making delicious Cheesy Taco Pasta Skillet. We covered pasta choices, protein types, and tasty veggies. You learned how to season your dish and make it creamy. I shared tips for cooking perfectly and storing leftovers. Try different flavors and adapt the recipe to your taste. With this guide, you can impress everyone at your table! Happy cooking!

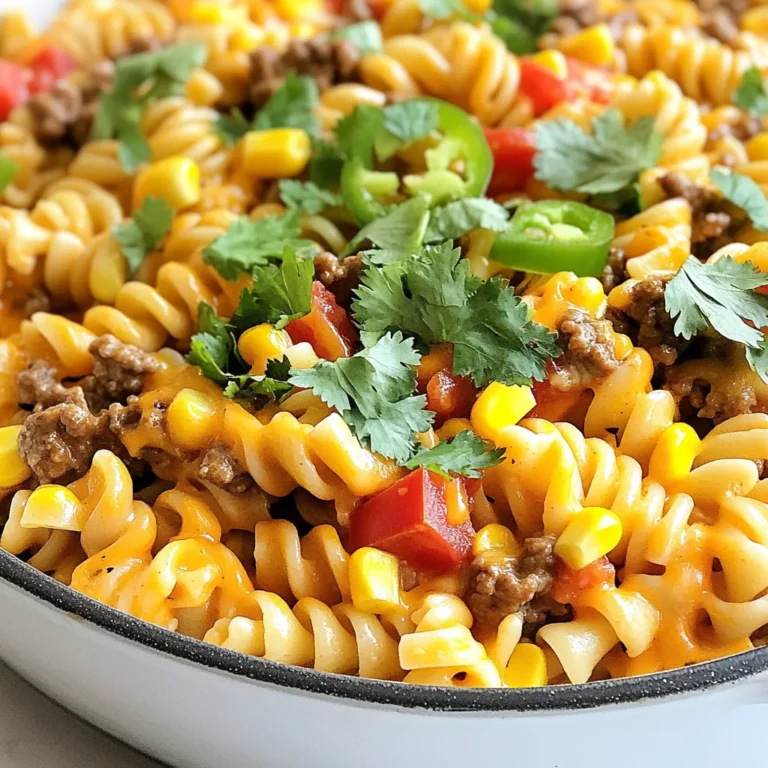
Cheesy Taco Pasta Skillet Quick and Simple Recipe

- 4 boneless, skinless chicken breasts - 4 tablespoons unsalted butter, melted - 4 cloves of garlic, finely minced - 1 cup grated Parmesan cheese - 1 teaspoon dried oregano - 1 teaspoon garlic powder - 1 teaspoon onion powder - Salt and freshly cracked black pepper to taste To create this dish, you need simple yet flavorful ingredients. The main star is the chicken breasts. I prefer boneless and skinless for a tender bite. They soak up all the garlic and cheese goodness. The garlic and butter blend adds depth. I use four cloves of garlic. Mince them finely to release their full flavor. The butter makes everything rich and creamy. Parmesan cheese is key for that savory taste. Grate it fresh for best results. I also mix in dried oregano, garlic powder, and onion powder. These spices enhance the flavor profile. Don’t forget salt and pepper to taste! - Fresh parsley - Additional seasoning options For a pop of color, I love adding fresh parsley. It brightens the dish and adds a hint of freshness. You can also play with other seasonings. Consider a sprinkle of paprika or a dash of red pepper flakes for a kick. {{ingredient_image_2}} 1. First, preheat your oven to 375°F (190°C). This warms up the oven for even cooking. 2. Next, in a small bowl, melt 4 tablespoons of unsalted butter. Add 4 cloves of finely minced garlic to the butter. Mix them well to create a tasty garlic butter mixture. 1. Place your 4 boneless, skinless chicken breasts in a baking dish. Make sure they lay flat and do not overlap. 2. Take the garlic butter mixture and brush it over each chicken breast. Cover them well for the best flavor. 3. In another bowl, mix 1 cup of grated Parmesan cheese, 1 teaspoon of dried oregano, 1 teaspoon of garlic powder, 1 teaspoon of onion powder, salt, and black pepper. Stir until blended. 4. Sprinkle this cheese mixture evenly over the chicken. Press it gently into the chicken to help it stick. 1. Place the baking dish in the oven. Bake the chicken for 25-30 minutes. Check that it reaches an internal temperature of 165°F (74°C) for safety. 2. After baking, take the dish out of the oven. Let the chicken rest for about 5 minutes. This helps keep the chicken juicy. To keep your chicken breast juicy, start with brining it. Soak it in a mix of water and salt for about 30 minutes. This step adds moisture and flavor. After brining, pat the chicken dry before cooking. This helps the skin crisp up nicely. The best internal temperature for doneness is 165°F (74°C). Use a meat thermometer to check the thickest part of the breast. Once it reaches this temp, remove it from the oven. Letting it rest for about 5 minutes keeps the juices inside. For extra flavor, consider marinating the chicken. A mix of olive oil, lemon juice, and herbs works well. Let it sit for at least 30 minutes or overnight for the best taste. You can also add spices to the mix. Consider using paprika, cumin, or red pepper flakes for a kick. These spices pair nicely with garlic and Parmesan. Don't be afraid to experiment until you find your favorite blend. Pro Tips Butter Temperature: Ensure your butter is melted but not too hot, as this can cook the garlic too quickly and make it bitter. Marinate for Flavor: For a deeper flavor, consider marinating the chicken in the garlic butter mixture for 30 minutes before baking. Cheese Variations: Experiment with different cheeses, such as mozzarella or Asiago, for a unique twist on the dish. Resting Time: Always allow the chicken to rest after baking; this helps retain its juices for a more succulent bite. {{image_4}} You can switch up the cheese for new flavors. Here are some great options: - Mozzarella: This cheese melts well and gives a lovely stretch. - Asiago: A bit sharper than Parmesan, it adds a nice kick. - Cheddar: For a bold taste, use sharp cheddar for a twist. Adding herbs can enhance the taste. Try these: - Basil: Fresh basil brings a sweet, aromatic touch. - Thyme: This herb adds a woodsy flavor. - Rosemary: It offers a fragrant, earthy taste. You don’t have to bake the chicken. Here are some fun methods: - Air frying: This gives you a crispy outside while keeping the inside juicy. Cook at 375°F for about 15-18 minutes. - Grilling: Grilling brings a smoky flavor. Cook the chicken on medium heat for about 6-7 minutes per side. The grill marks alone will impress your guests! These options let you enjoy Garlic Parmesan Chicken in new ways. Experiment and find your favorite! To keep your Garlic Parmesan Chicken juicy, store it in an airtight container. Make sure it cools down first. Place it in the fridge for up to three days. If you want to save it longer, freezing works great. Wrap each piece tightly in plastic wrap or foil. Then, put them in a freezer bag. This way, you can enjoy this dish later, up to three months. When it’s time to eat the leftovers, don't let them dry out. The best method is to use an oven. Preheat it to 350°F (175°C). Place the chicken in a baking dish, cover it with foil, and heat for 15-20 minutes. This keeps it moist. You can also use a microwave, but be careful. Heat it in short bursts, around 1-2 minutes. Check often to avoid drying it out. Can I use chicken thighs instead of breasts? Yes, you can use chicken thighs. They will have a richer flavor and can stay juicier. Just adjust the cooking time. Thighs usually take a bit longer due to their thickness. How do I know when chicken is properly cooked? The chicken is safe to eat when it reaches 165°F (74°C) in the center. Use a meat thermometer for accuracy. You can also check that the juices run clear, not pink. Calories per serving Each serving of Garlic Parmesan Chicken Breast has about 400 calories. This may vary based on portion size and extra ingredients. Health benefits of garlic and parmesan Garlic may boost your immune system and lower blood pressure. It adds flavor without extra fat. Parmesan cheese is high in protein and calcium, which are good for bones. Best side dishes to pair with Garlic Parmesan Chicken Breast Great sides include sautéed spinach, roasted veggies, or garlic mashed potatoes. These options balance the meal and add color. How to create a full meal around this dish To make a full meal, serve the chicken with a salad and a grain like quinoa or rice. This adds fiber and makes the dish well-rounded. You can also include a light dessert for a complete dining experience. This recipe shows you how to make delicious Garlic Parmesan Chicken Breasts. You use simple ingredients like chicken, garlic, and cheese. Follow the steps for baking and enjoy juicy chicken every time. Remember, you can also try different cheeses or cooking methods to mix things up. Don't forget to store leftovers properly and reheat them to keep the flavor. Now, you're ready to impress with your tasty meal!

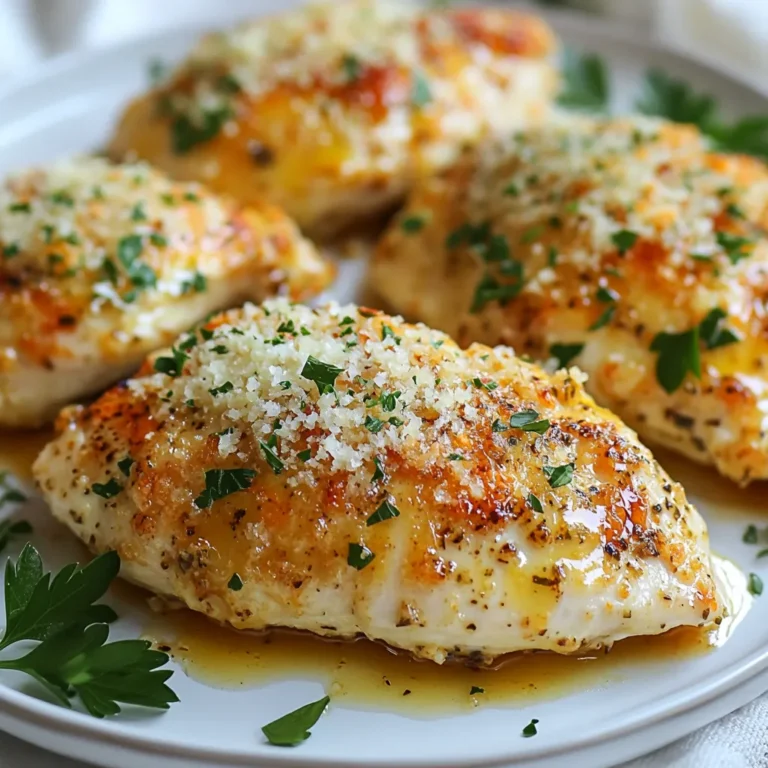
Garlic Parmesan Chicken Breast Juicy and Flavorful Dish

PREV 1 … 14 15 16 … 18 NEXT
feastful focus

explore

DessertsDinnerAppetizersDrinks

Our Policies

  • Cookie Policy
  • Copyright Policy
  • Disclaimer
  • GDPR Policy
  • Terms Of Use
Back to Top
  • About
  • Contact Us
  • Privacy Policy
© 2025 feastful focus