FREE DINNER EBOOK! Get your copy!
  • Cookie Policy
  • GDPR Policy
  • Disclaimer
  • Terms Of Use
  • Visit my other site: Fun Cookie Recipes
feastful focus
  • Home
  • Dinner
  • Desserts
  • Drinks
  • Appetizers
  • Contact
  • About
  • Privacy Policy
  • Home
  • Dinner
  • Desserts
  • Drinks
  • Appetizers
  • Contact
  • About
  • Privacy Policy
  • Cookie Policy
  • GDPR Policy
  • Disclaimer
  • Terms Of Use
Visit my other site: Fun Cookie Recipes

HOME / CATEGORIES /

Latest

- 2 cups heavy cream - 1 cup whole milk - 3/4 cup granulated sugar - 1 tablespoon pure vanilla extract - 1/2 cup fresh cherries, pitted and finely chopped - 1/2 cup semi-sweet chocolate chips Heavy cream gives the ice cream a rich texture. You can use light cream if you want a lighter version. Whole milk adds creaminess, but you can use 2% milk if that’s all you have. Granulated sugar sweetens the mix. If you need a sugar-free option, try a sugar substitute. Pure vanilla extract adds flavor. Avoid imitation vanilla for the best taste. Cherries are a must! If fresh cherries are hard to find, frozen cherries work too. Semi-sweet chocolate chips bring the right chocolatey taste. You could use dark chocolate for a richer flavor. When you pick cherries, look for bright colors and firm texture. Avoid any with soft spots or bruises. The stems should be green, not brown, which shows they are fresh. If you can, taste a cherry before buying! Sweet cherries taste best in ice cream. When you get home, wash them gently and dry them. Then, pit and chop them to get ready for your ice cream mix. Fresh cherries make the ice cream tasty and colorful! {{ingredient_image_2}} Start by gathering your ingredients. You need heavy cream, whole milk, sugar, and vanilla. In a large bowl, mix the heavy cream, whole milk, and sugar. Whisk until the sugar dissolves. This creates a smooth mix. Next, add the vanilla extract. Stir gently to blend this sweet flavor. Pour the creamy mix into your ice cream maker. Follow the machine’s guide for churning time. Usually, it takes around 20 to 25 minutes. You want the ice cream to become thick and smooth, similar to soft-serve. Keep an eye on it as it churns. You will see it change texture. While the ice cream churns, prepare the cherries. Pit them and chop them into small pieces. If you want, sprinkle a bit of sugar on them for extra sweetness. Once the ice cream is ready, gently fold in the chopped cherries and chocolate chips using a spatula. Make sure they spread evenly throughout the mix. This step adds bursts of flavor to each scoop! To get the best texture, focus on your mixing. Blend the heavy cream, whole milk, and sugar until smooth. This step is key. If you mix too little, your ice cream can turn out icy. Aim for a creamy base before you churn. When using your ice cream maker, don't over-churn. This will help keep it soft and not too hard. Vanilla adds a nice touch to your ice cream. Use pure vanilla extract for the best taste. It brings out the sweetness of the cherries. Don't skip this step! You can even try adding a bit more if you want a stronger flavor. Just remember, balance is key. Too much vanilla can overwhelm the other flavors. One common mistake is not pitting the cherries well. Always remove the pits. Cherries with pits can ruin the whole experience. Another error is adding the mix-ins too early. Wait until the ice cream is almost done churning. This keeps the chocolate and cherries from sinking to the bottom. Lastly, avoid rushing the freezing process. Let your ice cream freeze until it's firm for the best result. Pro Tips Chill Your Ingredients: For a creamier texture, chill your cream and milk in the refrigerator for a few hours before mixing. This helps the ice cream churn faster and results in a smoother consistency. Choose the Right Cherries: Use ripe, sweet cherries for the best flavor. If fresh cherries are out of season, frozen cherries can be a great alternative, just thaw and drain them before use. Mix-Ins Timing: Add the cherries and chocolate chips to the ice cream during the last few minutes of churning to ensure they are evenly distributed without breaking apart. Storage Tips: To prevent ice crystals forming, press a piece of plastic wrap directly onto the surface of the ice cream before sealing the container. This helps maintain a smooth texture while stored. {{image_4}} You can make a dairy-free version of Cherry Garcia ice cream. Swap the heavy cream and whole milk for coconut cream and almond milk. This change keeps the ice cream creamy and rich. Use the same amounts as in the original recipe. You’ll still get that sweet cherry and chocolate taste. Just make sure to check the labels of your products to avoid any dairy. If you love fruit, try adding other options. Strawberries or raspberries work great! You can replace the cherries or mix them in. Just chop them up and fold them in like the cherries. This change gives your ice cream a new flavor. You could even mix in a bit of banana for a fun twist. For chocolate lovers, add more chocolate! Use chocolate chunks instead of chips. You can also try dark chocolate or white chocolate. For extra crunch, add nuts like walnuts or pecans. These mix-ins bring a new texture to your ice cream. You can combine them with the cherries or use them alone. Each scoop becomes a unique treat! To keep your Cherry Garcia ice cream fresh, use an airtight container. This prevents air from getting in. Air can cause ice crystals to form. When you scoop, use a clean spoon each time. This helps avoid contamination. For the best taste, freeze your ice cream at zero degrees Fahrenheit. This keeps it firm and creamy. If your freezer is too cold, ice cream can become too hard. Let it sit out for a few minutes before serving. This softens it back to a scoopable state. Homemade ice cream lasts about two weeks in the freezer. After that, the flavor may fade. For the best quality, try to enjoy it within the first week. If it develops an icy layer, it’s time to let it go. Freshness is key to enjoying every bite! Yes, you can make Cherry Garcia ice cream without an ice cream maker. Use a large bowl and a whisk. Mix the cream, milk, and sugar until smooth. Then, pour this mix into a freezer-safe container. Freeze it for about 1 hour. After that, stir it well with a fork. Return it to the freezer. Repeat this every 30 minutes for about 3 hours. This helps break up ice crystals and makes it creamy. Homemade ice cream can last in the freezer for about 2 to 4 weeks. To keep it fresh, store it in an airtight container. Make sure to press plastic wrap against the surface before sealing. This reduces air exposure and helps prevent ice crystals from forming. If it develops an icy texture, just stir it a bit before serving. Cherries pair well with many flavors in ice cream. Here are some great options: - Vanilla: It enhances the cherry taste. - Almond: Adds a nice nutty flavor. - Chocolate: Rich and sweet, a classic combo. - Coconut: Gives a tropical twist. - Mint: Adds a refreshing touch. Experiment with these flavors to find your favorite mix! We covered how to make Cherry Garcia ice cream from start to finish. You learned about key ingredients, step-by-step preparation, and helpful tips to avoid mistakes. We discussed tasty variations, storage methods, and answered common questions. Making this treat is fun and rewarding. You can enjoy fresh cherries or mix in other flavors. Experiment and have fun with your own creations! Remember, homemade ice cream brings joy to everyone.

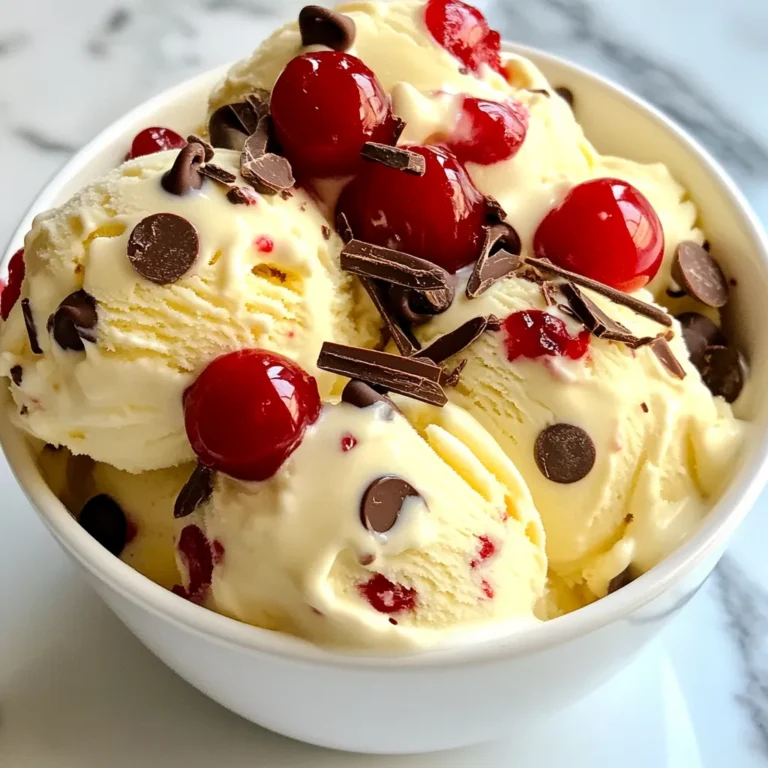
Cherry Garcia Ice Cream Copycat Easy Homemade Treat

- 8 oz (225g) whole wheat penne pasta - 4 cups fresh arugula, roughly chopped - 1 cup cherry tomatoes, halved - 1/2 cup cucumber, diced into small cubes - 1/4 cup red onion, thinly sliced - 1/3 cup feta cheese, crumbled - 1/4 cup toasted pine nuts, for garnishing - 3 tablespoons extra virgin olive oil - 2 tablespoons fresh lemon juice - Zest of 1 medium lemon - 1 teaspoon honey, or to taste - Salt and freshly cracked black pepper, to taste You can swap arugula for spinach or kale if you prefer. For a dairy-free option, use a vegan feta. Whole wheat pasta offers great fiber, but you can use gluten-free pasta if needed. For dressings, a balsamic vinaigrette works well too. This salad has about 250 calories per serving. It has around 10 grams of protein, 15 grams of fat, and 30 grams of carbs. Arugula is high in vitamins A, C, and K, while cherry tomatoes give antioxidants. Whole wheat pasta adds fiber, which is great for digestion. {{ingredient_image_2}} To cook whole wheat penne, start by bringing a large pot of salted water to a rolling boil. Add 8 ounces of the pasta and cook it according to the package instructions. It usually takes about 9 to 11 minutes to achieve al dente. Once done, drain the pasta in a colander. Rinsing the pasta under cold running water is key. This stops the cooking process and cools it down quickly. To make the dressing, gather a small bowl. Combine 3 tablespoons of extra virgin olive oil, 2 tablespoons of fresh lemon juice, and the zest of one medium lemon. Add 1 teaspoon of honey, salt, and freshly cracked black pepper to taste. Whisk the mixture well until it is smooth and creamy. Mixing it well helps blend the flavors nicely. You can adjust the flavor by adding more honey for sweetness or extra lemon juice for tartness. In the bowl with your cooled pasta, add 4 cups of roughly chopped arugula, 1 cup of halved cherry tomatoes, 1/2 cup of diced cucumber, 1/4 cup of thinly sliced red onion, and 1/3 cup of crumbled feta cheese. Drizzle the dressing over the top. Using tongs or a large spoon, gently toss everything together. This ensures that each bite is full of flavor and dressing. For a finishing touch, sprinkle 1/4 cup of toasted pine nuts over the salad right before serving. This adds a nice crunch and depth. You can serve the salad at room temperature or chilled. I recommend letting it sit for about 10 minutes before serving. This time allows the flavors to meld beautifully. To make it look even better, use large, shallow bowls and garnish with extra lemon zest and whole arugula leaves. To achieve a balanced flavor in your Lemon Arugula Pasta Salad, focus on the dressing. The blend of fresh lemon juice, honey, and olive oil creates a bright taste. Adjust the honey to match your sweetness level. The salt and pepper should enhance, not overpower, the salad. Resting time is key. Letting the salad sit for about 10 minutes allows flavors to mix. This small wait transforms your dish into a flavor-filled delight. Serve it at room temp or chilled for the best experience. Store leftovers in an airtight container. This keeps the salad fresh and tasty. You can keep it in the fridge for up to three days. The pasta may soak up some dressing, so add more before serving. Pair your salad with grilled chicken or fish. This adds protein and makes a complete meal. For a fun twist, serve it in jars for easy transport. You can even layer the ingredients for a colorful display. Pro Tips Cook the Pasta Perfectly: Make sure to cook the pasta al dente to maintain its texture. This will prevent the pasta from becoming mushy when mixed with the dressing and other ingredients. Fresh Ingredients Matter: Use fresh, high-quality ingredients, especially for the arugula and tomatoes. This enhances the flavor and nutritional value of your salad. Let it Rest: Allowing the salad to sit for about 10 minutes before serving helps the flavors meld together, resulting in a more delicious dish. Experiment with Additions: Feel free to add other ingredients like grilled chicken, olives, or avocado for a more filling meal and to customize it to your taste. {{image_4}} You can easily make this pasta salad vegan. Just swap the feta cheese for a vegan cheese alternative. Many brands offer great-tasting options that melt well. For the dressing, stick with the same base but replace honey with maple syrup or agave nectar. This keeps it sweet and light. If you want to add protein, grilled chicken or shrimp works well. Just cook them first and slice them before mixing. For a vegetarian option, try chickpeas or edamame. Both add protein and texture to the dish. You can also use diced tofu for a plant-based boost. This salad is great with seasonal veggies. In spring, add peas or asparagus for crunch. In summer, try bell peppers or zucchini for freshness. Fall brings roasted squash or beets, which add warmth. Adjust the herbs too; basil in summer or sage in fall can change the flavor profile. Lemon arugula pasta salad can last about three days in the fridge. Make sure to store it in an airtight container. The fresh ingredients will stay tasty, but the arugula may wilt over time. For the best flavor and texture, enjoy it within the first two days. Yes, you can make this salad ahead of time. Prepare the pasta and dressing in advance. Mix them with the fresh veggies just before serving. This keeps the salad crunchy and fresh. If you store it without the dressing, it will taste better when you’re ready to eat. You can serve this salad chilled or at room temperature. For a fun twist, serve it in large, shallow bowls. Add extra lemon zest and whole arugula leaves on top for a beautiful look. You can pair it with grilled chicken or shrimp for a hearty meal. Absolutely! You can swap whole wheat penne for other pasta types. Try rotini, fusilli, or even gluten-free pasta. Just make sure to cook it al dente for the best texture. Each pasta shape will give the salad a unique twist while keeping it fresh and tasty. To capture the beauty of your Lemon Arugula Pasta Salad, use natural light. Place your dish near a window for the best results. Avoid harsh shadows by diffusing sunlight with a white curtain. For a pleasing aesthetic, arrange the salad in layers. Start with pasta, then add arugula and tomatoes. This makes the colors pop and draws the eye. For presentation, choose shallow, wide bowls. They allow guests to see all the vibrant colors. A large white platter can also enhance the dish's look. Garnish with lemon zest and a few whole arugula leaves. This adds freshness and makes the salad more inviting. When taking photos, focus on the fresh ingredients. Capture close-ups of the cherry tomatoes and crumbled feta. Show the texture of the dressing, as it coats the pasta. This invites viewers to imagine the flavors. The vibrant colors and textures will make your dish irresistible to anyone scrolling through their feed. This blog post covered a bright and tasty Lemon Arugula Pasta Salad. We explored the best ingredients and their healthy benefits. We discussed how to cook and mix everything for a delicious dish. I shared tips for serving and storing leftovers. You can even switch things up with fun variations! In conclusion, this salad is easy to make and good for you. It’s perfect for parties or quick meals. Enjoy making it your own!

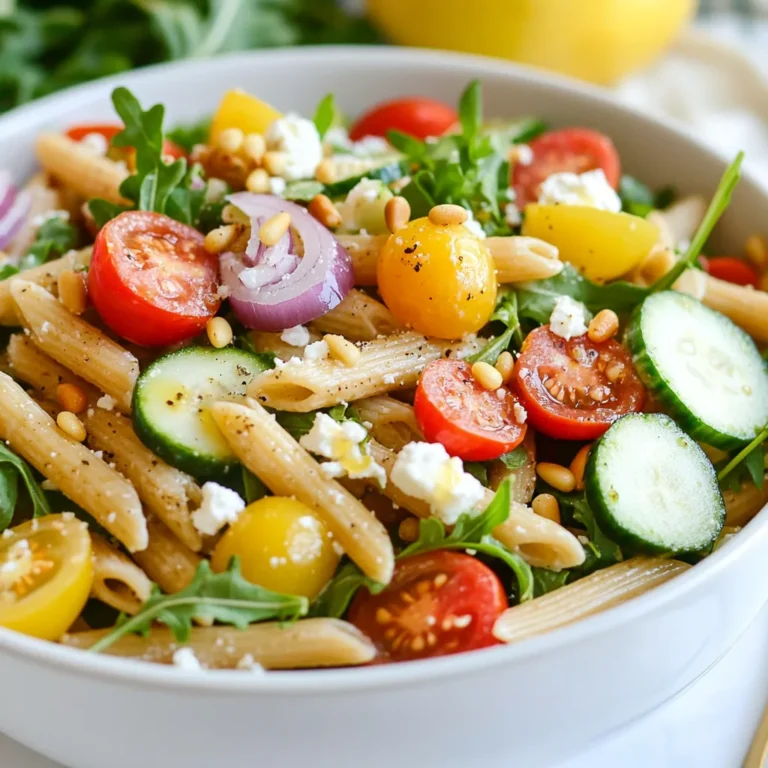
Lemon Arugula Pasta Salad Fresh and Flavorful Delight

To make bruschetta chicken pasta, you need a few key items. Here’s the list: - Chicken Breasts: Use 2 boneless, skinless chicken breasts. They cook quickly and stay juicy. - Pasta Type: I recommend 8 oz of penne pasta. It holds sauce well and adds a nice bite. - Fresh Vegetables: For this dish, use 1 cup of halved cherry tomatoes and 1/2 cup of chopped fresh basil. They give bright flavors and color. - Seasonings and Oils: You will need 2 cloves of minced garlic, 1 tablespoon of balsamic vinegar, and 1 tablespoon of olive oil. These ingredients enhance the taste. - Cheese Options: Add 1/2 cup of shredded mozzarella cheese and 1/4 cup of grated Parmesan cheese. They melt nicely and create a creamy texture. Having these ingredients ready will make cooking easy and fun! {{ingredient_image_2}} First, fill a large pot with water and add salt. Bring it to a rolling boil. Add the penne pasta. Cook it according to the package instructions. You want the pasta to be al dente, which means it should be firm to the bite. This usually takes around 10-12 minutes. After cooking, drain the pasta in a colander. Set it aside to keep warm. While your pasta cooks, grab a large skillet. Heat the olive oil over medium heat. Season the chicken breasts well with salt and pepper. When the oil shimmers, add the chicken to the skillet. Sear each side for about 6-7 minutes. You want a nice golden-brown crust. Once done, move the chicken to a cutting board. Let it rest for a few minutes before slicing into bite-sized pieces. In the same skillet, add minced garlic. Sauté it for about one minute. It should smell great and start to soften. Next, toss in the halved cherry tomatoes and the balsamic vinegar. Stir them well. Cook this for 3-4 minutes until the tomatoes soften and their juices flow out. Now, add the warm, drained penne pasta to the skillet. Gently toss it with the tomato mixture. Make sure every piece of pasta gets coated. Add the sliced chicken and chopped basil. Mix everything thoroughly to combine all the flavors. Sprinkle shredded mozzarella and half of the grated Parmesan cheese over the pasta. Toss again to help the cheese melt. This will give you a creamy texture that makes the dish so good. To serve, scoop the bruschetta chicken pasta into a large shallow bowl. For a nice touch, garnish with more fresh basil leaves. Drizzle a bit of olive oil on top for a vibrant finish. Enjoy this simple yet delicious meal! To boost the flavor of bruschetta chicken pasta, use fresh herbs. I recommend basil and oregano. These herbs add bright notes to the dish. You can also sprinkle in some red pepper flakes for a little heat. For marinating the chicken, try a mix of olive oil, balsamic vinegar, and garlic. Let the chicken sit for at least 30 minutes. This gives it time to soak up those tasty flavors. To avoid overcooking the pasta, watch the clock closely. Cook it just until it is al dente. This means it should have a slight bite to it. After draining, toss it with a little olive oil to stop it from sticking. To keep the chicken juicy, don’t skip the resting time. After cooking, let it rest for a few minutes. This step helps the juices stay inside the meat. It will taste much better! Bruschetta chicken pasta shines when served with a side salad. A simple arugula salad with lemon dressing pairs well. You can also serve it with garlic bread for a classic touch. For the best sides, consider roasted vegetables. Zucchini or bell peppers work great. They add color and nutrition to your meal. Enjoy your beautiful plate! Pro Tips Let the Chicken Rest: After searing the chicken, allow it to rest for a few minutes before slicing. This helps the juices redistribute, making the chicken more tender and flavorful. Fresh Basil Matters: Use fresh basil for the best flavor. If you can't find fresh, consider using a small amount of dried basil, but remember that the taste will be different. Perfectly Cooked Pasta: Always cook pasta until al dente for the best texture. It will continue to cook slightly after being added to the skillet, so avoid overcooking. Balsamic Vinegar Substitute: If you don't have balsamic vinegar, red wine vinegar can be a good substitute, though it will give a slightly different flavor profile to the dish. {{image_4}} If you want a gluten-free option, use gluten-free pasta. This pasta comes in many types, like brown rice or corn. Both work well in this dish. For cheese, try low-fat mozzarella or ricotta. These options cut calories while keeping flavor. You can change proteins based on your taste. Try shrimp, turkey, or even tofu. These can add new flavors and textures. For veggies, consider spinach, bell peppers, or zucchini. Each adds color and nutrition to your meal. Want to spice things up? Add some red pepper flakes for heat. This small change can give your dish a bold kick. You can also switch sauces. Consider pesto or Alfredo sauce for a creamy twist. Each sauce will change the dish's taste in a fun way. For the best storage, use airtight containers. Glass or plastic containers work well. Store the bruschetta chicken pasta in the fridge right after it cools down. It stays fresh for up to three days. After that, the flavors may fade, and the pasta can become mushy. To keep the flavor, reheat the pasta on the stove. Add a splash of water or broth to prevent drying. Stir gently over low heat until everything is warm. You can also use the microwave. Heat it in short bursts, stirring in between. This way, the pasta warms evenly. To freeze bruschetta chicken pasta, let it cool completely first. Then, pack it in freezer-safe containers or bags. Make sure to remove as much air as possible. It can last for up to three months in the freezer. When ready to eat, thaw it in the fridge overnight. For reheating, use the stove or microwave as mentioned before. Add a bit of water if it looks dry after thawing. Enjoy a taste of your cooking anytime! You can make bruschetta chicken pasta healthier by using whole wheat pasta. This adds fiber and nutrients. You can also reduce the cheese amount. Use less mozzarella and Parmesan to cut calories. Another option is to use skinless chicken thighs instead of breasts. They are flavorful and juicy. Adding more veggies like spinach or zucchini boosts the dish's nutrition. Yes, you can prep bruschetta chicken pasta ahead of time. Cook the pasta and chicken, then let them cool. Store them separately in airtight containers. You can keep them in the fridge for up to three days. When you are ready to eat, just reheat everything together. Add fresh basil and cheese right before serving for the best flavor. Absolutely! You can use turkey or shrimp instead of chicken. Both options work well with the flavors in this dish. If you prefer plant-based proteins, try using chickpeas or tofu. They soak up the sauce nicely and provide a great texture. To make bruschetta chicken pasta vegetarian, skip the chicken. Use beans like cannellini or black beans for protein. You can also add more vegetables like bell peppers, mushrooms, or eggplant. This makes the dish hearty and filling. Use vegetable broth instead of chicken broth for extra flavor. This blog post covered how to make bruschetta chicken pasta. We discussed key ingredients, step-by-step cooking methods, and tips to enhance flavors. You learned about variations for dietary needs and storage tips for freshness. In the end, this dish is both easy to prepare and delicious. With simple swaps and some creativity, you can make it fit your taste and health goals. Enjoy creating your own version, and share it with others!

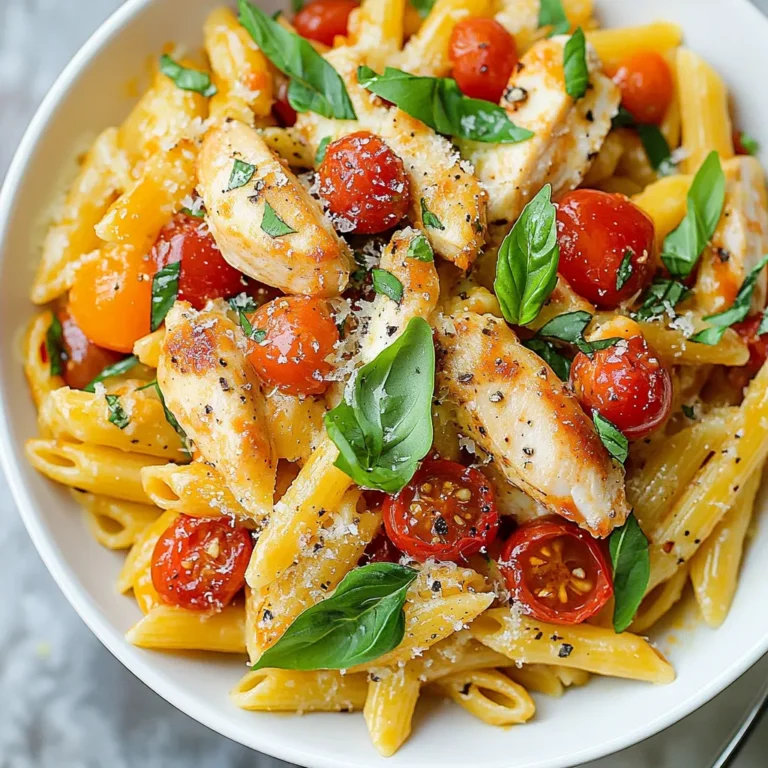
Bruschetta Chicken Pasta Flavorful and Easy Recipe

To make Million Dollar Spaghetti Squash Pasta, gather these fresh and tasty ingredients: - 1 medium spaghetti squash - 1 tablespoon olive oil - 1 teaspoon garlic powder - 2 cups marinara sauce - 1 cup ricotta cheese - 1 cup shredded mozzarella cheese - ½ cup grated Parmesan cheese - 1 teaspoon Italian seasoning - Salt and pepper to taste - Fresh basil leaves for garnish Each ingredient plays a key role in the dish's flavor and texture. The spaghetti squash becomes the pasta base, offering a fun twist on traditional noodles. Olive oil adds a rich taste. Garlic powder brings in that warm, savory flavor. Marinara sauce adds depth and moisture. The cheeses—ricotta, mozzarella, and Parmesan—create a creamy, cheesy delight that binds everything together. Italian seasoning rounds out the flavors with herbs. Finally, salt and pepper enhance the overall taste, while fresh basil adds a pop of color and freshness. These ingredients make this dish not just delicious but also a visual treat on your plate! {{ingredient_image_2}} Start by preheating your oven to 400°F (200°C). This temperature is key for roasting. A hot oven helps the squash cook evenly and become tender. To prepare the spaghetti squash, carefully cut it in half lengthwise. Use a sharp knife for safety and ease. Once halved, scoop out the seeds using a spoon. Discard the seeds to make space for the filling. Drizzle olive oil on the inside of each squash half. Sprinkle garlic powder, salt, and pepper for flavor. These seasonings enhance the taste and make each bite delicious. Place the squash cut side down on a baking sheet lined with parchment paper. Roast for about 40 minutes. You want the flesh to be tender enough to shred easily with a fork. While the squash roasts, mix the cheese filling. In a bowl, combine ricotta, half a cup of mozzarella, Parmesan, Italian seasoning, and a pinch of salt and pepper. Stir until smooth and well-blended. After roasting, let the squash cool for a few minutes. Then, use a fork to gently shred the flesh into long, noodle-like strands. This will create the “pasta” for your dish. In a large mixing bowl, add the shredded squash, marinara sauce, and cheese mixture. Stir well to coat everything evenly with the sauce and cheese. This ensures every bite is packed with flavor. Spoon the mixture back into the hollowed-out squash halves. Fill them generously so each bite is full. Top with the remaining mozzarella for a cheesy finish. Return the stuffed squash to the oven and bake for 15 more minutes. This step melts the cheese and gives a bubbly, golden top. Once out of the oven, let the squash cool slightly. Garnish with fresh basil leaves for a burst of color and flavor. Slice and serve to your guests for a delightful meal! When picking spaghetti squash, size matters. Aim for a medium squash, about 3 to 4 pounds. This size has a good ratio of flesh to skin. Look for a squash with a firm shell. Avoid any with soft spots or blemishes. A ripe squash will have a rich yellow color. This means it is ready for cooking. You can change the flavors by using different cheeses or sauces. Try goat cheese or feta for a tangy twist. If you want a creamy sauce, use Alfredo instead of marinara. You can also mix in fresh herbs like thyme or oregano for more depth. These changes can make the dish feel new each time you cook it. Add extra ingredients to boost flavor. Cooked spinach or kale can add nutrients and color. If you like spice, sprinkle in some crushed red pepper flakes. Chopped sun-dried tomatoes can give a sweet and savory touch. For a twist, consider adding ground turkey or sausage for protein. Each of these choices can make your dish unique and delicious. Pro Tips Choose a Ripe Squash: Look for a spaghetti squash that is firm, with a uniform yellow color and no soft spots to ensure the best flavor and texture. Enhance the Flavor: For added depth, consider roasting the squash with fresh garlic cloves alongside it; this infuses a wonderful aroma and taste. Make Ahead: You can prepare the spaghetti squash and cheese mixture in advance. Just assemble and bake it when you’re ready to serve for convenience. Experiment with Cheeses: Feel free to mix in different cheeses like goat cheese or feta for a unique twist on the classic flavors in this dish. {{image_4}} To make this dish vegan, you can swap out the cheese and sauce. Use cashew cheese instead of ricotta. For mozzarella, try nut-based cheese or vegan mozzarella. Look for marinara sauce without added cheese. Fresh herbs can add flavor without dairy. This recipe is gluten-free if you choose the right ingredients. Most marinara sauces are gluten-free, but always check the label. Avoid any bread-based toppings. Ensure the cheese substitutes are also gluten-free. This way, everyone can enjoy the meal. Want to add protein? Ground turkey or beef blends well in this dish. Cook the meat before mixing it with the squash. You can also use cooked chicken or sausage for added flavor. Just remember to adjust the seasoning for balance. To keep your Million Dollar Spaghetti Squash Pasta fresh, place leftovers in an airtight container. Make sure to cool the dish to room temperature before sealing. Store it in the fridge for up to three days. Label the container with the date, so you know when to enjoy it by. When reheating, use the oven for the best results. Preheat your oven to 350°F (175°C). Place the pasta in a baking dish and cover it with foil. Heat for about 15 to 20 minutes, or until warm. If you want a crispy top, remove the foil for the last five minutes. You can also reheat individual servings in the microwave. Just cover with a damp paper towel and heat in short bursts. To freeze, let the dish cool completely. Portion it into freezer-safe containers or bags. Remove as much air as possible to prevent freezer burn. Label each container with the date. You can freeze the pasta for up to three months. To thaw, place it in the fridge overnight. Reheat it as mentioned above for a tasty meal. Spaghetti squash is a unique vegetable. When cooked, its flesh turns into strands that look like spaghetti. It is low in calories and high in nutrients. Here’s a quick look at its nutrition: - Low in calories - High in fiber - Rich in vitamins A and C - Contains potassium and magnesium This makes it a great choice for healthy meals. Yes, you can cook spaghetti squash in a microwave. It’s a quick method if you’re short on time. Here’s how: 1. Cut the squash in half and remove the seeds. 2. Place it cut side down in a microwave-safe dish. 3. Add a little water and cover with plastic wrap. 4. Microwave for about 10-12 minutes. This method saves time and still gives you that tasty squash. You’ll know the squash is done when it’s tender. Here are some signs to check for: - Flesh can be easily shredded with a fork. - The skin feels soft when pressed. - It should take about 40 minutes in the oven. These signs show that your squash is ready for mixing. Yes, you can prepare this dish in advance. Here are some tips for prepping and storing: - Cook and stuff the squash a day ahead. - Store it in an airtight container in the fridge. - Reheat it in the oven when you’re ready to eat. This makes it easy to serve a delicious meal quickly. Spaghetti squash pairs well with many side dishes. Here are some ideas: - A fresh green salad for a light touch. - Garlic bread for a classic combo. - Roasted veggies for extra flavor. These sides will enhance your meal and add variety. In this article, we explored how to make a delicious spaghetti squash dish. You learned about the key ingredients, step-by-step instructions, and tips for improving your meal. I covered variations for different diets, storage tips, and answered common questions. Remember, cooking is about creativity and fun. Experiment with flavors and enjoy this tasty, healthy meal. Your kitchen can be a place of joy and discovery with spaghetti squash!

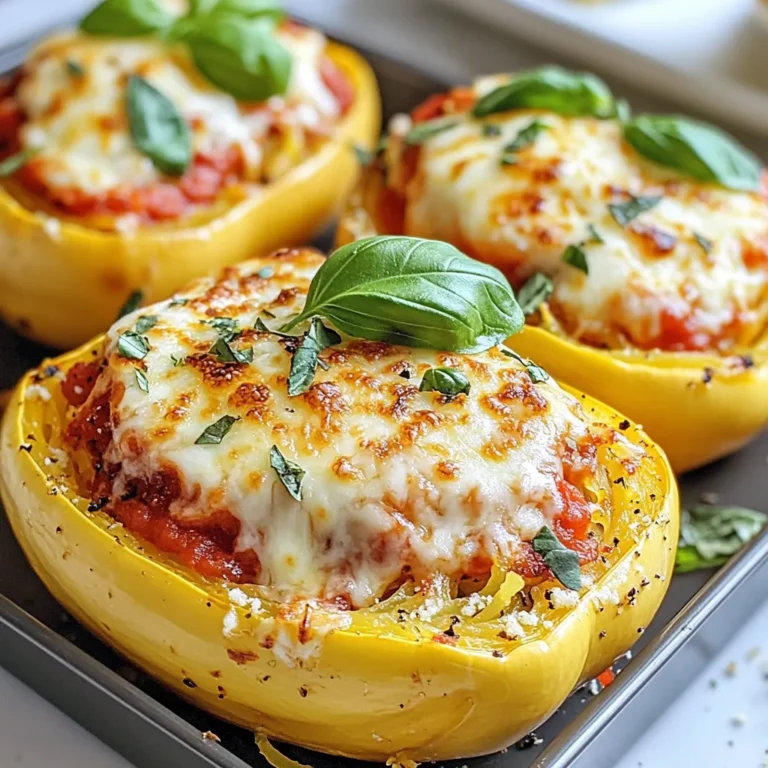
Million Dollar Spaghetti Squash Pasta Delightful Dish

For this tasty dish, you need: - 4 boneless, skinless chicken breasts - 4 tablespoons high-quality olive oil - 6 cloves fresh garlic, finely minced - 1 cup low-sodium chicken broth - 1 tablespoon freshly squeezed lemon juice - Fresh parsley, finely chopped (for garnish) These main ingredients bring rich flavors and a lovely texture to your meal. The chicken breasts are the star here, providing a lean source of protein. Olive oil helps in cooking and adds richness. Fresh garlic infuses the dish with its unique aroma. Chicken broth keeps the chicken moist and flavorful, while lemon juice adds a bright touch. The seasonings will make your chicken pop with flavor. Use: - 1 teaspoon smoked paprika - 1 teaspoon dried oregano - Salt and pepper to taste - 1/2 teaspoon red pepper flakes (optional) Smoked paprika gives a warm, smoky taste. Dried oregano adds an aromatic twist. Salt and pepper elevate the flavors, while red pepper flakes offer a spicy kick for those who enjoy heat. You can customize your dish with these optional ingredients: - A splash of white wine for depth - Additional herbs like thyme or basil for freshness These ingredients can enhance your dish and make it uniquely yours. A splash of white wine can create a richer sauce, while fresh herbs can add a burst of color and flavor. Feel free to experiment and find what you love! {{ingredient_image_2}} Start by grabbing a large, heavy skillet. Pour in 2 tablespoons of olive oil. Heat it over medium-high heat until it shimmers. While it warms, season your chicken breasts. Sprinkle salt, pepper, smoked paprika, and oregano on both sides. This will add great taste. Once the oil is hot, add the chicken breasts carefully. Let them cook for 5-6 minutes without moving. This helps form a golden brown crust. After that, flip the chicken over gently. Add the remaining olive oil to the skillet. Now, toss in the minced garlic and red pepper flakes, if using. Sauté for about 1 minute. Stir often, but don’t let the garlic brown. It can turn bitter. Next, pour in the chicken broth and lemon juice. Cover the skillet and reduce the heat to medium-low. Let it simmer for 10-15 minutes. Ensure the chicken reaches 165°F (75°C). After cooking, uncover and let it simmer for another 2-3 minutes. This thickens the sauce and boosts the flavors. Finally, garnish with chopped parsley for a fresh touch. To get that lovely golden crust, start with a hot skillet. Heat 2 tablespoons of olive oil until it shimmers. Season the chicken well with salt, black pepper, smoked paprika, and oregano. Place the chicken in the skillet without moving it for 5-6 minutes. This helps the crust form. Once golden, flip the chicken gently. The crust will add great flavor! Garlic is key for flavor. When you add the minced garlic, do it after flipping the chicken. Stir it for about one minute. Watch closely! If garlic browns, it gets bitter. You want it fragrant and soft. This step enhances the dish without overpowering it. Cooking chicken to the right temperature is vital. Use a meat thermometer to check for doneness. The chicken must reach 165°F (75°C). This ensures it is safe to eat and juicy. After cooking, let it simmer for a few extra minutes. This helps thicken the sauce and locks in all the flavors. Pro Tips Use a Meat Thermometer: To ensure your chicken is cooked perfectly, use a meat thermometer to check that it has reached an internal temperature of 165°F (75°C). Marinate for Extra Flavor: For a deeper flavor, consider marinating the chicken in olive oil, garlic, and spices for at least 30 minutes before cooking. Don’t Rush the Browning: Allow the chicken to brown properly before flipping. This helps develop a rich flavor and a nice crust. Serve with a Side: Pair your chicken with a side of steamed vegetables or a light salad for a balanced meal that complements the flavors. {{image_4}} You can boost the health of your garlic skillet chicken by adding vegetables. Veggies like spinach, bell peppers, or zucchini work well. Just chop them into bite-sized pieces. Add them to the skillet after you flip the chicken. Sauté them for about 3-4 minutes. This gives the dish color and extra nutrients. Plus, they soak up the tasty garlic sauce. If you want to mix it up, try different proteins. You can use turkey cutlets or even firm tofu for a vegetarian option. Adjust the cooking time based on what you choose. Chicken is the classic option, but turkey or tofu can add new flavors. Do you like spice? You can easily make this dish hotter. Add more red pepper flakes to the garlic mix. If you want a bigger kick, consider jalapeños or hot sauce. Just be careful, as too much can overpower the garlic flavor. Start small and taste as you go. This way, you find the heat that suits your taste! To keep your garlic skillet chicken fresh, store it in an airtight container. Let it cool down before placing it in the fridge. This helps prevent moisture build-up. You can keep it for up to 3 days. Remember to separate the chicken from the sauce if you prefer. This can help the chicken stay tender. When you reheat garlic skillet chicken, do it gently. Use a skillet over low heat. Add a splash of chicken broth to keep it moist. Stir occasionally to heat evenly. You can also use the microwave. Place the chicken on a microwave-safe dish. Cover it with a damp paper towel to trap steam. Heat for 1-2 minutes, checking to avoid overcooking. Freezing garlic skillet chicken is easy! First, let it cool completely. Then, wrap it tightly in plastic wrap. Place it in a freezer bag. Remove as much air as possible. You can freeze it for up to 3 months. When ready to eat, thaw it overnight in the fridge. Reheat using the tips mentioned above for best results. Yes, you can use bone-in chicken. Bone-in pieces add rich flavor. Cooking time will be longer. You need about 25-30 minutes for bone-in chicken. Make sure it reaches 165°F (75°C) inside. Garlic Skillet Chicken pairs well with many sides. Here are some ideas: - Steamed vegetables like broccoli or green beans - A light salad with mixed greens - Garlic bread for extra flavor - Rice or quinoa to soak up the sauce These sides complement the chicken well and balance the meal. Cooking garlic chicken takes about 30 minutes total. This includes: - 5-6 minutes for browning the chicken - 10-15 minutes simmering in broth - An extra few minutes to thicken the sauce Always check the internal temperature to ensure it is safe to eat. Garlic Skillet Chicken is easy to make and full of flavor. We covered key ingredients, cooking steps, and helpful tips for perfect results. You can add vegetables or change proteins for variety. Remember to store leftovers correctly for the best taste. With these instructions, you'll enjoy a tasty meal every time. Experiment with spices or sides, and make it your own. Happy cooking!

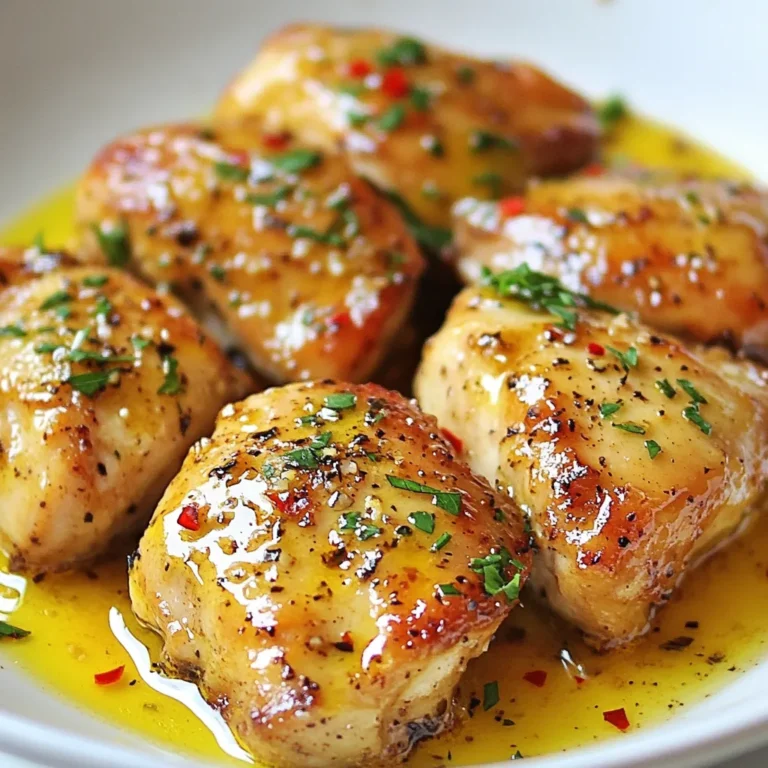
Garlic Skillet Chicken Flavorful and Simple Recipe

- 4 boneless, skinless chicken thighs - 1 medium onion, thinly sliced - 3 cloves garlic, finely minced - 1 bell pepper, diced - 2 cups low-sodium chicken broth - 1 cup long-grain rice - 1 cup heavy cream - 2 tablespoons olive oil - 1 teaspoon smoked paprika - 1 teaspoon dried thyme - Salt and freshly ground black pepper to taste - Fresh parsley, chopped for garnish Gathering the right ingredients is key. Start with the chicken thighs. They add a rich flavor. The onion, garlic, and bell pepper create a tasty base. I love using a colorful bell pepper for a pop of color. Next, we need chicken broth. Low-sodium broth keeps the dish balanced. The long-grain rice will soak up all the good flavors. Heavy cream makes it creamy and smooth. For seasoning, I use smoked paprika and dried thyme. They give depth to the dish. Don’t forget salt and pepper! Fresh parsley adds a lovely finish. It’s not just for looks; it gives a fresh taste too. With all these ingredients, you’ll create a dish that's warm and inviting. It’s comfort food at its best! {{ingredient_image_2}} Start by seasoning the chicken thighs. Use salt, black pepper, and smoked paprika. Make sure each piece is well-coated. Set the chicken aside for a few minutes. This allows the flavors to soak in. Next, heat olive oil in a large skillet over medium heat. Once the oil is hot, add the sliced onions and diced bell pepper. Sauté these vegetables for about five minutes. You want the onions to turn soft and fragrant. Then, add the minced garlic and cook for one more minute. Stir often to prevent burning. Now, push the sautéed vegetables to one side of the skillet. Place the seasoned chicken thighs in the other side. Brown the chicken for about five to six minutes on each side. Look for a nice golden-brown crust on the chicken. This adds great flavor. After browning the chicken, sprinkle the long-grain rice around it in the skillet. Pour the chicken broth over everything. Make sure the rice is fully submerged in the liquid. Raise the heat to bring the mixture to a gentle boil. Once it boils, reduce the heat to low. Cover the skillet with a lid. Let it simmer for about twenty minutes. Check the rice for tenderness after the time is up. After simmering, remove the lid. Stir in the heavy cream and dried thyme. Mix until it's smooth and creamy. Let it cook for five more minutes to warm through. Taste your dish and add more salt or pepper if needed. Finally, garnish with fresh parsley for color and freshness. To make the best smothered chicken, choose boneless skinless thighs. They stay juicy and tender during cooking. If you prefer, you can use bone-in pieces. Just remember that they will take longer to cook. For this dish, long-grain rice works best. It cooks evenly and stays fluffy. Rinse the rice in cold water before cooking. This helps remove extra starch, so it won’t stick together. Spices make this meal pop! Use smoked paprika and dried thyme for warmth. You can also add a pinch of cayenne for heat. Fresh herbs like parsley brighten the dish. If you want more spice, try adding diced jalapeños or a splash of hot sauce. Pro Tips Use Bone-In Chicken: For even more flavor, consider using bone-in chicken thighs. The bones add richness to the dish while cooking. Customize the Veggies: Feel free to add other vegetables like carrots or zucchini to the mix for added nutrition and color. Let it Rest: After cooking, let the dish sit for a few minutes before serving. This allows the flavors to meld beautifully. Adjust Creaminess: If you prefer a lighter dish, you can substitute half of the heavy cream with low-fat milk or broth. {{image_4}} Smothered chicken has roots in Southern cooking. You can taste the rich culture in each bite. Southern-style smothered chicken uses a thick gravy with onions and spices. This dish often comes with rice, making it a full meal. Cajun-style smothered chicken adds a unique twist. You’ll find spicy seasonings, like cayenne or Creole seasoning. These spices give the dish a kick. The browning of the chicken adds depth to the flavor, making it a favorite. You can easily swap proteins in this dish. For example, turkey thighs work well. They have a similar texture and flavor. Tofu is a great choice for a plant-based option. It absorbs flavors well, making each bite tasty. If you want a dairy-free version, you can replace the heavy cream. Use coconut milk or cashew cream instead. Both options will keep your dish creamy and rich without the dairy. Pair smothered chicken and rice with fresh vegetables. Steamed broccoli or green beans brighten the plate. You can also serve it with warm bread to soak up the gravy. Another fun idea is to turn it into a casserole. Just layer the chicken, rice, and sauce in a baking dish. Top it with cheese before baking, and you’ll have a new twist on a classic. After cooking, let the smothered chicken and rice cool down. Use an airtight container for storage. This helps keep the dish fresh. Store it in the fridge for up to three days. Always check for any signs of spoilage before eating. Reheat only what you will eat to keep the rest safe. To freeze smothered chicken and rice, let it cool completely. Use a freezer-safe container or bag for storage. Make sure to remove as much air as possible. This helps prevent freezer burn. You can freeze it for up to three months. When ready to eat, thaw it in the fridge overnight. For reheating, place the frozen meal in a skillet with a splash of broth. Heat it on low until warm. Stir often to prevent sticking. You can also use the microwave. Heat in short bursts, stirring in between, until hot throughout. Making smothered chicken and rice ahead of time is easy. Cook a batch during the weekend for busy weekdays. Store it in single-serving containers, making it simple to grab. For reheating, use the stove or microwave. If using the stove, add a bit of broth to keep it moist. Heat on low until warm. Always check the temperature before serving. Enjoy your meal without the hassle of cooking each day! Smothered chicken and rice takes about 40 minutes total. You need 10 minutes to prep. Cooking takes about 30 minutes. 1. Prep Time: 10 minutes 2. Cooking Time: 30 minutes - Sauté vegetables: 5 minutes - Brown chicken: 12 minutes - Simmer rice and chicken: 20 minutes - Stir in cream and finish: 5 minutes Yes, you can use brown rice. However, it takes longer to cook. Adjust the broth and simmer time. Use 2.5 cups of broth and simmer for about 30-35 minutes. 1. Brown Rice Cooking Time: 30-35 minutes 2. Broth Adjustment: Increase to 2.5 cups You can serve many things with smothered chicken and rice. Consider these ideas: - Steamed vegetables - A fresh green salad - Cornbread or biscuits - Iced tea or lemonade Smothered chicken can be part of a healthy meal. It uses chicken thighs, which are flavorful. The heavy cream adds richness, but you can use lighter options. Use low-sodium broth to cut salt. 1. Nutritional Considerations: - Chicken thighs provide protein - Heavy cream adds calories - Low-sodium broth helps reduce salt Yes, you can adapt this recipe for a slow cooker. Start by browning the chicken in a skillet. Then, transfer it to the slow cooker. Add the sautéed veggies, rice, and broth. Cook on low for 4-5 hours. 1. Slow Cooker Steps: - Brown chicken first - Add all ingredients to slow cooker - Cook on low for 4-5 hours You learned how to make smothered chicken and rice step by step. We covered the key ingredients, cooking methods, and ways to boost flavor. Remember, you can swap ingredients or try new spices to make it your own. Store leftovers safely, or freeze meals for busy days. You now have all the tools to create a delicious dish. Enjoy cooking and make it a meal to remember!

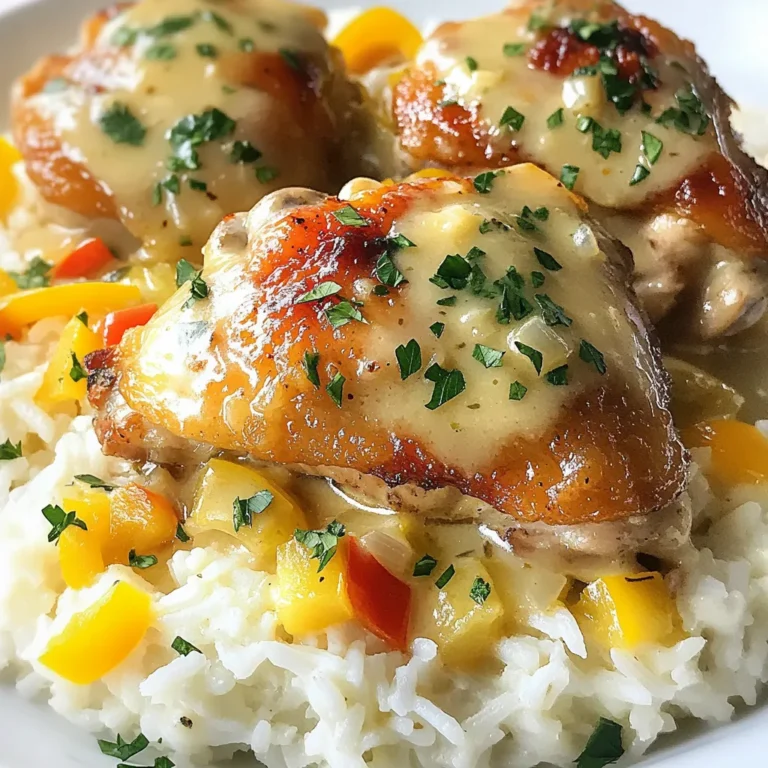
Smothered Chicken and Rice Flavorful Comfort Meal

- 4 large flour tortillas - 2 large potatoes, peeled and diced - 1 cup shredded cheddar cheese - 1 teaspoon ground cumin - 1 teaspoon smoked paprika - 1/2 teaspoon chili powder - 1/2 teaspoon garlic powder - Salt and fresh ground pepper to taste - 1/2 cup sour cream (or Greek yogurt for a healthier option) - 1/4 cup fresh cilantro, finely chopped - 1 jalapeño, thinly sliced (optional for an added kick) - Olive oil for cooking These ingredients create a warm and cheesy filling. The potatoes give a nice texture. The spices bring in rich flavors. The cheese melts beautifully, making each bite creamy. You can add a few fun extras to make your burritos pop! Try: - Black beans for protein - Corn for sweetness - Avocado for creaminess - A squeeze of lime for zest - Different herbs like parsley or green onions These options help you customize your burritos to your taste. Each addition can change the flavor, making them fun to create. If you have special needs, don’t worry! You can swap some ingredients. For a gluten-free option, use corn tortillas. If you want a dairy-free meal, try vegan cheese and skip the sour cream. For a lower-carb dish, use cauliflower rice instead of potatoes. These swaps keep the spirit of the dish while meeting your needs. {{ingredient_image_2}} First, grab a big pot. Fill it with water and add salt. Bring the water to a rolling boil. Next, add the diced potatoes. Cook them for about 10 to 12 minutes. You want them fork-tender. Once they are ready, drain the water. Let the potatoes cool for a few minutes before you mash them. Now, take your cooled potatoes and put them in a mixing bowl. Use a fork or potato masher to mash them until smooth. It should feel creamy and soft. Next, add your spices: ground cumin, smoked paprika, chili powder, and garlic powder. Mix well. Don’t forget to add salt and fresh ground pepper to taste. This will make your potatoes flavorful. Take a warm tortilla and place it on a flat surface. Scoop a generous amount of your cheesy potato mixture into the center. Next, add a dollop of sour cream. Sprinkle on some fresh cilantro for color and taste. If you like heat, add jalapeño slices. Now, fold in the sides of the tortilla over the filling. Roll it from the bottom to the top to seal it. Heat a skillet over medium heat and brush it with olive oil. Place your burritos seam-side down in the skillet. Toast them for about 2 to 3 minutes on each side. You want them golden brown and crispy. Once toasted, remove them from the skillet. Enjoy your warm, cheesy potato burritos! To cook your potatoes just right, start with large, fresh potatoes. I prefer russet or Yukon gold for their creamy texture. - Peel and Dice: Peel the potatoes and chop them into even pieces. This helps them cook evenly. - Salted Water: Always add salt to the boiling water. This flavors the potatoes as they cook. - Test for Doneness: Check if they are tender by poking with a fork. Aim for a soft texture, not mushy. For crispy burritos, follow these steps: - Warm Tortillas: Heat tortillas until soft. This makes them easier to roll and prevents tearing. - Use Enough Oil: Brush your skillet with olive oil. This adds flavor and helps them crisp up. - Cook on Medium Heat: Don’t rush the cooking. Medium heat allows the burritos to get golden brown without burning. Pair your cheesy potato burritos with tasty dips and sides for a complete meal. Here are some ideas: - Sour Cream or Greek Yogurt: A dollop on the side adds creaminess and tang. - Salsa: Fresh salsa or pico de gallo brings a bright flavor contrast. - Guacamole: The smooth texture of guacamole pairs well with the crispy burritos. - Cilantro Lime Rice: This light side dish complements the hearty burritos nicely. Feel free to mix and match to find your favorite combinations! Pro Tips Tip for Perfect Potatoes: Always choose starchy potatoes like Russets for mashing as they yield a creamier texture compared to waxy varieties. Tip for Cheese Integration: For a melty burrito, use freshly shredded cheese instead of pre-shredded. It melts better and has a richer flavor. Tip for Flavor Boost: Enhance the seasoning by adding a splash of lime juice to the potato mixture for a zesty kick. Tip for Crispy Burritos: Ensure the skillet is sufficiently hot before adding the burritos to achieve that delightful golden brown crust. {{image_4}} For a tasty vegetarian option, you can stick to the basics. Use the same ingredients but leave out any meat. The creamy cheese and soft potatoes make a great filling. You can add veggies like bell peppers or spinach for extra flavor and color. To make vegan burritos, swap the cheddar cheese for a dairy-free cheese. You can also replace sour cream with a vegan yogurt or avocado. The potatoes still shine, and you keep all the yummy spices. This version is just as filling and tasty without animal products. If you like heat, make it spicy! Add diced jalapeños to the filling for a kick. You could also mix in some hot sauce or cayenne pepper. This will give your burritos a bold flavor. For an extra layer, serve with a spicy salsa on the side. To store leftover burritos, let them cool down first. Place them in an airtight container. You can also wrap them tightly in plastic wrap. This keeps them fresh and prevents drying out. Store the container in the fridge. They will last for up to 3 days. For the best taste, reheat your burritos in the oven. Preheat the oven to 350°F (175°C). Wrap each burrito in foil to keep it moist. Place them on a baking sheet and heat for about 15-20 minutes. You can also use a skillet. Heat it over medium heat and cook each burrito for about 3-4 minutes on each side. This gives them a nice crisp. Freezing is a great way to enjoy these burritos later. Wrap each burrito tightly in plastic wrap or foil. Then, place them in a freezer-safe bag. Make sure to remove as much air as possible. Label the bag with the date. You can freeze them for up to 3 months. When ready to eat, thaw them in the fridge overnight before reheating. Yes, you can use other types of cheese. Monterey Jack, pepper jack, or even mozzarella work great. Each cheese gives a different taste and texture. For a stronger flavor, try blue cheese or feta. Just make sure to use cheese that melts well for a creamy filling. To boost protein, you can add cooked chicken, beef, or beans. Black beans or pinto beans are tasty options. If you prefer meat, shredded rotisserie chicken is quick and easy. Adding scrambled eggs also makes a filling breakfast burrito. Feel free to mix and match to suit your taste. To make this recipe gluten-free, simply swap the flour tortillas for gluten-free ones. Many stores offer gluten-free tortillas made from rice or corn. Check the package for any allergens. This way, everyone can enjoy a cheesy potato burrito! In this blog post, we explored how to make cheesy potato burritos. We covered main and optional ingredients, then moved to cooking and mashing potatoes. You learned how to assemble and toast the burritos, plus tips for perfect results. We also discussed variations like vegetarian and spicy options. Lastly, we shared storage tips and answered common questions. These burritos are fun and easy to make. Try them for your next meal! Enjoy the flavors and get creative with your toppings.

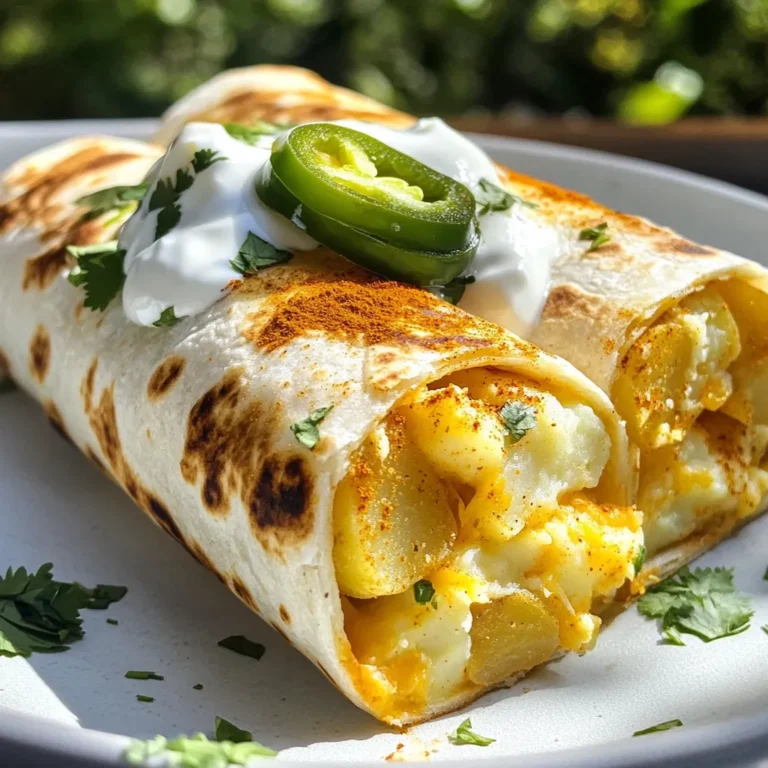
Cheesy Potato Burritos Savory and Satisfying Meal

- 12 oz pasta of your choice (fettuccine or penne recommended) - 3 large red bell peppers - 1 medium onion, diced - 3 cloves garlic, minced - 1 cup heavy cream - 1 cup vegetable broth - 1/2 cup grated Parmesan cheese - 2 tablespoons olive oil - 1 teaspoon smoked paprika - Salt and pepper to taste - Fresh basil leaves for garnish Choosing fresh ingredients makes a big difference. Look for bright, firm red bell peppers. They should feel heavy for their size. A good onion will have a smooth skin and feel firm. Fresh garlic is a must for the best flavor in this dish. Heavy cream gives the sauce a rich taste and nice texture. If you want a lighter option, you can use half and half, but it won’t be as creamy. You can swap the heavy cream for a non-dairy option, like cashew cream. Use vegetable broth or chicken broth as your base. If you don’t have smoked paprika, regular paprika works, but the smoky flavor will change. You can also replace Parmesan with nutritional yeast for a vegan twist. If you want more color, try adding spinach or sun-dried tomatoes. {{ingredient_image_2}} Start by preheating your oven to 400°F (200°C). Slice three large red peppers in half and remove the seeds. Place them cut-side down on a baking sheet lined with parchment paper. Roast them for about 25–30 minutes. You want the skins to be charred and blistered. After roasting, move the peppers to a bowl and cover it tightly with plastic wrap. This will help steam the peppers for easier peeling. Wait about ten minutes before peeling off the burnt skins. While your peppers steam, bring a large pot of salted water to a boil. Add 12 oz of your favorite pasta, like fettuccine or penne. Cook the pasta according to the package instructions until it's al dente. Drain the pasta and set it aside. This will be the base for your creamy sauce. In a large skillet, heat two tablespoons of olive oil over medium heat. Dice one medium onion and add it to the skillet. Sauté for about five minutes until the onion is soft and translucent. Next, add three minced garlic cloves and sauté for another minute, stirring often. Now, take the peeled red peppers and blend them in a food processor with the sautéed onion and garlic. Add one cup of vegetable broth, one cup of heavy cream, and one teaspoon of smoked paprika. Blend until you achieve a smooth and creamy sauce. Pour this sauce back into the skillet and bring it to a gentle simmer. Gradually stir in half a cup of grated Parmesan cheese. If the sauce is too thick, add a splash more vegetable broth. Taste and season with salt and pepper as needed. Finally, add the drained pasta to the skillet. Toss it gently in the sauce to coat every piece. Let it heat through for about a minute, and then you're ready to serve! To get the best flavor from your peppers, start with fresh, ripe red bell peppers. Slice them in half and remove the seeds. Place them cut-side down on a baking sheet lined with parchment paper. Roast them at 400°F (200°C) for 25-30 minutes. Look for deep charring on the skins. This gives the peppers a rich, smoky taste. After roasting, cover them with plastic wrap. Let them steam for about 10 minutes. This step helps you peel the skins off easily. For a creamy sauce, use high-quality heavy cream. Blend the roasted peppers with sautéed onions and garlic. Add vegetable broth for smoothness. Blend until you have a silky texture. If your sauce is too thick, add more vegetable broth a little at a time. Stir in grated Parmesan cheese gradually. This will enhance the creaminess and flavor. Keep the sauce on low heat after blending to maintain warmth and texture. Taste your sauce as you cook. Start with salt and pepper, then adjust to your liking. Smoked paprika adds a nice depth. If you prefer a little kick, consider adding a pinch of red pepper flakes. Fresh basil leaves make a great garnish and add freshness. Mixing in some lemon juice can brighten the dish too. Remember, seasoning enhances flavor. Adjust as needed for your taste buds! Pro Tips Roasting Peppers: For an even deeper flavor, consider charring the peppers on a grill instead of in the oven. Choosing Pasta: Pasta types like fettuccine or penne hold the creamy sauce well, ensuring each bite is flavorful. Adjusting Creaminess: If you prefer a lighter sauce, substitute half of the heavy cream with Greek yogurt or a plant-based alternative. Herb Infusion: Add fresh herbs like thyme or oregano while sautéing the onions for an extra layer of flavor. {{image_4}} You can easily add protein to this dish. Chicken breast, shrimp, or sausage work well. Cook the protein before adding it to the sauce. For chicken, grill or pan-sear it until fully cooked. For shrimp, sauté them until they turn pink. If you use sausage, slice it thin and cook it in the skillet before the onions. This way, the meat becomes flavorful and pairs well with the creamy sauce. If you want a vegan version, swap out the cream and cheese. Use coconut milk or cashew cream instead. You can also use nutritional yeast for a cheesy flavor. For the broth, make sure it’s vegetable-based. This keeps the dish creamy and rich without dairy. Don’t forget to adjust the seasoning to match your taste. To boost the flavor, consider adding herbs and spices. Fresh basil or parsley can brighten up the dish. For a kick, add red pepper flakes or a splash of lemon juice. You could also try a hint of balsamic vinegar for depth. Mix in some sun-dried tomatoes for extra sweetness. These simple tweaks will make your pasta even more exciting! To store leftovers, let the pasta cool first. Place it in an airtight container. You can keep it in the fridge for about 3 to 4 days. For reheating, you can use a skillet or microwave. If using a skillet, add a splash of water or broth to keep it moist. Heat over low until warmed through. In the microwave, cover the pasta and heat in 30-second bursts, stirring in between. You can freeze this pasta dish, too. Use a freezer-safe container. It stays good for up to 2 months. To reheat, thaw overnight in the fridge. Then, heat it in a skillet or microwave as described above. Yes, you can use jarred roasted red peppers. They save time and effort. Just drain and rinse them before use. This switch will still give you a tasty sauce. However, fresh roasted peppers add a deeper flavor. To make this creamy roasted red pepper pasta gluten-free, choose gluten-free pasta. Many brands offer great options. Look for ones made from rice or chickpeas. Always check labels for allergens. Fettuccine or penne work best for this dish. They hold sauce well and offer great texture. You can also try spaghetti or rigatoni for a fun twist. Just ensure you cook the pasta al dente for the best bite. This post covered key ingredients for a delicious dish and how to prepare them. We explored step-by-step cooking methods, tips for the best results, and helpful variations. We also addressed common questions about storage and ingredient swaps. You can customize the recipe to fit your needs and taste. Enjoy making this tasty dish your own, and remember, cooking should be fun and creative!

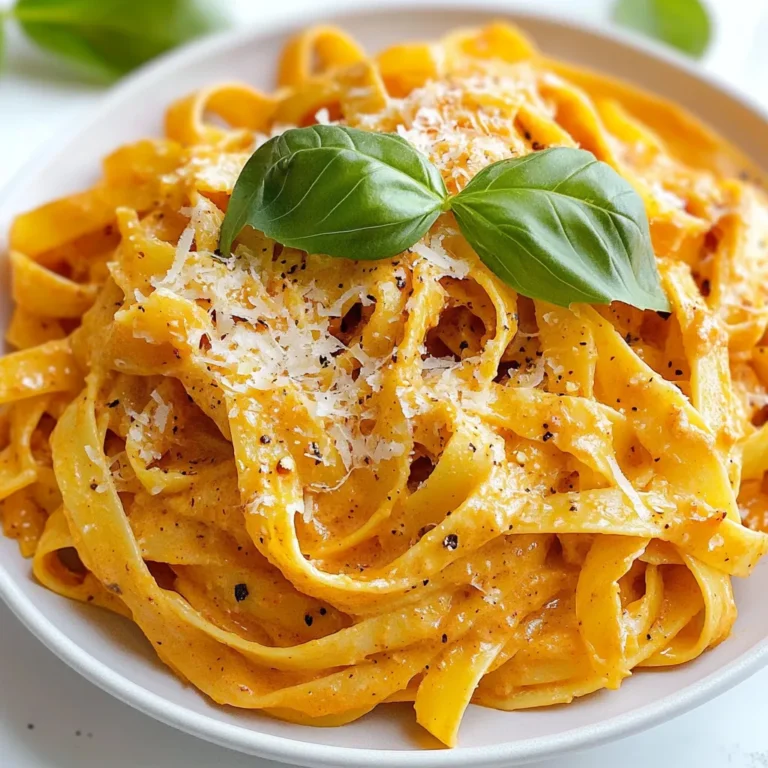
Creamy Roasted Red Pepper Pasta Flavorful and Easy

For the meatballs, you need to gather some key ingredients. Here’s what you’ll need: - 1 pound ground beef or turkey - 1/2 cup breadcrumbs - 1/4 cup grated Parmesan cheese - 1 large egg - 2 cloves garlic, minced - 1 teaspoon Italian seasoning - Salt and pepper, to taste These ingredients create a delicious base for the meatballs. The ground meat gives it flavor, and the cheese adds a nice salty kick. The breadcrumbs help bind everything together and make the meatballs tender. Next, we turn to the veggies. They add nutrition and taste to the stew. You will use: - 1 medium onion, diced - 2 medium carrots, sliced - 2 stalks celery, diced - 1 cup green beans, trimmed and cut in half These vegetables provide a variety of textures. The onion gives a sweet flavor, while carrots and celery add crunch. Green beans bring a fresh taste, rounding out the mix. Finally, we need a good broth and seasonings to enhance the stew's flavor. Gather these: - 4 cups low-sodium beef broth - 1 can (14.5 oz) diced tomatoes, with their juice - 2 tablespoons fresh parsley, chopped (for garnish) The broth is the heart of the stew. It keeps everything moist and flavorful. The diced tomatoes add acidity and sweetness, while parsley gives a fresh touch on top. These ingredients combine to create a hearty and flavorful dish. Enjoy the process of mixing and cooking, as each step builds amazing flavors! {{ingredient_image_2}} Start by mixing the meatball ingredients in a large bowl. Use 1 pound of ground beef or turkey. Add 1/2 cup of breadcrumbs and 1/4 cup of grated Parmesan cheese. Crack in 1 large egg. Add 2 cloves of minced garlic and 1 teaspoon of Italian seasoning. Season with salt and pepper. Now, use your hands to mix everything well. This helps the flavors blend. Once mixed, form the mixture into small meatballs. Aim for about 1 inch in size. Place the meatballs on a plate and set them aside. Next, grab a large pot or Dutch oven. Heat 1 tablespoon of olive oil over medium heat. Add 1 medium diced onion, 2 sliced carrots, and 2 diced celery stalks to the pot. Sauté the vegetables for 5 to 7 minutes. Stir occasionally. You want the veggies to soften. The onion should turn clear. Carefully add the meatballs to the pot. Make sure they are spaced out. Cook them for about 5 minutes. Turn them occasionally so they brown on all sides. Don’t worry if they aren’t fully cooked yet. Now, pour in 4 cups of low-sodium beef broth. Also, add 1 can of diced tomatoes, juice included. Stir gently to combine. Make sure the meatballs are submerged in the liquid. Increase the heat until the stew simmers. Once it bubbles, reduce the heat to low. Cover the pot with a lid and let it simmer for 20 minutes. This helps all the flavors blend and the meatballs to cook through. After 20 minutes, remove the lid. Check if the meatballs are done. Taste the stew and adjust the salt and pepper if needed. Serve the stew in bowls. Garnish each bowl with 2 tablespoons of chopped fresh parsley for a touch of color and flavor. Enjoy your hearty one-pot meatball stew! To make perfect meatballs, start with quality meat. Use ground beef or turkey. Mix it with breadcrumbs, Parmesan cheese, and an egg. This helps the meatballs stay juicy. Add minced garlic for flavor. Don't forget Italian seasoning, salt, and pepper. Once the mixture is ready, form small balls, about 1 inch wide. This size cooks evenly in the stew. Make sure they are not too tight. A loose mixture makes for softer meatballs. Set them aside while you prepare the stew. Herbs are key to boosting flavor in your stew. I love using fresh parsley for garnish. It adds brightness to the dish. You can also add dried herbs like thyme or oregano during cooking. These give depth to the broth. For a richer taste, try adding bay leaves while the stew simmers. Just remember to remove them before serving. Fresh basil also works well and can be added right before serving for a fresh twist. If you choose turkey or chicken, adjust the cook time. These meats may cook faster than beef. After browning the meatballs, simmer the stew for about 15 minutes. Always check that the meatballs are cooked through before serving. Using a meat thermometer is a great way to ensure they reach 165°F. This keeps your dish safe and tasty. If you're using leaner meats, keep an eye on them. They can dry out if cooked too long. Pro Tips Use Fresh Herbs: Fresh parsley not only enhances the dish's flavor but also adds a vibrant color. Consider adding other herbs like thyme or basil for additional depth. Adjust the Meat Ratio: Mixing ground beef with ground turkey can lighten the dish while still retaining flavor. Feel free to experiment with different meat combinations! Customize Your Veggies: This stew is highly adaptable; you can add other vegetables like potatoes, bell peppers, or zucchini based on your preference or what you have on hand. Perfect Your Meatballs: For juicy meatballs, avoid overmixing the meat mixture and let the meatballs rest for a few minutes before adding them to the pot to help them hold their shape. {{image_4}} You can easily switch the meat in this stew. Ground turkey is a great choice. It has less fat than beef but still tastes great. You can also use veggie meatballs for a plant-based option. Look for brands with good flavor and texture. Both options make the dish lighter yet still hearty. Feel free to get creative with veggies! You can add bell peppers for a sweet touch. Zucchini adds a nice softness. Mushrooms give an earthy flavor that works well. Try adding spinach for a pop of color and nutrients. These veggies not only boost flavor but also make the stew more colorful and fun. If you like heat, you can spice things up! Add red pepper flakes or a dash of cayenne for warmth. You can also use smoked paprika for a smoky flavor. A bit of hot sauce can add a kick, too. These spices transform the stew into a bold dish that warms you from the inside out. Enjoy experimenting! After enjoying your one-pot meatball stew, let it cool to room temperature. Use airtight containers for storage. This helps keep the stew fresh. You can store it in the fridge for up to three days. Make sure to label the containers with the date. This way, you know when to eat it. If you want to keep the stew longer, freezing is a great option. Portion the stew into freezer-safe bags or containers. Remove as much air as possible to avoid freezer burn. The stew can last in the freezer for about three months. When you’re ready to eat, just thaw it in the fridge overnight. When it’s time to enjoy your leftovers, reheating is simple. You can use the stove or microwave. If using the stove, pour the stew into a pot and heat over medium-low. Stir it often to prevent sticking. For the microwave, use a microwave-safe bowl and heat in short bursts. Stir between each burst to ensure even heating. Always check the temperature. It should be hot throughout before serving. Yes, you can use frozen meatballs. Just add them to the pot without thawing. Adjust the cooking time. You may need to simmer the stew a bit longer. Check the meatballs for doneness before serving. This makes meal prep easier on busy days. This stew lasts about three to four days in the fridge. Store it in an airtight container. Make sure to let it cool before sealing. Reheat it on the stove or in the microwave. The flavors may deepen over time, making it even better. You can serve this stew with bread or rice. A crusty baguette is great for dipping. You might also try a simple salad for a fresh touch. Serve it with mashed potatoes for a hearty meal. Each option complements the rich flavors of the stew. This post covered how to make a tasty One-Pot Meatball Stew. We looked at key ingredients, step-by-step cooking, and helpful tips. Remember, the right herbs can boost flavor, and there are many fun variations to try. Store leftovers well, or freeze for later use. With this guide, you can create delicious meals that warm your heart. Enjoy experimenting in the kitchen! You have the tools to make it great!

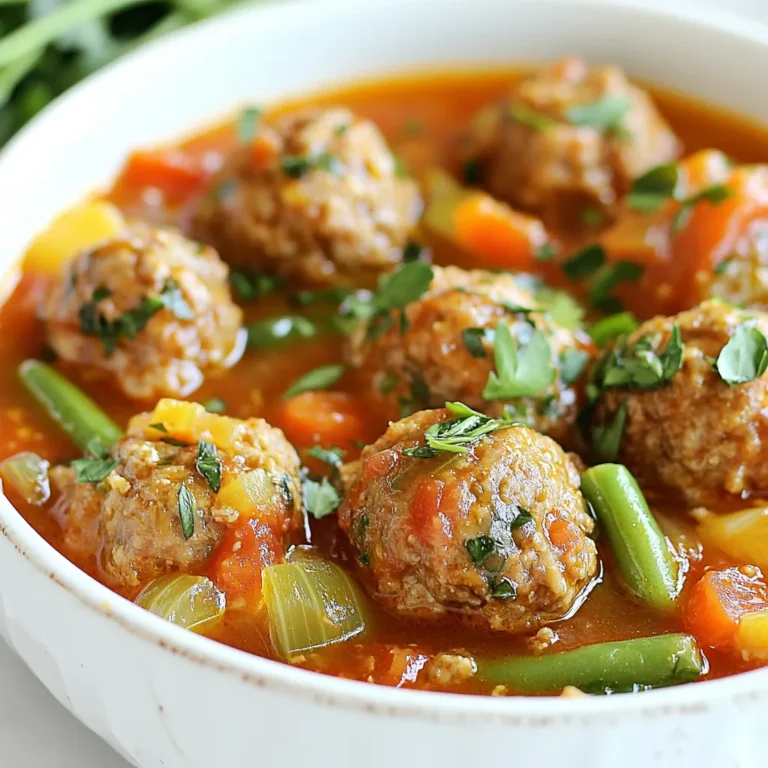
One-Pot Meatball Stew Flavorful and Hearty Dish

The right ingredients make this Lemon Raspberry Sheet Cake shine. Here’s what you need: - 2 cups all-purpose flour - 1 ½ cups granulated sugar - 1 tablespoon baking powder - ½ teaspoon salt - 1 cup unsalted butter, softened to room temperature - 4 large eggs - 1 cup whole milk - Zest from 2 lemons - ¼ cup freshly squeezed lemon juice - 1 cup fresh raspberries, with extra for garnish - 1 teaspoon vanilla extract - 1 cup powdered sugar (for frosting) - 2 tablespoons lemon juice (for frosting) Each of these ingredients plays a key role in making the cake moist and flavorful. The flour gives structure, while the sugar adds sweetness. Baking powder helps it rise, and salt balances the flavors. Using fresh raspberries adds a tart burst, making each bite special. The lemon zest and juice give that bright, refreshing flavor everyone loves. The butter and eggs work together to keep the cake tender and rich. You can choose to use organic ingredients for added flavor and quality. Fresh lemons and raspberries will elevate the cake even more. Remember, measuring accurately is key to success! {{ingredient_image_2}} 1. First, preheat your oven to 350°F (175°C). This step gets your oven ready for baking. 2. Next, take a 12x17 inch sheet cake pan. Grease it with butter. Then lightly dust it with flour. This keeps the cake from sticking. 3. In a large mixing bowl, add the dry ingredients. Combine 2 cups of flour, 1 ½ cups of sugar, 1 tablespoon of baking powder, and ½ teaspoon of salt. Use a whisk to mix them well. 1. In another bowl, beat 1 cup of softened butter with 4 large eggs. Use an electric mixer or a whisk until creamy. 2. Now, add in 1 cup of whole milk, 2 tablespoons of lemon juice, 1 teaspoon of vanilla extract, and the zest from 2 lemons. Mix until smooth. 3. Slowly add the dry mixture into the wet mixture. Stir gently until just combined. Be careful not to overmix, as it can make the cake dense. 1. Gently fold in 1 cup of fresh raspberries. Make sure they mix in well but do not break them apart too much. 2. Pour the batter into the greased pan. Spread it evenly with a spatula for even baking. 3. Bake in the oven for 25-30 minutes. To check if it's done, insert a toothpick into the center. It should come out clean when ready. To ensure even baking, always preheat your oven to 350°F (175°C) before starting. This helps the cake rise and cook properly. Use a light-colored pan to reflect heat and avoid burning the edges. Spread the batter evenly in the pan. Check the cake at 25 minutes. If the edges pull away from the pan, it’s almost ready. To test for doneness, insert a toothpick into the center of the cake. If it comes out clean, your cake is done. If there is batter on the toothpick, bake it for a few more minutes. Remember to check again. Applying the lemon glaze is easy. Wait until the cake cools completely to avoid melting. Drizzle the glaze from a spoon for a nice effect. Allow it to flow down the sides for a pretty look. If the glaze is too thick, add more lemon juice until it’s smooth. For garnishing, add fresh raspberries on top for color and flavor. A sprig of mint adds a nice touch too. Arrange the raspberries evenly for a beautiful finish. Adjusting sweetness can make a big difference. If you prefer a sweeter cake, add a bit more sugar to the batter. You can also add more lemon juice for a tangy taste. Pairing flavors is key to making this cake special. Consider serving it with whipped cream or a scoop of vanilla ice cream. The cream balances the tartness and adds richness. Pro Tips Use Room Temperature Ingredients: Make sure your butter, eggs, and milk are at room temperature before mixing. This helps create a smoother batter and results in a lighter cake. Fresh Raspberries: For the best flavor and texture, use fresh raspberries rather than frozen. If frozen are your only option, gently fold them in while still frozen to minimize breaking. Test for Doneness: Always use a toothpick to check the center of the cake for doneness. If it comes out clean or with a few crumbs, the cake is ready to be removed from the oven. Glaze Consistency: When preparing the lemon glaze, adjust the consistency by adding more lemon juice or powdered sugar until it’s pourable but thick enough to stay on the cake without running off too quickly. {{image_4}} You can switch up the fruit in this cake. Blueberries or strawberries work great too. They add a burst of color and flavor. If you want to use frozen raspberries, that’s fine! Just make sure to thaw and drain them first. This helps keep the batter from getting too wet. If you need a gluten-free option, use a gluten-free flour blend. This will keep the cake soft and tasty. For vegan alternatives, swap the eggs with flaxseed meal or applesauce. Use plant-based butter and milk too. This way, everyone can enjoy this treat! Pairing this cake with whipped cream is a must. It adds a creamy texture that complements the cake nicely. You could also get creative by adding herbs or spices. Try some fresh mint or a hint of cardamom for a unique twist. These flavors can elevate your cake to a new level! You can store your lemon raspberry sheet cake at room temperature. Just cover it with plastic wrap or foil. This keeps it fresh for about three days. If you live in a hot area, consider refrigerating it. This helps prevent spoilage. The cake stays moist, but the fridge can dry it out. So, always wrap it well. If you want to enjoy the cake later, freezing is a great option. First, let the cake cool completely. Then, wrap it tightly with plastic wrap. After that, place it in a freezer-safe bag or container. This prevents freezer burn. For best results, eat it within three months. To thaw, simply move it to the fridge overnight. If you're in a hurry, leave it on the counter for a few hours. Your lemon raspberry sheet cake stays fresh for about three days at room temperature. If refrigerated, it can last up to a week. However, the flavor is best when fresh. So, serve it soon after baking for the best taste. To keep your cake moist, use fresh ingredients. Make sure your butter is soft but not melted. Also, do not overmix the batter. Overmixing can lead to a dense texture. Adding whole milk and eggs at room temperature helps, too. They blend better and keep the cake light. Finally, bake until just done. Use a toothpick to check. It should come out clean, but not dry. Yes, you can use other citrus fruits for fun flavors. Try lime or orange for a twist. These fruits can replace lemon juice and zest. This change will give the cake a unique taste. Just remember to adjust the amount if the citrus is stronger or weaker than lemon. Experiment and find what you like best! You can make this cake ahead of time! Bake the cake the day before your event. Let it cool completely, then wrap it tightly. Store it at room temperature or in the fridge. If you want to frost it later, wait until the cake is cool. Frosting it in advance can make it soggy. Enjoy the fresh taste when you're ready to serve! To recap, we covered all the key ingredients and simple steps to bake a delicious cake. I shared helpful baking and decorating tips to enhance your creation. We also explored different variations to suit your taste and dietary needs. Lastly, I provided storage tips to keep your cake fresh. This recipe is not only fun to make but also full of flavor. I hope you feel inspired to try it yourself and enjoy every bite. Happy baking!

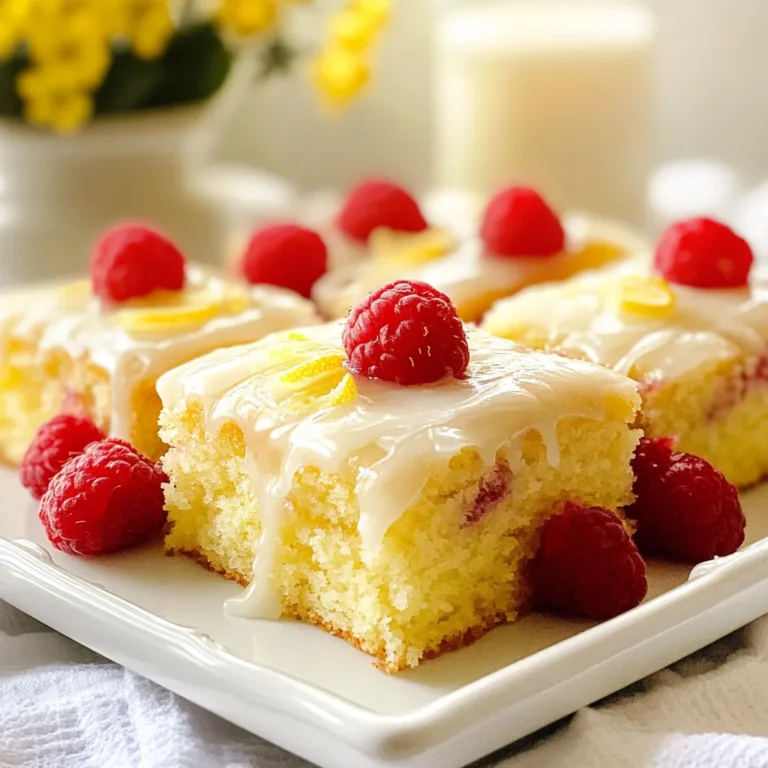
Lemon Raspberry Sheet Cake Fresh and Flavorful Delight

PREV 1 … 15 16 17 18 NEXT
feastful focus

explore

DessertsDinnerAppetizersDrinks

Our Policies

  • Cookie Policy
  • Copyright Policy
  • Disclaimer
  • GDPR Policy
  • Terms Of Use
Back to Top
  • About
  • Contact Us
  • Privacy Policy
© 2025 feastful focus