FREE DINNER EBOOK! Get your copy!
  • Cookie Policy
  • GDPR Policy
  • Disclaimer
  • Terms Of Use
  • Visit my other site: Fun Cookie Recipes
feastful focus
  • Home
  • Dinner
  • Desserts
  • Drinks
  • Appetizers
  • Contact
  • About
  • Privacy Policy
  • Home
  • Dinner
  • Desserts
  • Drinks
  • Appetizers
  • Contact
  • About
  • Privacy Policy
  • Cookie Policy
  • GDPR Policy
  • Disclaimer
  • Terms Of Use
Visit my other site: Fun Cookie Recipes

HOME / CATEGORIES /

Latest

- 2 lbs boneless, skinless chicken thighs - 1 cup creamy natural peanut butter - 1/4 cup soy sauce or tamari - 1/4 cup honey - 2 tablespoons lime juice - 1 tablespoon fresh ginger - 3 cloves garlic - 1 red bell pepper - 1 cup coconut milk - Fresh cilantro and jasmine rice To make Slow Cooker Thai Peanut Chicken, you need a few key ingredients. First, the chicken thighs. They stay juicy and tender. You can use boneless, skinless chicken thighs for the best results. Next, peanut butter gives this dish its unique flavor. I prefer creamy peanut butter. It blends well with other ingredients. Soy sauce or tamari adds saltiness. Tamari is great if you need a gluten-free option. Honey brings sweetness to balance the flavors. Lime juice adds a nice zing. Fresh ginger and garlic give the dish depth. They add warmth and a bit of spice. For garnishing, I like to use a red bell pepper. It adds color and crunch. Coconut milk makes the sauce rich and creamy. Serve the chicken over jasmine rice. It's the perfect base to soak up all the delicious sauce. Finally, sprinkle fresh cilantro on top for a fresh taste. These ingredients come together to create a meal that’s not just tasty but also easy to make. Start by placing the chicken thighs in the slow cooker. Lay them evenly at the bottom. This helps them cook well. For even cooking, try not to stack the chicken. If you have more, cook in two batches. In a bowl, mix together the peanut butter, soy sauce, honey, lime juice, ginger, garlic, coconut milk, and red pepper flakes. Use a whisk to combine everything. Make sure the sauce is smooth with no lumps. This step is key for great flavor. Once the sauce is ready, pour it over the chicken. Make sure every piece is coated. Next, layer the sliced red bell pepper on top. This will add color and taste as it cooks. Set your slow cooker to low for 6-7 hours, or high for 3-4 hours. Cook until the chicken hits 165°F (75°C). After cooking, use two forks to shred the chicken right in the slow cooker. Mix it well with the sauce. For serving, place the chicken over bowls of jasmine rice. Garnish with chopped cilantro for a nice touch. Enjoy your tasty meal! For the best slow cooker chicken, follow these cooking times: - Low setting: 6-7 hours - High setting: 3-4 hours Make sure your chicken thighs reach 165°F. This keeps the chicken safe to eat. Use a meat thermometer to check the temperature. It’s an easy step that ensures a tasty meal. Want to change the heat? Adjust the red pepper flakes in the recipe. - For less spice, reduce the flakes to 1/4 teaspoon. - To make it spicier, add more flakes to taste. You can also add sliced jalapeños or sriracha for more heat. If you prefer a milder dish, skip the red pepper flakes entirely. You can boost the dish’s flavor by adding more veggies. Here are a few ideas: - Add carrots for sweetness. - Use snap peas for crunch. - Toss in broccoli for a pop of color. For garnishing, think outside the box. Consider: - Chopped green onions for a fresh taste. - Crushed peanuts for added texture. - A squeeze of lime to brighten the dish. These simple changes can make your Thai peanut chicken even better! {{image_4}} To make this dish gluten-free, simply use tamari instead of soy sauce. Tamari is a great choice since it has a similar flavor but does not contain wheat. This makes it safe for people with gluten allergies. The taste will remain rich and tasty, so you won’t miss the soy sauce at all! You can add more veggies to the dish for extra flavor and nutrition. Some great options include carrots, snap peas, or broccoli. Just chop them up into small pieces and add them to the slow cooker with the chicken. They will soak up the peanut sauce and add crunch. This makes the meal colorful and healthy! If you want to try something different, you can swap the chicken for tofu or shrimp. For tofu, use firm tofu and press it to remove extra water. Cut it into cubes and add it to the slow cooker. If you choose shrimp, add it during the last hour of cooking. Both options will bring a new twist to this classic dish! To store leftovers, let the Thai peanut chicken cool first. Place it in an airtight container. It stays fresh for up to four days in the fridge. Make sure to keep the sauce with the chicken for flavor. For reheating, the best method is the microwave. Use a microwave-safe bowl and cover it. Heat in short bursts, stirring in between. This helps the chicken stay moist and tasty. You can also reheat it in a pan on low heat, stirring often for even warmth. If you want to freeze the dish, use a freezer-safe container. It can last for up to three months in the freezer. To thaw, place it in the fridge overnight. Reheat it on the stove or microwave, adding a splash of water if it seems dry. This keeps the flavors strong and the chicken tender. Yes, you can use chicken breasts. Chicken thighs are juicy and tender. They have more fat, which adds flavor. Chicken breasts are leaner but can dry out. If you use breasts, check for doneness earlier. Cooking on low takes 6-7 hours. This method allows flavors to blend well. Cooking on high takes 3-4 hours. It is faster but may not be as tender. Both methods should reach 165°F for safe eating. Serve Thai Peanut Chicken with jasmine rice. The rice soaks up the sauce. You can also add steamed broccoli or snap peas. Fresh cilantro adds a nice touch on top. Consider lime wedges for extra zest. This blog post explored the delicious Thai Peanut Chicken recipe. We covered the main ingredients, like chicken thighs and peanut butter, along with the steps for cooking it perfectly. I shared tips for adjusting spice levels and enhancing flavor. Remember, you can easily modify this dish with vegetables or different proteins. Enjoy storing leftovers properly for quick meals later. With these tips, I hope you feel ready to get cooking and impress your family! Your journey to tasty Thai Peanut Chicken starts now; let the fun begin!

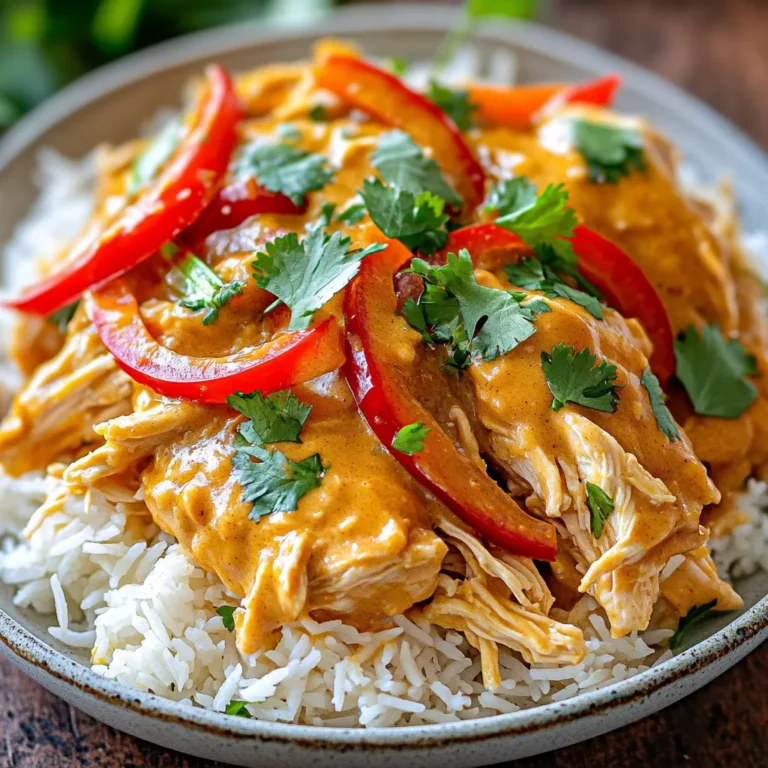
Slow Cooker Thai Peanut Chicken Flavorful and Easy Meal

- 2 large Granny Smith apples, peeled and diced - 2 cups all-purpose flour, plus extra for dusting - 1 cup granulated sugar - 1/2 cup unsalted butter, softened to room temperature - 1/2 cup packed brown sugar - 2 large eggs, at room temperature - 1 cup buttermilk, at room temperature - 1 teaspoon baking powder - 1 teaspoon baking soda - 1 teaspoon ground cinnamon - 1/2 teaspoon ground nutmeg - 1/2 teaspoon salt - 1 teaspoon vanilla extract - 1/2 cup rolled oats - 1/2 cup chopped walnuts (optional) These ingredients create a moist and flavorful cake. The Granny Smith apples add a nice tartness. The buttermilk makes the cake tender. The spices bring warmth and depth to each bite. You can change a few ingredients to suit your taste. If you want a nut-free cake, skip the walnuts. You can also use other apple types, like Honeycrisp or Fuji, for a sweeter flavor. If you don’t have buttermilk, mix regular milk with a splash of vinegar or lemon juice. To make this cake, gather these tools: - A large mixing bowl - A medium-sized bowl - An electric mixer - A whisk - A 9x13 inch baking pan - Parchment paper (optional) - A spatula - A measuring cup and spoons These tools will help you mix, bake, and serve your cake with ease. Having everything ready makes the cooking process smooth and fun. Enjoy the journey of making this delicious dessert! Start by preheating your oven to 350°F (175°C). Take a 9x13 inch baking pan. Grease it with butter and dust it with flour. This helps the cake come out easily. You can also line it with parchment paper if you prefer. In a medium bowl, toss 2 large diced Granny Smith apples. Add 1 teaspoon of ground cinnamon and 1 tablespoon of granulated sugar. Let the apples sit for about 10 minutes. This lets their flavor shine and softens them a bit. In a large bowl, cream together 1/2 cup of softened butter, 1 cup of granulated sugar, and 1/2 cup of brown sugar. Use an electric mixer on medium speed for about 2-3 minutes. The mixture should be light and fluffy. Next, add 2 large eggs, one at a time. Beat well after each addition. Stir in 1 teaspoon of vanilla extract for extra flavor. In a separate bowl, whisk together 2 cups of all-purpose flour, 1 teaspoon of baking powder, 1 teaspoon of baking soda, 1 teaspoon of ground cinnamon, 1/2 teaspoon of ground nutmeg, and 1/2 teaspoon of salt. Gradually mix this dry mixture into the wet ingredients in three parts. Alternate with 1 cup of buttermilk. Start and end with the flour mixture. Mix just until combined. Be careful not to overmix. Gently fold in the seasoned apples, ensuring they are well mixed without breaking them. To make the crumb topping, mix 1 cup of flour, 1/2 cup of rolled oats, and 1/2 cup of brown sugar in a small bowl. Cut in cold butter until it looks like coarse crumbs. If you want, add 1/2 cup of chopped walnuts for crunch. Now, pour half of the batter into your prepared pan. Spread it evenly. Sprinkle half of the crumb topping over this layer. Pour the rest of the batter on top, finishing with the remaining crumb topping. Bake for 35-40 minutes. The cake is done when a toothpick comes out clean or with a few moist crumbs. Once baked, cool for 10 minutes in the pan, then transfer to a wire rack. Enjoy your cake warm or at room temperature! To get a great crumb texture, use cold butter for the topping. Cold butter helps form small chunks that will bake into a crunchy topping. Mix it until it looks like coarse crumbs, not smooth. Also, do not overmix your batter. Combine just until you see no dry flour. This keeps the cake light and fluffy. One common mistake is not prepping your apples enough. Always dust them with sugar and cinnamon before adding to the batter. If you skip this step, your apples might not stand out in flavor. Another mistake is overbaking. Keep an eye on the cake in the oven. Check it with a toothpick at 35 minutes. If it comes out clean, take it out right away. For a lovely presentation, dust the cooled cake with powdered sugar. You can also add thin apple slices on top for color. A dollop of whipped cream makes it even better. Serve it warm for the best taste. This cake pairs well with coffee or tea, making it a perfect treat for guests. {{image_4}} To make this cake gluten-free, swap regular flour for a gluten-free blend. Look for blends that work well in baking. These often include rice flour, potato starch, and tapioca flour. Ensure the blend has a binding agent like xanthan gum for good texture. You may need to adjust the liquid slightly, as gluten-free flours can absorb more moisture. Keep an eye on the baking time, as it may differ. You can change up the fruit in this cake for a new twist. Try using pears or peaches for a sweeter taste. Berries, like blueberries or raspberries, add a tart flavor. You can even mix fruits. Just remember to chop them into small pieces, like the apples, to keep the texture smooth. This way, every bite remains light and enjoyable. Get creative with your crumb topping for added flavor. Instead of walnuts, try pecans or almonds for a nutty crunch. You can also mix in some dried fruit, like raisins or cranberries, to the topping. For a sweeter finish, sprinkle a bit of cinnamon sugar on top before baking. This adds a nice sweetness and a beautiful golden color to the crust, making it look as good as it tastes. To keep your apple cinnamon crumb cake fresh, wrap it well. Use plastic wrap or aluminum foil. Store it at room temperature for up to three days. If you want it to last longer, refrigeration works too. Just remember to cover it tightly. You can freeze the cake if you have extra. First, let it cool completely. Then, slice it into pieces. Wrap each piece in plastic wrap, then place them in a freezer bag. This way, it can last for up to three months. When you're ready to enjoy, just thaw it in the fridge overnight. To reheat your apple cinnamon crumb cake, preheat your oven to 350°F (175°C). Place the slice on a baking sheet. Heat it for about 10-15 minutes. If you want it warm and cozy, you can also use the microwave. Heat it for about 20-30 seconds, just enough to warm it up. Enjoy it fresh and tasty! Yes, you can use other apples. Sweet apples like Fuji or Honeycrisp work well. Tart apples like Granny Smith give a nice balance. Mixing different types adds depth to the flavor. To make this cake dairy-free, swap buttermilk for almond milk or oat milk. Use dairy-free butter or coconut oil instead of unsalted butter. These options keep it tasty and moist. You can serve the cake warm with vanilla ice cream or whipped cream. A drizzle of caramel sauce adds a sweet touch. Fresh fruit like berries or a cup of coffee pairs nicely too. Apple Cinnamon Crumb Cake stays fresh for about 3 days at room temperature. Store it in an airtight container to keep it moist. If you want it to last longer, refrigerate it for up to a week. Yes, you can make the cake a day in advance. Just cool it completely and store it covered. Reheat individual slices in the microwave for a warm treat later. In this post, we explored how to make a tasty Apple Cinnamon Crumb Cake. We covered key ingredients, including options and tools to use. You learned how to layer the cake, bake it perfectly, and avoid common mistakes. I also shared tips for storing and freezing leftovers, offering tweaks for gluten-free and dairy-free diets. Remember, cooking is about experimenting. Don't hesitate to make this recipe your own. Enjoy your baking journey!

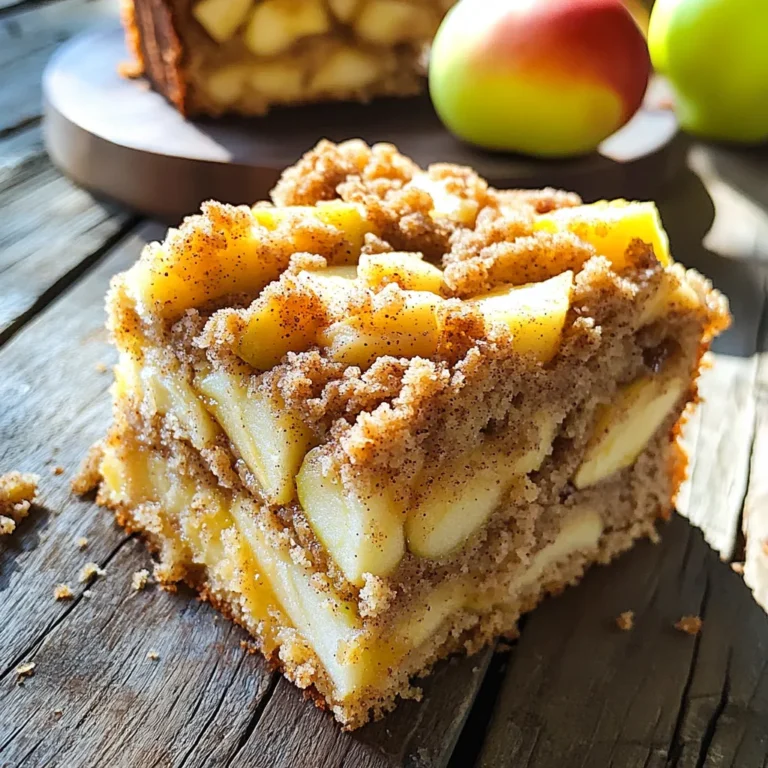
Apple Cinnamon Crumb Cake Delicious and Simple Recipe

- 12 oz (340g) spaghetti or fettuccine - 1 tablespoon extra virgin olive oil - 1 small onion, finely chopped - 3 cloves garlic, minced - 1 teaspoon red pepper flakes - 1 can (14 oz) crushed tomatoes - 4 cups vegetable broth - 1 teaspoon granulated sugar - 1 teaspoon dried oregano - Salt and freshly ground black pepper - Fresh basil leaves, torn into pieces For this dish, you can choose either spaghetti or fettuccine. Both types work well. I love using fresh aromatics like onion, garlic, and basil. They add so much flavor. Red pepper flakes give the dish a nice kick. If you want it spicier, add more. Crushed tomatoes create a rich sauce, and vegetable broth adds depth. A touch of sugar balances the acidity of the tomatoes. Dried oregano is a must for that classic Italian flavor. - Grated Parmesan cheese for serving - Side dish suggestions: salad or garlic bread If you want to elevate your meal, sprinkle some grated Parmesan cheese on top. It melts beautifully and enhances the flavor. Pairing this pasta with a side salad or garlic bread makes it even better. A crisp salad adds freshness, and garlic bread offers a nice crunch. These extras round out your meal perfectly. Start by heating the olive oil in a large pot over medium heat. Once it’s hot, add the chopped onion. Cook it for about 3 to 4 minutes. You want the onion to be soft and clear. Then, add the minced garlic and red pepper flakes. Cook for one more minute. Stir it often so the garlic doesn’t burn. You’ll notice a lovely smell filling your kitchen! Next, pour in the crushed tomatoes and the vegetable broth. Add the sugar, dried oregano, a pinch of salt, and some black pepper. Mix everything well. This will create a rich and flavorful base for your pasta. Now, turn up the heat to bring this mixture to a gentle boil. Once it’s boiling, add your spaghetti or fettuccine. Give it a good stir to make sure all the pasta is submerged in the sauce. This step is key for even cooking. Lower the heat to medium-low. Cover the pot and let it simmer for about 10 to 12 minutes. Stir occasionally to prevent sticking. The pasta should be al dente, and the sauce will thicken nicely. This is where the magic happens! After the pasta is cooked, take the pot off the heat. Gently fold in the torn basil leaves. This adds a fresh flavor. Taste the dish and adjust the seasoning if needed. A little more salt or pepper can make a big difference! Serve the pasta hot from the pot. If you like, sprinkle some grated Parmesan cheese on top. Add a few extra basil leaves for color and taste. For a complete meal, pair it with a side salad or some crusty garlic bread. Enjoy your delicious creation! To cook pasta al dente, follow these steps: - Boil water in a large pot. - Add salt to the water before the pasta. - Stir the pasta often while it cooks. - Test the pasta a minute before the time is up. For spice lovers, tweak the red pepper flakes. Start with one teaspoon. Add more if you like it hotter. Just remember, you can always add more, but you can’t take it out! Fresh herbs make a big difference. Toss in extra basil when you serve the dish. You can also add parsley for a bright touch. Quality ingredients matter. Use good olive oil and fresh tomatoes when possible. These choices impact the taste. Pair this pasta with a fresh side salad. A crunchy salad balances the meal well. Garlic bread is another easy side. It adds comfort and goes great with pasta. For meal prep, store leftovers in an airtight container. You can keep it in the fridge for up to three days. Reheat it in a pot over low heat. Add a splash of water to keep it moist. {{image_4}} You can easily boost your pasta with protein. Adding grilled chicken gives a nice flavor. Cook the chicken separately, then slice and mix it in before serving. Shrimp is another great option. Sauté shrimp until pink and toss them in for a seafood twist. If you prefer vegetarian options, chickpeas are an excellent choice. They add protein and a hearty texture. Just drain and rinse a can of chickpeas, then stir them in during the last few minutes of cooking. If you need gluten-free pasta, you have options. Look for gluten-free spaghetti or fettuccine. Many brands taste just as good as regular pasta. Cook it according to package directions. Want to make this dish vegan? Skip the Parmesan cheese. You can replace it with nutritional yeast for a cheesy flavor. Also, ensure the vegetable broth is vegan. Don't be afraid to get creative with flavors. Roasted vegetables can enhance the dish. You can add bell peppers, zucchini, or cherry tomatoes. Roast them first, then mix them in before serving. Infuse the dish with different herbs or spices. Try thyme or rosemary for a unique twist. For a smoky flavor, consider adding smoked paprika. Just a pinch can change the whole vibe of your pasta. To store leftovers, let the pasta cool first. Transfer it to an airtight container. This keeps the pasta fresh in the fridge for up to three days. When you want to eat it, use a pot or microwave to reheat. For the pot, add a splash of water. Heat it on low, stirring often until warm. If using a microwave, heat in short bursts. Stir in between to avoid hot spots. You can freeze this dish for longer storage. Allow the pasta to cool completely. Then, place it in a freezer-safe container. Make sure to leave some space for expansion. It can last for up to three months in the freezer. When you're ready to eat, thaw the pasta overnight in the fridge. For quick thawing, you can use the microwave's defrost setting. Reheat on the stove, adding a little water or broth to restore moisture. Stir often to heat evenly. Enjoy your tasty pasta later! Yes, you can use other pasta types. Good options include penne or rotini. These shapes hold sauce well. You can pick any pasta you like, just adjust the cook time. To reduce spice, cut back on red pepper flakes. You can also add more tomatoes or broth. These will tone down the heat. Another option is to add a dollop of cream or yogurt. This will help cool the dish. This pasta pairs well with a side salad. A fresh green salad complements the dish nicely. You can also serve it with crusty garlic bread. Bread is perfect for soaking up the sauce. Prep takes about 10 minutes. Cooking time is around 15 minutes. So, the total time is about 25 minutes. It’s quick and easy for busy nights. Yes, you can prep this dish ahead. Store it in the fridge for up to three days. For reheating, warm it on the stove. Add a splash of broth to keep it moist. This blog post covered everything you need for a tasty One Pot Spicy Tomato Basil Pasta. We talked about the main ingredients, like pasta, tomatoes, and herbs. You learned how to cook the pasta perfectly and add flavor with simple spices. I offered tips for making it a full meal, like side dishes and protein options. Remember, you can adjust flavors as you like. With the right methods, leftovers will taste great too. Enjoy cooking this dish and sharing it with others!

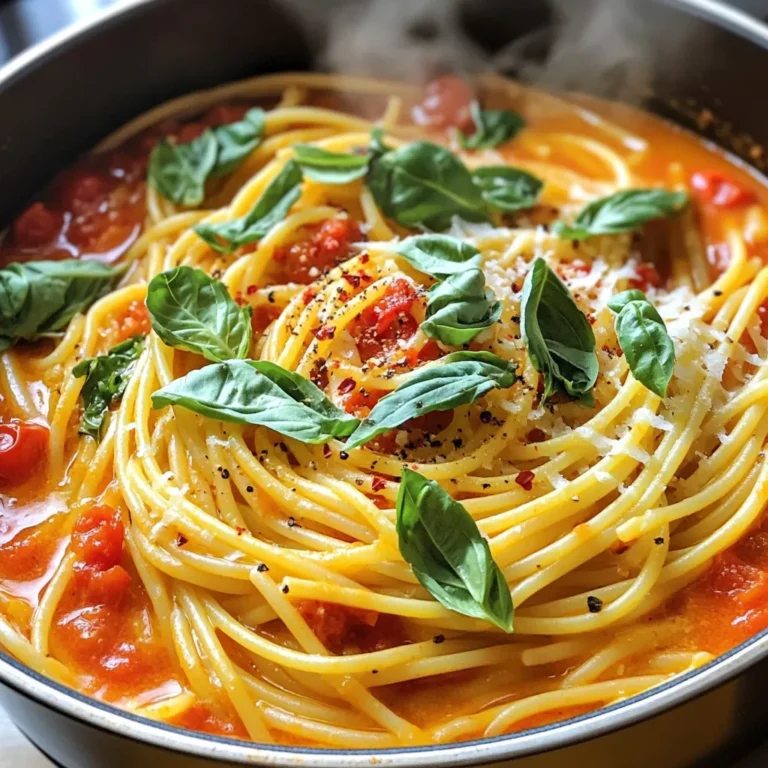
One Pot Spicy Tomato Basil Pasta Easy and Flavorful Meal

- 1 cup all-purpose flour - 1 teaspoon baking powder - 1/2 teaspoon baking soda - 1/2 teaspoon salt - 1 teaspoon ground cinnamon - 1/2 teaspoon ground nutmeg - 1/4 teaspoon ground ginger - 1/4 teaspoon ground cloves - 1/2 cup unsalted butter, softened to room temperature - 1 cup granulated sugar - 2 large eggs - 1/2 cup pumpkin puree - 1/2 cup brewed coffee, cooled to room temperature - 1 teaspoon vanilla extract - 1/2 cup unsalted butter, softened to room temperature - 2 cups powdered sugar - 1/4 cup pumpkin puree - 1 teaspoon vanilla extract - 1 teaspoon ground cinnamon When you gather these ingredients, make sure they are fresh. Using high-quality pumpkin puree makes a big difference. The spices bring warmth and depth to your cupcakes. If you can, grind whole spices for better flavor. Each ingredient plays a role in creating the perfect balance. The butter must be softened for easy mixing. This allows for a light and fluffy batter. Using cooled coffee adds a rich taste that complements the pumpkin. The frosting ingredients also need to be precise for the best results. Make sure to have everything ready before you start baking. First, turn on your oven and set it to 350°F (175°C). This helps the cupcakes bake evenly. Grab your cupcake tin and line it with paper liners. This makes it easy to take the cupcakes out once they are baked. In a medium bowl, whisk together the dry ingredients. Combine 1 cup of all-purpose flour, 1 teaspoon of baking powder, 1/2 teaspoon of baking soda, and 1/2 teaspoon of salt. Next, add 1 teaspoon of ground cinnamon, 1/2 teaspoon of ground nutmeg, 1/4 teaspoon of ground ginger, and 1/4 teaspoon of ground cloves. Mix well and set this bowl aside. Now, take a large mixing bowl. Use a hand mixer or stand mixer to beat 1/2 cup of softened unsalted butter and 1 cup of granulated sugar together. Mix until the mixture is light and fluffy. This should take about 3 to 4 minutes. Next, add 2 large eggs to the butter and sugar. Do this one at a time. Mix well after adding each egg. Then, stir in 1/2 cup of pumpkin puree, 1/2 cup of cooled brewed coffee, and 1 teaspoon of vanilla extract. Make sure everything is blended together smoothly. Gradually add the bowl of dry ingredients to the wet mixture. Use a spatula or wooden spoon to stir gently. Mix just until everything is combined. Be careful not to overmix, or the cupcakes may not be fluffy. Now it's time to fill the cupcake liners. Divide the batter evenly among them, filling each about two-thirds full. This gives them room to rise while baking. Place the cupcake tin in the oven and bake for 18 to 20 minutes. Check if they are done by inserting a toothpick into the center. If it comes out clean, they are ready! Let them cool in the pan for 5 minutes before moving to a wire rack. While the cupcakes cool, let’s prepare the frosting. In a mixing bowl, beat 1/2 cup of softened unsalted butter until creamy. Gradually add 2 cups of powdered sugar, mixing well until combined. To the frosting, add 1/4 cup of pumpkin puree, 1 teaspoon of vanilla extract, and 1 teaspoon of ground cinnamon. Beat on medium speed until the frosting is fluffy and easy to spread. Once the cupcakes are completely cool, use a piping bag or spatula to frost each cupcake. Make sure to create a nice swirl or smooth finish on top. To make the best pumpkin spice latte cupcakes, follow these tips: - Use room temperature ingredients: This helps the batter mix well. - Do not overmix: Mix until just combined. This keeps the cupcakes light and fluffy. - Fill liners correctly: Fill each liner about two-thirds full. This allows space for rising. - Check for doneness: Use a toothpick. If it comes out clean, your cupcakes are ready. Frosting is key for flavor and looks. Here are some tips: - Cool completely: Ensure cupcakes are cool before frosting. This prevents melting. - Use a piping bag: This makes it easy to create beautiful swirls. - Add spices to frosting: Mix in a bit of cinnamon for extra flavor. - Experiment with textures: You can spread it smooth or create peaks for fun. A good presentation makes cupcakes even more tempting. Try these ideas: - Use decorative stands: Display your cupcakes on a pretty cupcake stand. - Sprinkle toppings: Add a dash of cinnamon or place coffee beans on top. - Serve with coffee: Pair these cupcakes with a warm cup of coffee for a treat. - Create a theme: Use fall-themed plates or napkins to enhance the vibe. {{image_4}} You can easily make gluten-free cupcakes. Use a gluten-free flour blend instead of all-purpose flour. Look for blends that have xanthan gum added. This will help your cupcakes rise and stay soft. Always check the blend’s packaging. Many brands work well for baking. For a dairy-free version, swap out the butter for coconut oil or a dairy-free butter substitute. Use almond milk or oat milk instead of regular milk in the frosting. This way, you still get a rich flavor without dairy. Your guests won’t even notice the difference! You can change the frosting to mix things up. A cream cheese frosting adds a tangy twist. Just blend cream cheese with powdered sugar and vanilla. If you love chocolate, try chocolate ganache. Melt chocolate with heavy cream, then let it cool before frosting. Both options will give your cupcakes a new flair! To store unfrosted pumpkin spice latte cupcakes, let them cool fully. Place them in an airtight container. Keep them at room temperature for up to three days. If you need to store them longer, refrigerate for up to a week. Make sure to wrap them well to avoid drying out. After frosting your cupcakes, keep them in an airtight container. Store them in the fridge for up to five days. The frosting stays fresh and creamy this way. If you want to enjoy them at room temperature, let them sit out for about 30 minutes before serving. Freezing cupcakes is easy! First, let them cool completely. Wrap each cupcake tightly in plastic wrap. Place them in a freezer-safe container. They can stay frozen for up to three months. To enjoy, thaw them in the fridge overnight. Frost them after thawing for the best taste! Pumpkin spice latte cupcakes last about 3 to 5 days. Store them in an airtight container. This keeps them fresh and moist. Yes, you can use applesauce or mashed bananas. These options add moisture and sweetness. However, the flavor will change slightly. Brewed coffee works best. Use a medium roast for a balanced flavor. You can also use espresso for a stronger taste. Absolutely! You can bake them a day ahead. Just store them in an airtight container. Frost them on the day you serve. Serve them on a pretty plate or a cupcake stand. Add a sprinkle of cinnamon on top for flair. Pair with a warm drink for a cozy touch. You learned how to bake tasty pumpkin spice latte cupcakes. We covered all the key ingredients, both dry and wet, along with frosting options. The step-by-step instructions make it easy to follow. With tips for perfecting your cupcakes and fun variations to try, you can impress your friends. Just remember to store them right for freshness. Enjoy baking and sharing these delicious treats!

Delicious Pumpkin Spice Latte Cupcakes Easy Recipe

- 2 large chicken breasts - 1 cup grated Parmesan cheese - 1 cup panko breadcrumbs - 1 teaspoon garlic powder - 1 teaspoon onion powder - 1 teaspoon Italian seasoning - 1/2 teaspoon paprika - 1/2 teaspoon salt - 1/4 teaspoon freshly ground black pepper - 2 large eggs - 2 tablespoons olive oil The main ingredients in this recipe create a tasty chicken dish. Chicken breasts serve as the base, providing a lean protein. Parmesan cheese adds a salty and rich flavor. Panko breadcrumbs give a crunchy texture that makes the chicken satisfying to bite into. For seasoning, garlic powder, onion powder, and Italian seasoning blend well. These spices enhance the chicken's taste without overpowering it. Paprika adds a hint of color and mild heat. Salt and black pepper are must-haves, boosting the overall flavor. The binding agents help the crust stick. Eggs create a nice layer for the breadcrumbs to cling to. Olive oil adds moisture and aids in crisping up the coating. This combination makes each bite a delight. First, dry the chicken breasts. Use paper towels to soak up any moisture. If your chicken is thick, slice it in half. This step helps it cook evenly. Season both sides with salt and pepper. This adds great flavor to the chicken. In a shallow bowl, crack the eggs. Whisk them until they mix well. In another shallow bowl, combine the grated Parmesan cheese and panko breadcrumbs. Add garlic powder, onion powder, Italian seasoning, paprika, salt, and black pepper. Stir everything together until well blended. Now, take each chicken breast. Dip it into the egg mixture, letting any extra drip off. Next, coat it in the breadcrumb mixture. Press gently so the crumbs stick well. Make sure each piece is fully covered. Preheat your air fryer to 380°F (193°C). Let it warm up for about 5 minutes. This step ensures even cooking. Lightly spray the air fryer basket with cooking spray. Place the breaded chicken in a single layer. Do not overcrowd the basket. For crispiness, spray the tops of the chicken with a little olive oil. Air fry the chicken for 12-15 minutes at 380°F (193°C). Flip the chicken halfway through cooking. They are done when the coating is golden brown and the inside reaches 165°F (75°C) on a meat thermometer. Once cooked, remove the chicken from the air fryer. Let it rest for 3-5 minutes on a cutting board. This resting time helps keep the chicken juicy. After resting, slice the chicken and serve. Enjoy your tasty Air Fryer Parmesan Crusted Chicken Breast! Preheating the air fryer is key. Set it to 380°F (193°C) and let it warm for 5 minutes. This step helps the chicken cook evenly. Next, lightly spray the air fryer basket with oil. This adds crispiness and prevents sticking. A quick spray on the chicken tops adds even more crunch. Patting the chicken breasts dry is very important. Use paper towels to remove excess moisture. This step ensures the coating sticks well. If your chicken breasts are thick, slice them in half. This technique helps them cook evenly. Cooking times may vary based on the chicken size. Flip the chicken halfway through cooking for even browning. Always check the internal temperature. It should reach 165°F (75°C) for safety. Using a meat thermometer gives you the best results. {{image_4}} You can change the cheese for more flavor. Try mozzarella or cheddar for a twist. Each will give a different taste and texture to your chicken. You can also mix in some herbs and spices. Fresh parsley or basil adds a lovely touch. A pinch of cayenne pepper can give it a nice kick, too. Don't hesitate to experiment based on what you have at home. If you want to bake your chicken, set your oven to 400°F (200°C). Place the breaded chicken on a baking sheet. Bake for about 20-25 minutes. This method still gives you a crispy crust. For a pan-fried option, add oil to a skillet over medium heat. Cook the chicken for about 5-7 minutes on each side. This method creates a nice golden brown color and flavor. For a great meal, pair your chicken with sides like roasted veggies or rice. A fresh salad with lemon vinaigrette also works well. If you like sauces, try a creamy garlic sauce or marinara. These add extra flavor and make the dish more exciting. You can also serve lemon wedges for a zesty touch. Store leftover chicken in the fridge. Place it in an airtight container. This keeps the chicken fresh and moist for up to three days. If you want to save space, slice the chicken before storing it. This lets you fit more in the container. You can freeze cooked chicken for later use. Wrap it tightly in plastic wrap, then place it in a freezer bag. This helps prevent freezer burn. To reheat, thaw it overnight in the fridge. Heat it in the air fryer for about 5-7 minutes at 350°F (175°C). This keeps the chicken crispy. Cooked chicken lasts about three to four days in the fridge. Check for any off smells or slimy texture. These are signs of spoilage. If the chicken looks dry or discolored, it's best to toss it. Always trust your senses to ensure food safety. To check if the chicken is cooked, use a meat thermometer. Insert it into the thickest part of the breast. The internal temperature should reach 165°F (75°C). This ensures the chicken is safe to eat. If you don’t have a thermometer, look for a golden brown crust. The juices should run clear. If they are pink, it needs more time. Yes, you can use skinless chicken breasts for this recipe. Skinless chicken is lower in fat, which makes it a healthier choice. It still turns out juicy and tender. The Parmesan crust gives it great flavor and texture. Just remember to season well, as skin adds natural flavor. You can pair this chicken with many sides. Some good options include: - Mixed greens salad - Roasted vegetables - Garlic mashed potatoes - Steamed broccoli These sides balance the rich flavor of the chicken. They add color and nutrients to your meal. Yes, you can make this recipe gluten-free easily. Replace the panko breadcrumbs with gluten-free breadcrumbs. You can also use crushed gluten-free crackers for crunch. Just make sure to check labels for gluten-free certification. This way, everyone can enjoy this tasty dish. This guide shows you how to make Parmesan crusted chicken in an air fryer. We covered the main ingredients, seasoning, and binding agents. You learned the step-by-step process, tips for a crispy coating, and different cooking methods. Consider trying variations for added flavor. Remember to store leftovers properly to keep them fresh. With these insights, you can confidently cook a tasty meal that everyone will enjoy. Enjoy experimenting and impressing your guests with this simple yet delicious dish!

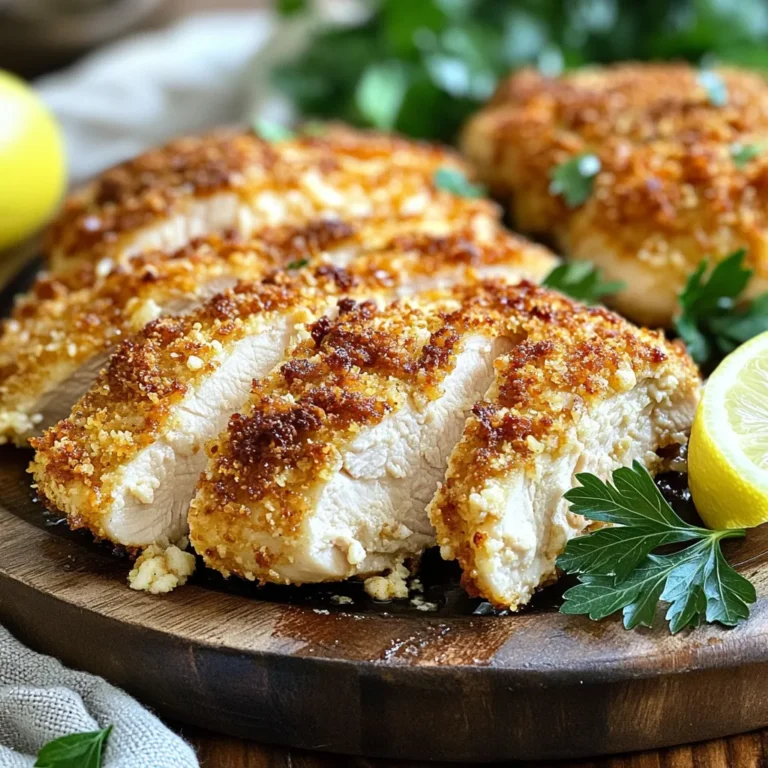
Air Fryer Parmesan Crusted Chicken Breast Delight

- 1 cup canned pumpkin puree - 1/2 cup vegetable oil - 3/4 cup brown sugar, tightly packed - 1/4 cup granulated sugar - 2 large eggs, at room temperature - 1 teaspoon vanilla extract - 1 1/2 cups all-purpose flour - 1 teaspoon baking soda - 1 teaspoon baking powder - 1 teaspoon ground cinnamon - 1/2 teaspoon ground nutmeg - 1/2 teaspoon ground ginger - 1/4 teaspoon sea salt - 1 cup semi-sweet chocolate chips - 1/2 cup chopped walnuts (optional) You can make some swaps if you need. For the vegetable oil, use melted coconut oil for a hint of flavor. Brown sugar can be replaced with white sugar if you prefer a lighter taste. For a dairy-free option, use flax eggs instead of regular eggs. This means mixing 1 tablespoon of ground flaxseed with 2.5 tablespoons of water per egg. You can also use dairy-free chocolate chips if you want to keep the muffins vegan. To bake these muffins, you will need a few key tools: - Standard muffin tin - Paper liners or non-stick cooking spray - Large mixing bowl - Whisk for mixing - Spatula or wooden spoon for folding - Ice cream scoop or tablespoon for batter - Toothpick for checking doneness - Wire rack for cooling These supplies make the process smooth and fun. Enjoy baking! Start by heating your oven to 350°F (175°C). Grab your muffin tin and line it with paper liners. You can also grease it with cooking spray. This step is key. It keeps the muffins from sticking and makes cleanup a breeze. In a large bowl, mix the pumpkin puree, vegetable oil, brown sugar, and granulated sugar. Use a whisk for this. Blend until the mixture is smooth and well combined. Now, add the eggs and vanilla extract. Whisk again until everything is light and fluffy. In another bowl, sift together the all-purpose flour, baking soda, baking powder, ground cinnamon, nutmeg, ginger, and sea salt. Sifting helps mix the dry ingredients well and aerates the flour. This makes your muffins light and fluffy. Gradually add the dry mixture into the wet pumpkin mixture. Use a spatula or wooden spoon to stir gently. Mix until just combined. Be careful not to overmix. Then, fold in the chocolate chips and walnuts if you choose to use them. This adds a sweet touch and a nice crunch. Scoop the batter into the lined muffin tins. Fill each cavity about 3/4 full. This gives them room to rise. Place the muffin tin in the oven and bake for 18-20 minutes. Check doneness by inserting a toothpick in the center. It should come out clean with a few crumbs. After baking, let the muffins cool in the tin for about 5 minutes. Then, move them to a wire rack to cool completely. This step is important. It keeps the muffins from getting soggy and helps them stay fluffy. To get bakery-style muffins, focus on texture and rise. Here are some key tips: - Use room temperature eggs. They mix better with other ingredients. - Don’t overmix the batter. Stir gently until just combined. - Fill muffin cups about 3/4 full. This allows them to rise nicely. - Bake at 350°F (175°C) for 18-20 minutes. Check with a toothpick to be sure. Watch out for these common mistakes: - Using cold ingredients. This can lead to dense muffins. - Overmixing the batter. This can make the muffins tough. - Skipping the cooling step. Cooling helps keep the muffins fluffy. - Not greasing the pan. Sticking can ruin your perfect muffins. Storing muffins right keeps them fresh. Here’s how: - Let muffins cool completely before storing. - Place them in an airtight container. This keeps moisture in. - Store at room temperature for up to 3 days. - For longer storage, freeze them. Wrap each muffin in plastic wrap. {{image_4}} To make gluten-free muffins, swap all-purpose flour with a gluten-free blend. Many brands work well, but look for one that includes xanthan gum. This helps mimic the texture of wheat flour. Follow the same steps in the recipe, and enjoy your gluten-free treat. They will be just as moist and tasty. For a vegan version, replace the eggs with flax eggs. Mix one tablespoon of ground flaxseed with three tablespoons of water. Let it sit for five minutes until it thickens. Use vegetable oil as usual, and choose vegan chocolate chips. These muffins will still have great flavor and texture. You can elevate your muffins with extra spices. Try adding a pinch of clove or allspice for depth. You can also mix in chopped nuts. Walnuts add a nice crunch, but pecans are a great choice too. If you love sweet and salty, sprinkle a bit of sea salt on top before baking. This will enhance the flavors even more. Store leftover muffins in an airtight container. This keeps them fresh and moist. Place a paper towel at the bottom of the container to absorb any extra moisture. It helps keep your muffins from getting soggy. If you plan to eat them within a few days, store them at room temperature. If not, the fridge works too. Just remember, muffins can dry out in the fridge. Freezing muffins is easy and a great way to save them. First, let the muffins cool completely. Wrap each muffin in plastic wrap or foil. Then, place them in a freezer-safe bag. Remove as much air as possible before sealing. Label the bag with the date. You can freeze muffins for up to three months. When you are ready to eat one, just take it out and let it thaw in the fridge overnight. To reheat your muffins, use your oven or microwave. For the oven, preheat it to 350°F (175°C). Place the muffins on a baking sheet and heat for about 5 to 10 minutes. This restores their fresh-baked taste. If you use a microwave, place a muffin on a plate and cover it with a damp paper towel. Heat for 15 to 20 seconds. This keeps the muffin soft. Enjoy your warm, delicious muffins anytime! Yes, you can use fresh pumpkin. Just roast and puree it first. This gives a fresh taste. Fresh pumpkin has a different moisture level. You might need to adjust other wet ingredients. Check the muffins at 18 minutes. Insert a toothpick into the center. If it comes out clean or with a few crumbs, they are done. If the toothpick has wet batter, bake a few more minutes. You can add spices like cloves or allspice for warmth. Chopped apples or cranberries add fruitiness. Try adding orange zest for a citrus kick. You can also mix in different types of nuts. Yes, mini muffins work great! Fill the mini muffin tin only halfway. Bake for about 10-12 minutes. Check with a toothpick as you would for regular muffins. Enjoy bite-sized treats! Now you know how to make amazing pumpkin chocolate chip muffins. We covered all the key steps, from gathering ingredients to enjoying the warm treats. Remember to choose the right substitutes and avoid common mistakes for perfect muffins. You can even try fun variations like gluten-free or vegan options. Store them properly to keep them fresh longer. Dive into baking with confidence and share your tasty muffins with others. Your kitchen adventure is just beginning!

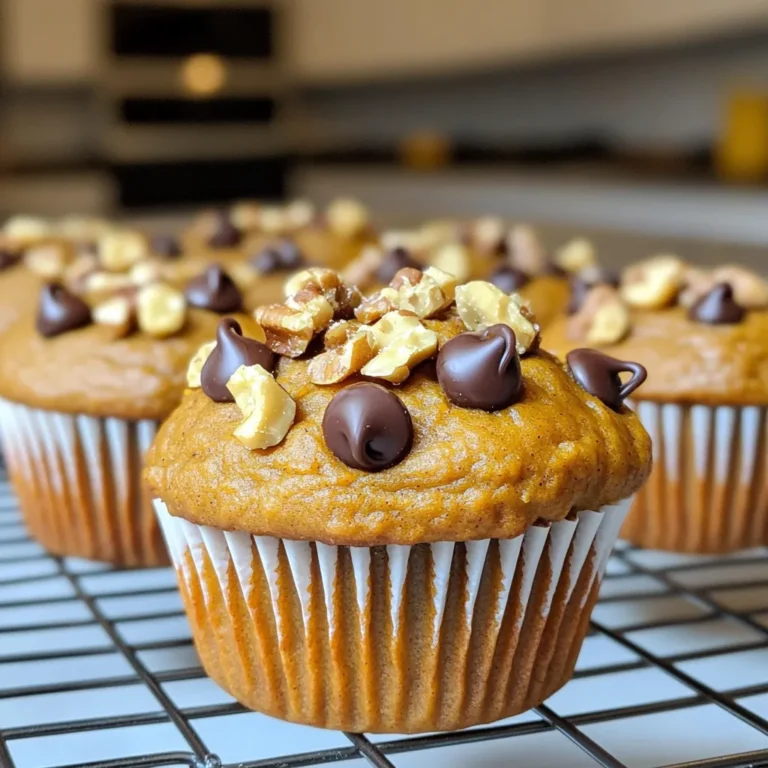
Pumpkin Chocolate Chip Muffins Bakery Style Delight

- 2 cups all-purpose flour - 1 tablespoon baking powder - 1/2 teaspoon baking soda - 1/2 teaspoon salt - 1 teaspoon ground cinnamon - 1/2 teaspoon ground nutmeg - 1/2 cup unsalted butter - 1 cup granulated sugar - 2 large eggs - 1 cup apple cider - 1 teaspoon pure vanilla extract - 1 medium Granny Smith apple - 1/2 cup packed brown sugar - 1 tablespoon ground cinnamon (for filling) - 1 cup powdered sugar (for glaze) - 1-2 tablespoons apple cider (for glaze) The dry ingredients form the base of the cake. Flour gives it structure, while baking powder and baking soda help it rise. Salt enhances flavor, and spices like cinnamon and nutmeg add warmth. The wet ingredients bring moisture and sweetness. Butter adds richness, and sugar helps create a tender crumb. Eggs bind everything together. Apple cider not only adds flavor but also keeps the cake moist. Lastly, vanilla extract gives a lovely aroma. For mix-ins and toppings, the Granny Smith apple adds a bright, tart flavor. Brown sugar mixed with cinnamon creates a sweet filling. The glaze, made of powdered sugar and apple cider, brings everything together with a sweet finish. This cake is a delightful way to enjoy fall flavors in every bite. 1. Preheat your oven to 350°F (175°C). 2. Grease a 9x13 inch baking dish with butter or non-stick spray. 3. Dust the greased dish with flour to prevent sticking. 1. In a medium bowl, whisk together: - 2 cups all-purpose flour - 1 tablespoon baking powder - 1/2 teaspoon baking soda - 1/2 teaspoon salt - 1 teaspoon ground cinnamon - 1/2 teaspoon ground nutmeg 2. Set this dry mixture aside for later use. 1. In a large bowl, combine: - 1/2 cup unsalted butter, softened - 1 cup granulated sugar 2. Use an electric mixer to cream these together on medium speed for about 3-4 minutes, until light and fluffy. 3. Add 2 large eggs, one at a time, mixing well after each addition. 4. Add 1 cup of apple cider and 1 teaspoon of pure vanilla extract, mixing until well combined. 5. Gradually fold in the dry mixture, stirring gently until just combined. A few lumps are okay. 6. Gently fold in 1 medium Granny Smith apple, diced. 1. Pour half of the batter into the prepared baking dish. 2. Evenly sprinkle half of the brown sugar and cinnamon mixture over the batter. 3. Pour the remaining batter on top, smoothing it gently. 4. Sprinkle the rest of the brown sugar and cinnamon mixture on top. 5. Using a butter knife, swirl the cinnamon topping into the batter for a marbled effect. 1. Bake the cake in the preheated oven for 30-35 minutes. 2. Check for doneness by inserting a toothpick into the center. It should come out clean or with a few moist crumbs. 3. Let the cake cool in the pan for about 10 minutes before glazing. 1. In a small bowl, whisk together: - 1 cup powdered sugar - 1 tablespoon apple cider 2. Adjust the glaze by adding more cider until it reaches a smooth, drizzling texture. 3. Drizzle the glaze generously over the warm cake. - Preventing overmixing Mix the dry and wet ingredients gently. This keeps the cake soft and fluffy. If you see lumps, that’s okay! They will bake out. - Achieving the perfect rise Make sure your baking powder and baking soda are fresh. This helps the cake rise well. Don’t open the oven door too early. Wait until the end to check for doneness. - Serving suggestions with garnishes Cut the cake into large squares. Place them on a rustic wooden platter. Top each piece with a sprinkle of cinnamon. A dollop of whipped cream or vanilla ice cream adds a nice touch. - Best serving dishes Use a clear glass cake stand for a nice look. A simple white plate also works well. Keep it simple to show off the cake's beauty. - Adding spices or nuts Try adding a pinch of nutmeg or allspice for extra warmth. Chopped walnuts or pecans add a nice crunch. Sprinkle them in the batter before baking. - Alternative toppings Instead of glaze, use a cream cheese frosting. A caramel drizzle also works great. Fresh apple slices on top add a nice finish too. {{image_4}} You can change the flavor by using different apple types. Try Honeycrisp or Fuji apples for a sweeter taste. For a tart twist, use Granny Smith apples. You can also add other fruits. Diced pears or fresh cranberries work great. They add extra texture and flavor to the cake. If you need a gluten-free option, replace all-purpose flour with a gluten-free blend. Make sure it has a binding agent like xanthan gum. For vegans, use flax eggs instead of regular eggs. Simply mix one tablespoon of ground flaxseed with three tablespoons of water for each egg. You can make this cake extra special for fall. Add spices like ginger or cloves for warmth. For the holidays, try mixing in chopped nuts or dried fruits. Walnuts and raisins create a festive flavor perfect for gatherings. To store your Apple Cider Cinnamon Roll Cake, keep it in the fridge. Place it in an airtight container or cover it tightly with plastic wrap. This keeps the cake moist and fresh. If you want to save it longer, freezing is a great option. Wrap the cake in plastic wrap, then in foil. This protects it from freezer burn. When you want to enjoy a slice, take it out of the fridge. For the best taste, heat each piece in the microwave for 10-15 seconds. This warms the cake without drying it out. If you have frozen cake, let it thaw in the fridge overnight. Then, reheat as mentioned. Your cake will stay fresh for about 4-5 days in the fridge. If you freeze it, it can last for about 2-3 months. Always check for spoilage. Signs include an off smell or mold. If you see these, it’s best to toss it. Enjoy your cake while it’s still delicious! It takes about 30-35 minutes to bake this cake. You will know it's ready when a toothpick inserted in the center comes out clean or with a few moist crumbs. Keep an eye on it, as ovens can vary. Yes, you can use store-bought apple cider. It saves time and still gives great flavor. Just make sure to choose a good quality cider for the best taste. To make the cake more moist, try these tips: - Use fresh apple cider. - Add a bit more butter or a splash of milk. - Avoid overmixing the batter. This keeps the cake light and fluffy. Serve the cake warm for the best experience. Here are some ideas: - Cut it into generous squares. - Drizzle extra glaze on top. - Add a dollop of whipped cream or a scoop of vanilla ice cream. - Sprinkle with extra ground cinnamon for a nice touch. Yes, you can make this cake ahead of time. Bake it and let it cool, then store it in the fridge. When you are ready to serve, warm it up in the oven. Drizzle with glaze before serving for that fresh-baked taste. From mixing the dry and wet ingredients to baking a delicious Apple Cider Cinnamon Roll Cake, each step is simple and fun. You can even customize flavors with different fruits or dietary needs. Remember to store leftovers properly to keep them fresh. Enjoy sharing this cake with friends and family, making new memories together. Happy baking!

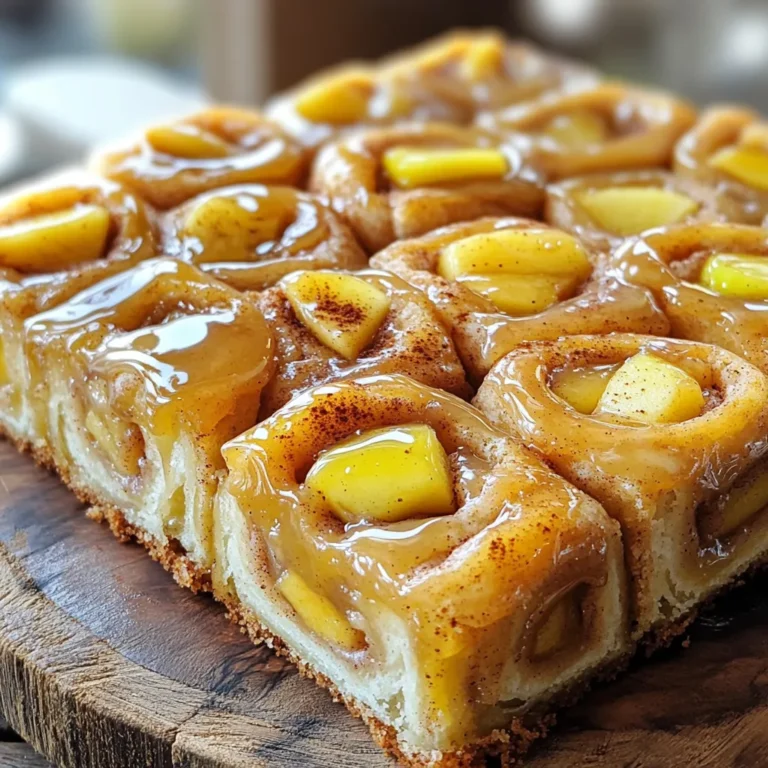
Apple Cider Cinnamon Roll Cake Irresistible Dessert

- 1 lb ground beef (or ground turkey) - 1/2 cup breadcrumbs - 1/4 cup grated Parmesan cheese - 1/4 cup fresh parsley, finely chopped - 1 garlic clove, minced - 1 large egg - 1 teaspoon Italian seasoning - Salt and pepper to taste - 6 small mozzarella balls (bocconcini) - 1 cup marinara sauce (for dipping) - Air fryer specifications - Cooking oil spray (optional) - Additional seasonings (optional) Gather your ingredients before you start. You can use ground beef or turkey. I often choose turkey for a leaner option. Breadcrumbs add texture and help bind the meat. Grated Parmesan brings a rich flavor. Fresh parsley brightens the dish. Garlic adds depth. The egg helps hold everything together. Italian seasoning gives that classic taste. Don't forget salt and pepper to enhance the flavors. The mozzarella balls are the star of the show, providing a gooey center. Lastly, marinara sauce is perfect for dipping. For cooking essentials, make sure your air fryer is ready. A light spray of cooking oil helps the meatballs brown nicely. You can add more spices if you like to customize the flavor. This mix of ingredients makes for a fun and tasty dish that everyone will love! First, grab a large bowl. Add 1 lb of ground beef or turkey. Next, mix in 1/2 cup of breadcrumbs, 1/4 cup of grated Parmesan cheese, and 1/4 cup of chopped parsley. Toss in 1 minced garlic clove, 1 large egg, 1 teaspoon of Italian seasoning, and salt and pepper to taste. Use your hands to mix well. This ensures a tasty blend for the meatballs. Next, take about 2 tablespoons of the meat mixture. Flatten it slightly in your palm. Place a small mozzarella ball in the center. Carefully fold the meat around the cheese. Make sure to seal it tightly. This helps keep the cheese from leaking out. Repeat this until you use all the meat mixture and mozzarella balls. Now, preheat your air fryer to 375°F (190°C). This step helps cook the meatballs evenly. Arrange the stuffed meatballs in the air fryer basket in a single layer. Leave space between them for air to flow. Cook the meatballs for 10-12 minutes. Check for a golden-brown color. Make sure the internal temperature reaches 160°F (70°C) to confirm they are fully cooked. If you have marinara sauce, heat it in a small saucepan while the meatballs cook. Once done, let the meatballs rest for a couple of minutes before serving. Enjoy with warm marinara sauce for dipping. To keep the mozzarella intact, use fresh mozzarella balls. They melt well and add a great taste. When you form the meatballs, ensure the meat fully surrounds the cheese. Seal them tightly so they won’t leak during cooking. For seasoning, mix in salt, pepper, and Italian herbs. This gives the meatballs a nice flavor boost. Always taste a small amount of the raw mixture. Adjust the spices if needed. Avoid overcrowding the air fryer basket. This ensures even cooking and gives the meatballs a crispy outside. If you stack them, they may steam instead of fry. Each air fryer can cook differently. Check your model's guide for cooking times. If yours runs hot, reduce the time by a few minutes. Always monitor the meatballs to ensure they don’t overcook. Presentation is key! Serve the meatballs on a large platter with fresh basil on top. This adds a pop of color. Place a small bowl of warm marinara sauce in the center for dipping. You can also sprinkle extra Parmesan on top before serving. For sides, serve with garlic bread or a fresh salad. These complement the meatballs nicely and make a complete meal. {{image_4}} You can switch up the meat in these meatballs. Ground turkey or chicken works great. They are leaner but still tasty. If you want a vegetarian option, use lentils or chickpeas. Both provide a hearty base for your meatballs. Adding herbs can change the whole taste. Try mixing in oregano or basil for a fresh kick. You can also add spices like paprika for a bit of heat. For the cheese filling, switch the mozzarella with cheddar or feta. Each cheese gives a unique twist to the dish. You can cook these meatballs in different ways. For an oven-baked version, preheat your oven to 400°F (200°C). Place the meatballs on a baking sheet and bake for 20 minutes. They will still be juicy and delicious. If you prefer a skillet, heat some oil over medium heat. Cook the meatballs for about 8-10 minutes, turning until brown and cooked through. Each method provides a new flavor experience. After cooking, let your meatballs cool. Place them in an airtight container. They last up to three days in the fridge. To reheat, preheat your air fryer to 350°F (175°C). Heat the meatballs for about 5-6 minutes. Check that they are warm all the way through. To freeze cooked meatballs, let them cool completely. Arrange them in a single layer on a baking sheet. Freeze for about one hour. Once firm, transfer them to a freezer bag. They can last up to three months. For thawing, move them to the fridge overnight. To reheat, use the air fryer at 350°F (175°C) for 8-10 minutes. This keeps them juicy! To check if the meatballs are done, use a meat thermometer. The internal temperature should reach 160°F (70°C). This ensures they are safe to eat. You can also look for visual cues. The meatballs should be golden brown on the outside. They should not be pink inside when you cut one open. Yes, you can make these meatballs ahead of time. Once formed, place them on a plate and cover tightly with plastic wrap. This keeps them fresh in the fridge for up to 24 hours. If you want to store them longer, freeze them before cooking. Use a freezer-safe container. They can last up to three months frozen. Absolutely! You can try different sauces with these meatballs. BBQ sauce adds a sweet and tangy flavor. Alfredo sauce gives a creamy touch. Pesto can offer a fresh herb taste. You can also pair them with ranch dressing or even a spicy aioli. Each sauce brings out a unique flavor in the meatballs. In this post, we explored how to make mozzarella stuffed meatballs using simple ingredients, like ground beef and Parmesan cheese. I shared easy steps for preparing and cooking them in an air fryer. Tips for serving and storing leftovers help you enjoy these meatballs later. You can even vary the meats and sauces to fit your taste. Remember, cooking should be fun and creative. Try different flavors and enjoy your delicious creations! Happy cooking!

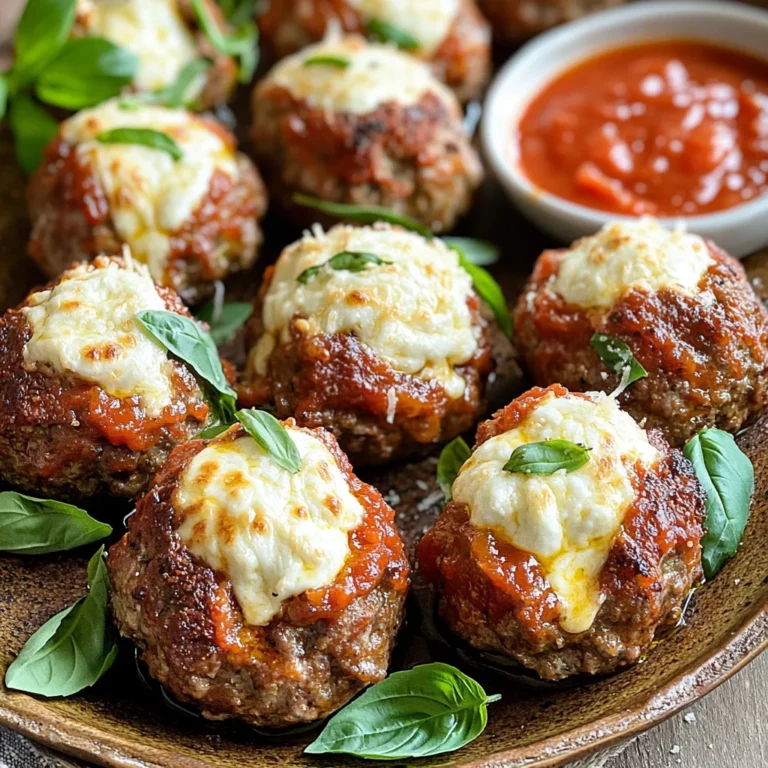
Air Fryer Mozzarella Stuffed Meatballs Savory Delight

- 4 salmon fillets (approximately 6 oz each) - 1/4 cup honey - 3 tablespoons low-sodium soy sauce - 2 cloves garlic, finely minced - 1 tablespoon fresh ginger, grated - 2 tablespoons olive oil - 1/4 teaspoon red pepper flakes (optional, for heat) - Salt and pepper, to taste - 1 tablespoon sesame seeds (for garnish) - Chopped green onions (for garnish) Gathering the right ingredients is key to making sticky honey garlic salmon. Each item plays a big role in the flavor. You want fresh salmon fillets for the best taste. Honey adds sweetness, while soy sauce gives a savory element. Garlic and ginger bring warmth and depth to the dish. Olive oil helps in cooking and adds richness. Red pepper flakes can spice things up, but they are optional. Don’t forget to season with salt and pepper. For garnish, sesame seeds add a nutty crunch, and green onions give a fresh touch. Each ingredient works together to create a dish that is sticky, sweet, and savory. This balance of flavors makes your meal stand out. - In a bowl, combine: - 1/4 cup honey - 3 tablespoons low-sodium soy sauce - 2 cloves garlic, finely minced - 1 tablespoon fresh ginger, grated - 1/4 teaspoon red pepper flakes (optional) - A pinch of salt and pepper - Whisk these ingredients together. You want a smooth and flavorful marinade. This mix packs a punch with sweetness and a hint of heat. - Take your 4 salmon fillets and arrange them in a shallow dish. - Pour the marinade over the fillets. Make sure each piece is coated well. - Set it aside for about 5 minutes. This short wait helps the flavors soak into the fish. - Heat 2 tablespoons of olive oil in a skillet over medium-high heat. Wait until it shimmers. - Place the salmon fillets into the skillet, skin-side down. Cook for 3-4 minutes. You want the skin crispy and golden. - After that, gently flip the salmon. Pour in the remaining marinade. - Let it bubble and cook for another 3-4 minutes. The salmon should be fully cooked, and the sauce will thicken to a sticky glaze. This method ensures rich flavor and perfect texture. Enjoy your sticky honey garlic salmon! Checking doneness with a fork To check if your salmon is done, gently press the fish with a fork. If it flakes easily, it’s ready. This method works well for moist salmon. A few minutes too long can dry it out, so keep an eye on it. Achieving crispy skin To get that perfect crispy skin, start with a dry surface. Pat the salmon with a paper towel before you cook it. Use medium-high heat in your skillet. Place the salmon skin-side down and let it cook without moving it. This will help create that golden crust. Adjusting soy sauce & honey ratios If you like your sauce sweeter, add more honey. For a saltier flavor, increase the soy sauce. Play around with these two to find your perfect balance. A 1:2 ratio of soy sauce to honey is a great starting point. Adding citrus zest for freshness To brighten up the dish, add some zest from a lemon or orange. Just a teaspoon can make a big difference. It adds a fresh flavor that cuts through the sweetness of the honey. Plating techniques When serving, place the salmon on one side of the plate. This leaves room for your sides. Use a spoon to drizzle the sticky sauce over the fish. This adds a nice touch and looks great. How to garnish effectively Garnishing can elevate your meal. Sprinkle sesame seeds over the salmon for crunch. Add chopped green onions for color and flavor. This not only makes your dish look good but adds more taste too. {{image_4}} You can swap salmon for chicken or tofu. Each option offers a new taste. When using chicken, cut it into thin strips. This helps it cook faster. For tofu, choose firm or extra-firm varieties. Always press the tofu to remove excess water. Cooking times will change with these proteins. Chicken needs about 6-8 minutes per side. Tofu cooks quicker, around 4-5 minutes on each side. Keep an eye on them to avoid overcooking. Don’t be afraid to play with herbs and spices. Fresh herbs like basil or cilantro add a nice touch. You can also try spices like paprika for warmth. Fruit-infused honey is a fun twist. Look for honey with flavors like orange or lemon. This adds a fruity note to your dish. You can also use fresh fruit, like mango or pineapple, in the sauce. If you need gluten-free options, choose tamari instead of soy sauce. Tamari has a similar taste but is gluten-free. For low-sodium options, use less soy sauce. Pair it with more honey for sweetness. This keeps the dish tasty without too much salt. Adjust to your preference and enjoy! To keep your sticky honey garlic salmon fresh, store it in an airtight container. This method locks in flavor and moisture. Place the salmon in the fridge within two hours of cooking. It will stay good for 3 to 4 days. Always check for any off smells before eating. When it's time to warm up your salmon, avoid dry fish. The best way is to reheat gently. Use a skillet over low heat and cover it with a lid. This keeps moisture in. You can also use the oven at 275°F. Wrap the salmon in foil to keep it juicy. A few minutes is all you need to heat it up. If you want to save salmon for later, freezing works well. Wrap it tightly in plastic wrap or foil. Then place it in a freezer bag. This keeps out air and prevents freezer burn. Salmon can stay frozen for up to three months. When ready to use, thaw it in the fridge overnight for the best texture. It takes about 8 to 10 minutes to cook salmon. This time includes 3 to 4 minutes on each side. The salmon cooks quickly due to its thin fillets. The key is to watch for the color change. When it turns from bright pink to a lighter shade, it is close to done. Yes, you can use fresh salmon! Fresh salmon often has a better taste and texture. If you use fresh, adjust the cooking time slightly. Fresh fillets may cook faster than frozen ones. You have many great options! Here are a few ideas: - Steamed rice - Quinoa - Roasted vegetables - A fresh salad - Mashed potatoes These sides pair well with the sweet and savory flavors of the salmon. To check if salmon is cooked, look at its color and texture. The fish should be opaque and flake easily with a fork. You can also use a meat thermometer. The safe internal temperature is 145°F. If you reach this temp, the salmon is done. This blog post covered everything you need for a tasty honey garlic salmon. We discussed the ingredients, step-by-step cooking, and tips for perfect results. Remember to adjust flavors to your taste and don't be afraid to try different proteins. Store leftovers properly for future meals and enjoy! Cooking can be fun, so experiment and make this dish your own. With practice, you'll impress everyone with your skills. Enjoy your journey in the kitchen!

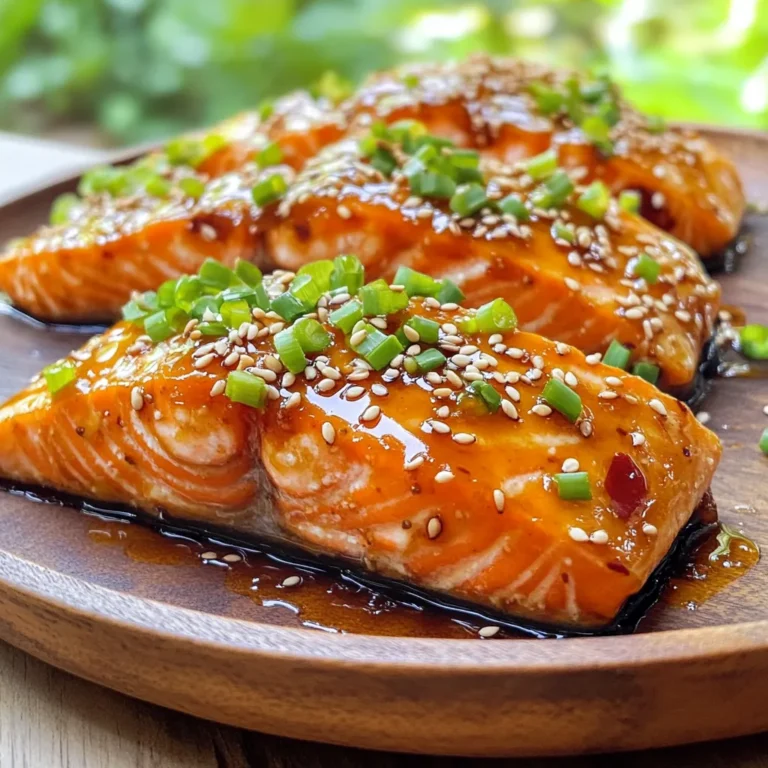
Sticky Honey Garlic Salmon 15 Minutes Flavor Boost

- 1 pound large shrimp, peeled and deveined - 2 tablespoons honey - 3 cloves garlic, minced - 2 tablespoons soy sauce - 1 tablespoon fresh lime juice The main ingredients for these tacos focus on fresh flavors. The shrimp provides a sweet and tender base. Honey adds a rich sweetness that balances well with garlic. Soy sauce gives a savory kick, while lime juice brings brightness to the dish. - 1 teaspoon ground cumin - 1 teaspoon smoked paprika - Salt and pepper, to taste - 1 tablespoon extra virgin olive oil Seasoning is key for flavor. Cumin adds warmth, while smoked paprika brings depth. A dash of salt and pepper enhances all the tastes. Olive oil helps the shrimp cook evenly and adds richness. - 8 small corn tortillas - 1 cup shredded red cabbage - 1 ripe avocado, sliced - Fresh cilantro, chopped - Lime wedges for serving When it comes to assembly, corn tortillas are perfect for wrapping. Shredded red cabbage gives a crisp texture. Ripe avocado adds creaminess, while cilantro brightens each bite. Lime wedges add a zesty finish, making the tacos refreshing and vibrant. 1. Preheat your oven to 400°F (200°C). This helps the shrimp cook evenly. 2. Line a baking sheet with parchment paper. This keeps the shrimp from sticking and makes cleanup easy. 3. In a medium bowl, mix together 2 tablespoons of honey, 3 minced garlic cloves, and 2 tablespoons of soy sauce. 4. Add 1 tablespoon of fresh lime juice, 1 teaspoon of ground cumin, and 1 teaspoon of smoked paprika. Season with salt and pepper. Whisk until well blended. 1. Place 1 pound of peeled and deveined shrimp into the bowl. Toss them in the marinade until they are well coated. 2. Spread the shrimp evenly on your prepared baking sheet. Make sure they are in a single layer. 3. Drizzle the shrimp lightly with 1 tablespoon of extra virgin olive oil. This adds flavor and prevents sticking. 1. Bake the shrimp for 8 to 10 minutes. They are done when they turn pink and opaque. Toss the shrimp halfway through cooking for even baking. 2. While the shrimp bake, warm 8 small corn tortillas in a dry skillet over medium heat. Heat each tortilla for about 30 seconds on each side. 3. To assemble your tacos, grab a warm tortilla. Place a few shrimp on top. Add shredded red cabbage and slices of ripe avocado. 4. Finish each taco with chopped fresh cilantro. Serve with lime wedges for a zesty kick. To know when shrimp is done, look for a pink color. The shrimp will also turn opaque. This change shows they are cooked through. Tossing shrimp halfway through baking helps them cook evenly. This step avoids overcooking on one side. If you need a gluten-free option, use tamari instead of soy sauce. This swap keeps the flavor while avoiding gluten. You can also change toppings based on your taste. Try adding fresh mango for sweetness or jalapeños for heat. Both will give your tacos a unique twist. For side dishes, rice or beans pair well with these tacos. They add heartiness and balance to your meal. You can also serve these tacos with salsas or sauces. A zesty salsa verde or creamy avocado sauce boosts flavor. These additions make the meal even more delicious. {{image_4}} You can switch up the seafood in these tacos. Try using scallops or firm fish like cod. They both cook well and taste great with the honey garlic sauce. If you want to change the tortillas, you can use flour or whole wheat. These options are soft and easy to fold. Want more heat? Add chili powder or cayenne to the marinade. This will spice things up and give your tacos a kick. You can also use fresh herbs. Try parsley or basil for a fresh twist. They add bright flavor and color to your dish. For a vegan option, replace shrimp with jackfruit or tofu. Both can soak up the marinade flavor and provide a hearty bite. If you're watching carbs, skip the tortillas. Instead, serve the shrimp over a salad or in a bowl with your favorite toppings. This keeps the meal light and fresh. To keep your shrimp fresh, place leftovers in an airtight container. This method keeps moisture in and prevents odor from spreading. You can store the shrimp and tacos in the fridge for about 3 days. After that, they may lose flavor and texture. For shrimp, the best way to reheat is on the stove. Heat a skillet over low heat and add a splash of water or oil. Cook the shrimp for 2 to 3 minutes until warm. For tortillas, warm them in a dry skillet. Heat each side for about 15 seconds. This keeps them soft and tasty. You can freeze cooked shrimp if you want to save them for later. Place the shrimp in a single layer on a baking sheet. Freeze for about an hour. Then, transfer them to a freezer bag. For tacos, it’s best to freeze the shrimp only. Assemble tacos fresh to enjoy the best taste. How do I know when shrimp is cooked? Shrimp cooks quickly. Look for a bright pink color. The shrimp should be opaque and firm. If they curl up tightly, they are likely done. Always check them closely to avoid overcooking. Can I make these tacos in advance? Yes, you can prep the shrimp and marinade ahead. Store them in the fridge until you are ready. Cook them right before serving for the best taste. You can also pre-chop toppings for easy assembly. What type of shrimp is best for tacos? I recommend large shrimp, peeled and deveined. They are easy to handle and cook quickly. You can use fresh or frozen shrimp. Both work well in this recipe. Can I use frozen shrimp, and how should I prepare them? Yes, frozen shrimp are great. Thaw them in the fridge overnight. You can also run them under cold water for a quick thaw. Pat them dry before marinating. This helps the marinade stick better. What else can I make with shrimp? Shrimp is very versatile. You can use it in stir-fries, pasta, or salads. Try shrimp tacos, shrimp fried rice, or shrimp skewers for a fun twist. Can I adapt this recipe for meal prep? Absolutely! Cook the shrimp and store them in meal prep containers. You can keep the toppings separate. This way, you can assemble fresh tacos each day. In this blog post, I shared a delicious shrimp taco recipe. You learned about the key ingredients and how to cook the shrimp perfectly. I also offered tips for variations, storage, and serving suggestions. Remember, you can customize these tacos to fit your tastes. Feel free to experiment with different seafood, toppings, or spices. Enjoy this simple, tasty meal with your family or friends. Cooking should always be fun and rewarding!

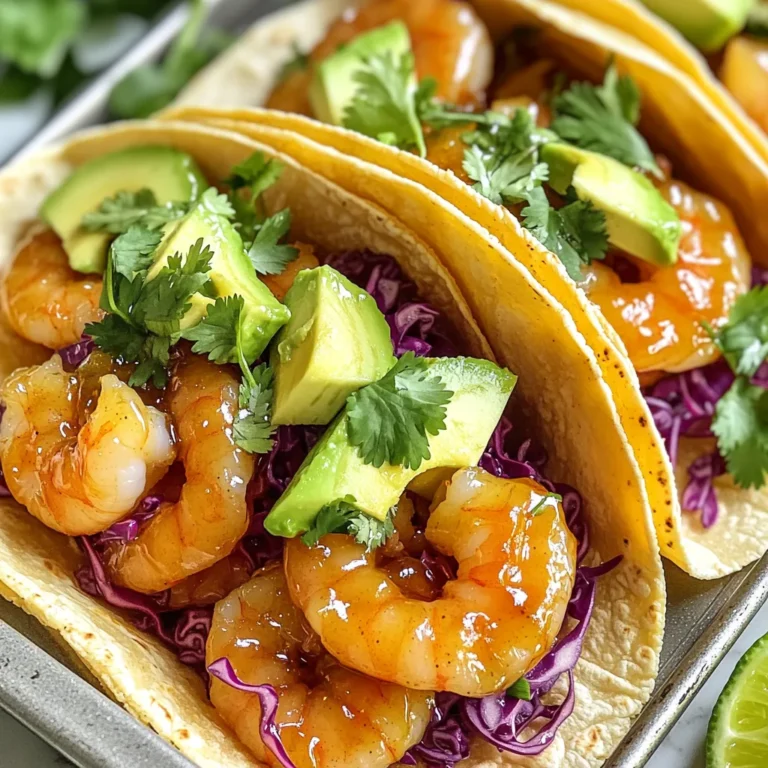
Sheet-Pan Honey Garlic Shrimp Tacos Easy Weeknight Meal

PREV 1 … 3 4 5 … 18 NEXT
feastful focus

explore

DessertsDinnerAppetizersDrinks

Our Policies

  • Cookie Policy
  • Copyright Policy
  • Disclaimer
  • GDPR Policy
  • Terms Of Use
Back to Top
  • About
  • Contact Us
  • Privacy Policy
© 2025 feastful focus