
Do you crave warm, buttery scones packed with garlic and herbs? You're in the right place! This easy recipe guarantees light, flaky scones that are perfect for breakfast or a snack. With simple ingredients and step-by-step instructions, you’ll impress your family and friends. Let’s dive into the world of Buttery Garlic Herb Scones and bring delightful flavors to your kitchen!
Why I Love This Recipe
- Easy to Make: These scones come together quickly, making them a perfect option for a last-minute snack or breakfast treat.
- Flavorful Combination: The combination of garlic, herbs, and sharp cheddar cheese creates a deliciously savory flavor that’s hard to resist.
- Versatile Enjoyment: These scones can be enjoyed on their own, with butter, or as a side to soups and salads, making them a versatile addition to any meal.
- Perfectly Golden: The melted butter glaze gives these scones a beautiful golden finish that’s as appealing to the eyes as it is to the palate.
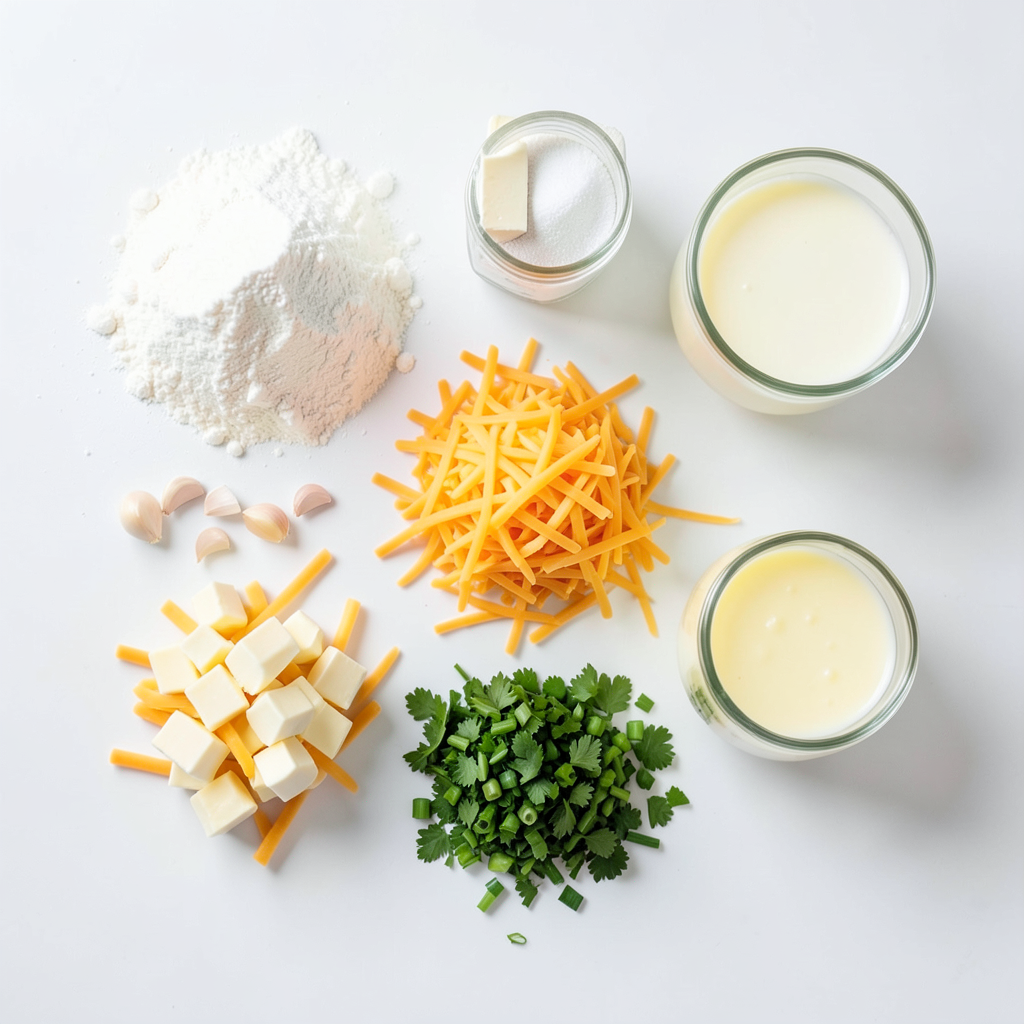
Ingredients
Main Ingredients
- 2 cups all-purpose flour
- 1 tablespoon baking powder
- 1/2 teaspoon baking soda
- 1 teaspoon salt
- 1/4 cup cold unsalted butter, cubed
The base of these scones starts with all-purpose flour. It gives the scones their structure. Baking powder and baking soda help them rise, making them light and fluffy. Salt adds flavor. Cold unsalted butter makes them rich and flaky. Use cold butter for the best texture.
Flavor Enhancers
- 1/2 cup shredded sharp cheddar cheese
- 2 cloves garlic, minced
- 2 tablespoons fresh parsley, finely chopped
- 1 tablespoon fresh chives, finely chopped
Next comes the flavor! Sharp cheddar cheese adds a nice kick. Minced garlic gives a bold taste. Fresh parsley and chives add a touch of brightness. They make the scones smell amazing while baking. These ingredients take your scones from plain to flavorful.
Liquid Ingredients
- 3/4 cup buttermilk (or 3/4 cup regular milk with 1 tablespoon lemon juice added)
- 1 tablespoon melted butter (for brushing on top)
For moisture, we use buttermilk. You can also make a quick substitute with regular milk and lemon juice. This keeps the scones tender. Brushing melted butter on top gives them a golden finish. It also adds flavor and keeps them rich.
Step-by-Step Instructions
Preparation Steps
1. Start by preheating your oven to 400°F (200°C). This heat is key for good scones.
2. Prepare a baking sheet by lining it with parchment paper. This keeps the scones from sticking.
3. In a large bowl, mix dry ingredients. Whisk together 2 cups of flour, 1 tablespoon of baking powder, 1/2 teaspoon of baking soda, and 1 teaspoon of salt. Ensure everything is well combined. This step is important for even flavor.
Incorporating Wet Ingredients
4. Now, add 1/4 cup of cold unsalted butter to the flour mix. Use a pastry cutter or your fingers. Work the butter in until it looks like coarse crumbs with tiny pieces of butter. This makes your scones flaky.
5. Next, fold in cheese and herbs. Add 1/2 cup of shredded sharp cheddar cheese, 2 cloves of minced garlic, 2 tablespoons of finely chopped parsley, and 1 tablespoon of finely chopped chives. Mix gently to spread the flavors.
6. Make a small well in the center of your dry mix. Pour in 3/4 cup of buttermilk. Use a fork to mix until the dough forms. Be careful to not overmix. This keeps your scones light.
Forming and Baking Scones
7. Dust a clean surface with flour. Place the dough on it and knead it gently a couple of times. Form the dough into a 1-inch thick disk.
8. With a sharp knife, cut the disk into 8 wedges. Transfer them to your baking sheet, leaving space between each. This allows them to rise and spread.
9. For a nice finish, brush the tops with melted butter. This adds a golden glaze and extra flavor.
10. Place the baking sheet in the oven. Bake for 15-20 minutes, or until they are lightly golden and sound hollow when tapped on the bottom.
11. Once they are done, let the scones cool slightly on the baking sheet. They taste best when served warm.
Tips & Tricks
Perfecting the Scones
To get a flaky texture, keep the butter cold. You want small pieces of butter in the flour. This helps create steam while baking. Use a pastry cutter or your fingers. Mix until it looks like coarse crumbs.
Do not overmix the dough. When you add buttermilk, stir gently. The dough should just come together. Overmixing makes scones tough. A gentle touch is key to light and airy scones.
Baking Techniques
Baking time can change based on your oven. If you have a convection oven, check your scones early. They might bake faster. Regular ovens may need the full time.
Using baking stones or sheets can help. Baking stones retain heat, giving a nice rise. If you use sheets, line them with parchment paper. This helps prevent sticking and makes cleanup easy.
Presentation Ideas
Garnish your scones with fresh herbs or cheese. A sprinkle of parsley or chives on top looks great. You can also add extra cheese for a savory touch.
Serve your scones warm. Pair them with a creamy garlic dip or herb butter. This adds flavor and makes your meal feel special.
Pro Tips
- Use Cold Butter: Ensure your butter is very cold for flaky scones. This helps create steam during baking, resulting in a light texture.
- Don’t Overmix: Mix the dough until just combined. Overmixing can lead to dense scones, so be gentle!
- Customize Your Cheese: Feel free to experiment with different types of cheese. Gouda or feta can add a delightful twist!
- Serve Warm: For the best flavor and texture, serve these scones warm right out of the oven or reheat them before serving.
Variations
Cheese Alternatives
You can switch up the cheese in your scones. Consider using mozzarella for a milder taste. Feta adds a tangy flavor, while Gruyère brings a nutty twist. You can also try flavored cheeses. A pepper jack will spice things up, while smoked cheese gives a rich depth.
Herb Swaps
Experiment with fresh herbs to change the flavor. Try using thyme or rosemary for a different aroma. You can also use dried herbs if fresh ones are not available. Just remember, dried herbs are stronger. Use about one-third of the amount needed for fresh herbs.
Flavor Additions
You can add spices to give your scones a kick. A sprinkle of cayenne adds heat, while paprika brings warmth. You can also add veggies to your dough. Chopped sun-dried tomatoes or roasted red peppers add zest and moisture. These small changes create unique flavor profiles in your scones.
Storage Info
Short-Term Storage
To keep your scones fresh, store them in an airtight container. This method helps prevent drying. Place a piece of parchment paper between layers if stacking. You can keep them in the fridge for up to three days. This way, they stay soft and tasty.
Long-Term Storage
For long-term storage, you can freeze the scones. Allow them to cool completely first. Wrap each scone tightly in plastic wrap. Then, place them in a freezer bag and seal it. They can last up to three months in the freezer. To enjoy, remove them from the freezer. Let them thaw in the fridge overnight.
Reheating Tips
To maintain texture and flavor, reheat the scones in the oven. Preheat your oven to 350°F (175°C). Place the scones on a baking sheet for about 10 minutes. This method keeps them crisp on the outside. Avoid using the microwave, as it can make them soggy. Enjoy your warm, buttery garlic herb scones fresh out of the oven!
FAQs
How do you make scones rise?
To make scones rise, you need baking powder. This ingredient creates gas bubbles when heated. These bubbles help the scones become light and fluffy. Mixing techniques also matter. When combining wet and dry ingredients, mix gently. Overmixing makes the dough tough. You want to keep it light for the best rise.
Can I make these scones ahead of time?
Yes, you can make these scones ahead of time. Prepare the dough and shape it into wedges. Place the wedges on a baking sheet and cover them with plastic wrap. This keeps them fresh. You can store them in the fridge for up to 24 hours before baking. When ready, just bake them as normal.
What can I serve with Buttery Garlic Herb Scones?
These scones pair well with many flavors. Serve them warm with herb-infused butter. You can also try a creamy garlic dip for extra taste. Another great option is to enjoy them with a side salad. The fresh herbs in the scones work well with light dishes.
In this blog post, we explored how to make Buttery Garlic Herb Scones. We covered essential ingredients like flour, baking powder, and cheese. I detailed step-by-step instructions for preparation, mixing, and baking. We also shared valuable tips for achieving the best texture and flavor. Plus, I suggested variations and storage methods for your scones.
Remember, scones are versatile and can be customized. Enjoy experimenting with flavors and serving them fresh!