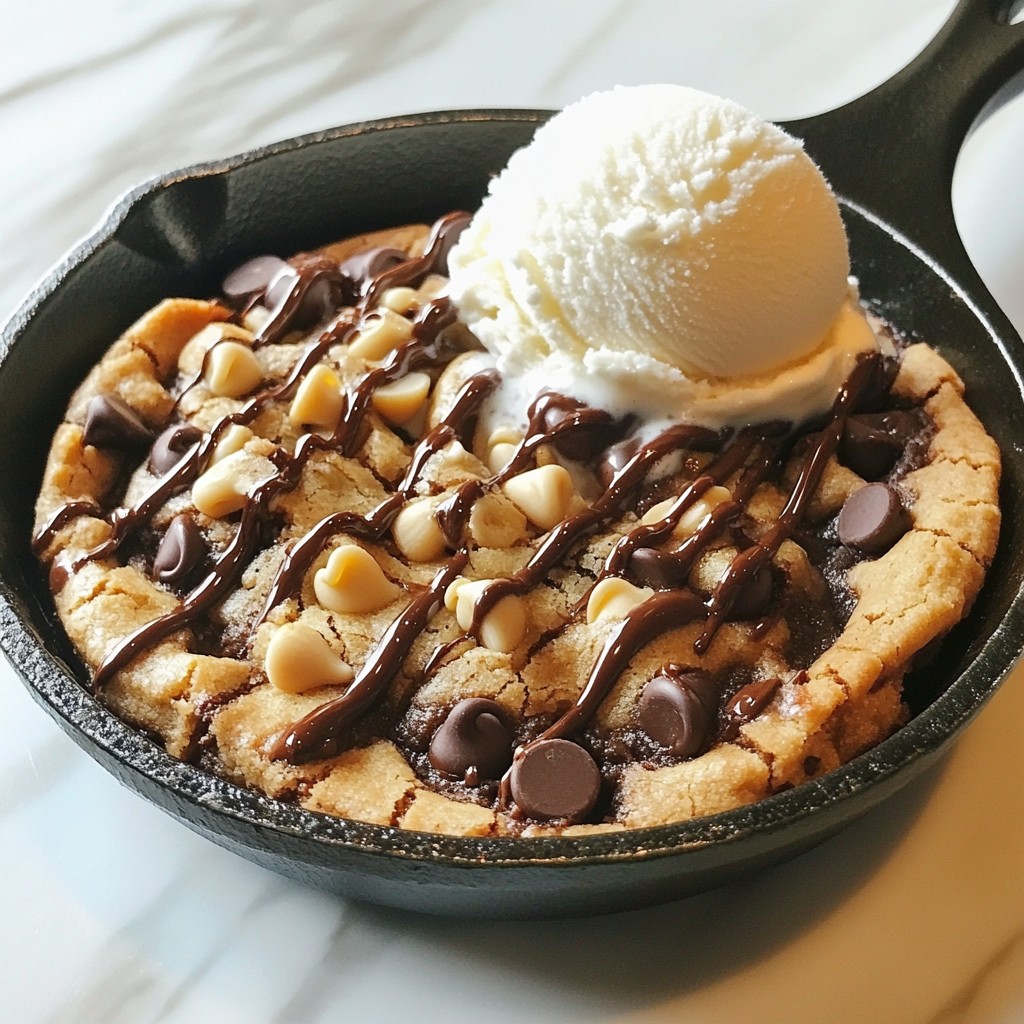
Craving a warm, gooey cookie straight from the oven? Let me introduce you to the Chocolate Chip Cookie Skillet! With just a few simple ingredients and easy steps, you can create a delightful dessert that’s perfect for sharing (or not!). Imagine soft, melted chocolate chips and a crisp edge, all served in a skillet. Get ready to impress your family and friends with this sweet treat! Let’s dive into the recipe!
Why I Love This Recipe
- Decadent Flavor: This skillet cookie is rich, chewy, and loaded with gooey chocolate chips, making every bite a delightful experience.
- Easy to Make: With simple ingredients and straightforward steps, this recipe is perfect for both novice and experienced bakers.
- Serve Warm: Baking it in a skillet allows you to serve it warm straight from the oven, creating an inviting and cozy dessert experience.
- Customizable: You can easily add your favorite nuts or even try different types of chocolate, tailoring the recipe to your taste.
Ingredients
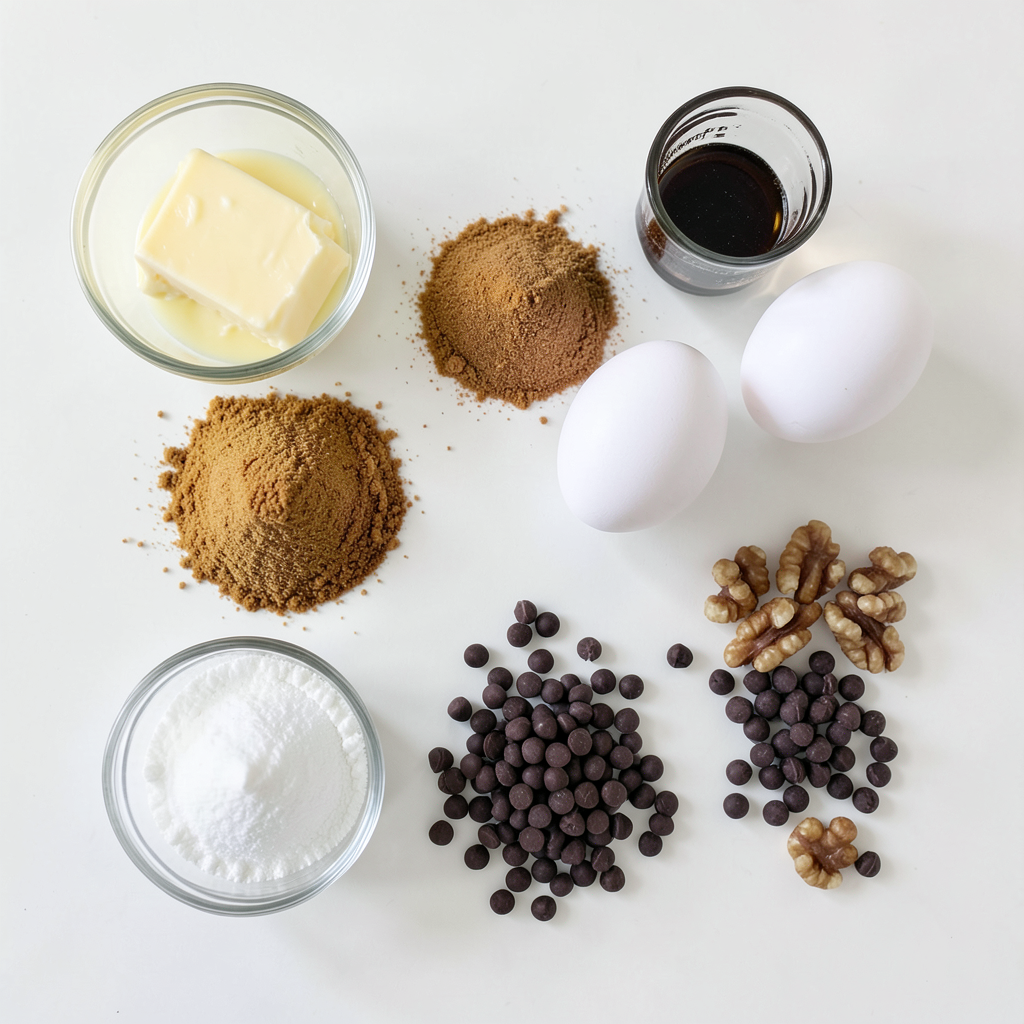
List of Ingredients
- 1 cup unsalted butter, melted
- 1 cup packed brown sugar
- 1/2 cup granulated sugar
- 1 teaspoon pure vanilla extract
- 2 large eggs
- 2 1/4 cups all-purpose flour
- 1 teaspoon baking soda
- 1/2 teaspoon fine sea salt
- 1 1/2 cups semi-sweet chocolate chips
- 1/2 cup chopped walnuts or pecans (optional)
To create the best Chocolate Chip Cookie Skillet, you need these key ingredients. Each one plays a role in making your dessert rich and delicious.
Butter gives the cookie its moistness and flavor. I use unsalted butter for better control over salt levels.
Brown sugar adds a deep, caramel-like taste. It helps keep the cookie soft. Granulated sugar adds sweetness and a bit of crisp.
Vanilla extract brings a warm, sweet aroma. It makes the flavors pop.
Eggs bind the ingredients and add moisture. They also help the cookie rise.
All-purpose flour is the base of the dough. It gives structure to the cookie.
Baking soda helps the cookie rise, making it fluffy.
Sea salt enhances all the flavors. Just a pinch goes a long way.
Semi-sweet chocolate chips are the star of the show. They melt beautifully and add rich chocolate flavor.
If you want a nutty crunch, add chopped walnuts or pecans. They give extra texture.
Gather these ingredients, and you’re ready to bake a warm, gooey treat!
Step-by-Step Instructions
Preparation Steps
- Step 1: Preheat the Oven to 350°F (175°C)
First, set your oven to 350°F or 175°C. This temperature is perfect for baking a soft cookie.
- Step 2: Mix Sugars and Melted Butter
In a large bowl, combine 1 cup of melted butter, 1 cup of brown sugar, and 1/2 cup of granulated sugar. Beat them together until the mix is smooth and creamy.
- Step 3: Incorporate Eggs and Vanilla Extract
Next, add 1 teaspoon of pure vanilla extract. Crack 2 large eggs into the bowl, one at a time. Mix well after each egg until fully blended.
Mixing Dry Ingredients
- Step 4: Combine All-Purpose Flour, Baking Soda, and Sea Salt
In another bowl, whisk together 2 1/4 cups of all-purpose flour, 1 teaspoon of baking soda, and 1/2 teaspoon of fine sea salt. This mix adds structure to your cookies.
- Step 5: Gradually Add Dry Ingredients to Wet Ingredients
Slowly add your dry mix to the wet mix. Stir gently until just combined. Avoid overmixing to keep your cookies tender.
Final Dough Preparation
- Step 6: Fold in Chocolate Chips and Nuts
Now, fold in 1 1/2 cups of semi-sweet chocolate chips. If you like, add 1/2 cup of chopped walnuts or pecans. Use a spatula for even distribution.
- Step 7: Prepare the Skillet for Baking
Lightly grease a 10-inch cast iron skillet with cooking spray or butter. This step keeps the cookie from sticking.
- Step 8: Add Dough to Skillet and Smooth Top
Pour the cookie dough into the skillet. Use a spatula to smooth the top and make it even.
- Step 9: Bake and Cool Before Serving
Place your skillet in the oven. Bake for 25-30 minutes. Look for golden edges and a slightly gooey center. Let it cool for about 5 minutes before serving. Enjoy!
Tips & Tricks
Baking Tips
- Optimal Baking Time and Temperature
Bake your cookie skillet at 350°F (175°C) for 25 to 30 minutes. This helps the edges turn golden while keeping the center soft. Check it often, as ovens may vary.
- How to Ensure a Gooey Center
To keep that perfect gooey center, do not overbake. Look for a toothpick to come out with some moist crumbs. If it comes out clean, it may be too dry.
- Recommended Skillet Types for Best Results
I suggest using a 10-inch cast iron skillet. It holds heat well and gives you a nice crust. If you don’t have one, any oven-safe skillet works, too.
Serving Suggestions
- Presentation Tips for Serving
For a great look, serve slices right from the skillet. This makes it fun and casual. You can cut it into wedges or serve it whole.
- Delicious Toppings to Add
Top each slice with a scoop of vanilla ice cream. Drizzle some chocolate sauce on top for extra yum. You can also sprinkle some chopped nuts for crunch.
- Pairing with Beverages or Ice Cream
Enjoy it with a glass of milk or a cup of coffee. Both pair nicely with the sweet flavors of the cookie. If you want more dessert, serve it with whipped cream on the side!
Pro Tips
- Use Room Temperature Ingredients: Allow your eggs and butter to come to room temperature before mixing. This helps create a smoother dough and ensures better incorporation of ingredients.
- Don’t Overmix the Dough: When combining the dry and wet ingredients, mix just until incorporated. Overmixing can lead to tough cookies, so be gentle!
- Check for Doneness: Baking times can vary by oven. Start checking for doneness a few minutes before the suggested time, looking for golden edges and a slightly gooey center.
- Experiment with Mix-ins: Feel free to get creative! Swap out the nuts for your favorite candies, or add in some dried fruit for a unique twist on the classic cookie skillet.
Variations
Flavor Variations
You can make your Chocolate Chip Cookie Skillet even better with fun flavors. Here are some ideas:
- Adding Different Types of Chocolate: Try mixing semi-sweet chocolate chips with milk or dark chocolate. You can even use white chocolate for a sweet twist. Each type adds its own taste and melts differently. The mix gives you a rich, layered flavor in every bite.
- Incorporating Other Nuts or Dried Fruits: Want to add crunch? Toss in some chopped pecans or walnuts. They bring a nice texture and nutty flavor. You can also add dried fruits like cranberries or cherries. They add a pop of color and a hint of tartness that pairs well with the sweet cookie.
Dietary Variations
You can easily adjust this recipe to fit different diets. Here are two common options:
- Gluten-Free Options: If you need a gluten-free treat, swap the all-purpose flour for a gluten-free blend. Make sure it’s a 1:1 substitute for the best results. This way, everyone can enjoy the warm, gooey goodness.
- Vegan Alternatives: To make a vegan version, replace the eggs with flax eggs. Mix one tablespoon of ground flaxseed with three tablespoons of water. Let it sit for a few minutes until it thickens. Use a plant-based butter and dairy-free chocolate chips for a yummy vegan treat.
Storage Info
Storing Leftovers
To keep your cookie skillet fresh, let it cool first. Then, cover it tightly with plastic wrap. You can also use aluminum foil. Place it in the fridge to keep it safe.
- Best Practices for Refrigerating: Always cool the skillet to room temperature before covering. This helps prevent moisture build-up.
- How Long Can it Stay Fresh?: Properly stored, it stays fresh in the fridge for up to four days.
Reheating Tips
When you are ready to enjoy leftovers, reheating is key. You want to bring back that warm, gooey goodness.
- Proper Reheating Methods: Preheat your oven to 350°F (175°C). Place the skillet in the oven for about 10 minutes. This warms it up without drying it out.
- Suggestions for Serving After Storage: Serve it warm, topped with a scoop of vanilla ice cream. Drizzle some chocolate sauce for extra flavor. Enjoy this treat with friends or family!
FAQs
Common Questions
How do I know when the cookie skillet is done? You can tell when your cookie skillet is done by checking the edges. They should be golden brown. The center will look soft and slightly gooey. Use a toothpick to test it. Insert it in the middle. If it comes out with a few moist crumbs, it's ready!
Can I make the dough ahead of time? Yes, you can make the dough ahead of time. Just mix all the ingredients as usual and cover the bowl. Store it in the fridge. You can keep it for up to 24 hours. When you are ready to bake, let it sit at room temperature for about 30 minutes before using.
What can I use if I don’t have a skillet? If you don’t have a skillet, don’t worry. You can use a baking dish or a cake pan. Just make sure it is oven-safe. You may need to adjust the baking time a little. Check for doneness by looking at the edges and using that toothpick test!
We covered a simple cookie skillet recipe from ingredients to serving ideas. With just a few steps, you can create a warm dessert that’s perfect for sharing. Remember to use the right baking tips for the best gooey center. Try various flavors or dietary options to suit your taste. Store any leftovers properly and enjoy them later. Baking is fun, and this recipe can make it a joyful experience. Go ahead and make your skillet treat today!