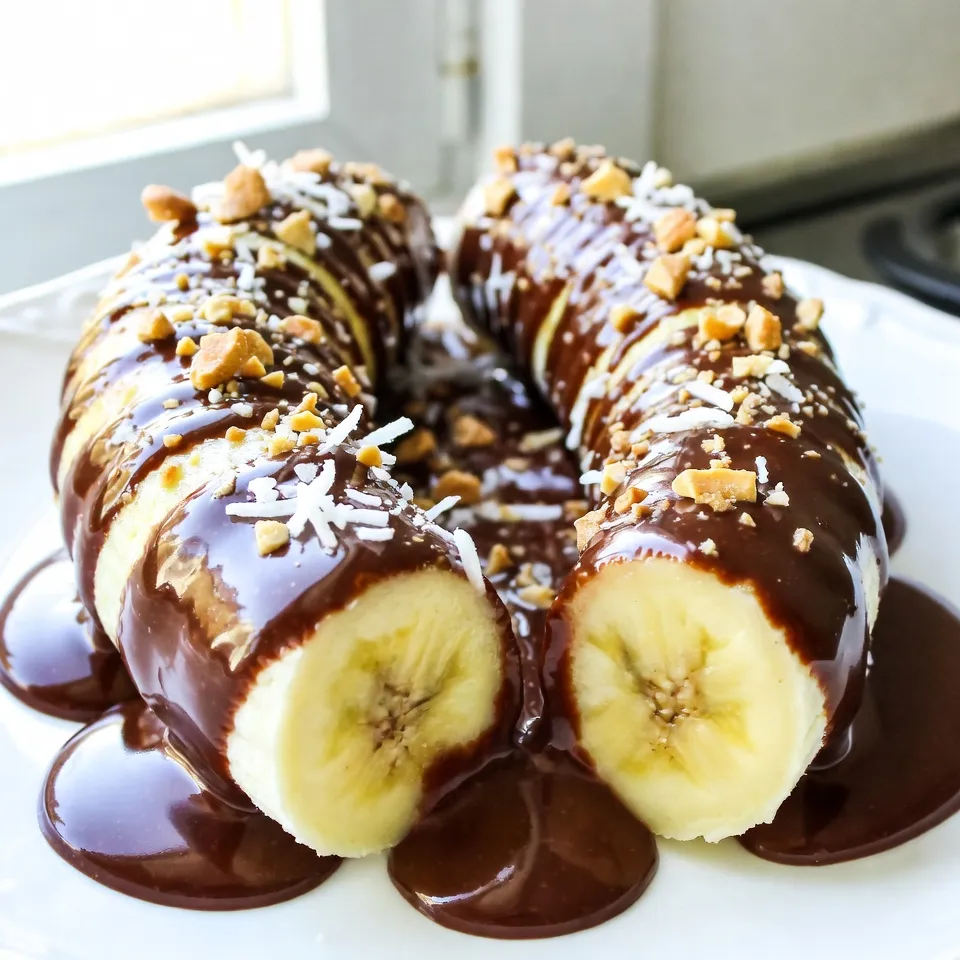
Do you want a quick, tasty treat that’s easy to make? Chocolate covered banana pops are your answer! You only need a few simple ingredients, like ripe bananas and semi-sweet chocolate chips, plus some fun toppings. In this guide, I’ll walk you through each step to create these delicious snacks. Perfect for kids and adults, they are a hit at any get-together. Let’s get started on this yummy adventure!
Why I Love This Recipe
- Delicious Flavor Combination: The rich chocolate pairs perfectly with the natural sweetness of ripe bananas, creating a delightful treat.
- Healthy Ingredients: Made with simple, wholesome ingredients, these pops are a guilt-free dessert option that satisfies your sweet tooth.
- Fun to Make: This recipe is easy and enjoyable, making it a great activity to do with kids or friends in the kitchen.
- Customizable Toppings: You can personalize your pops with various nuts, coconut, or even colorful sprinkles to match any occasion.
Ingredients
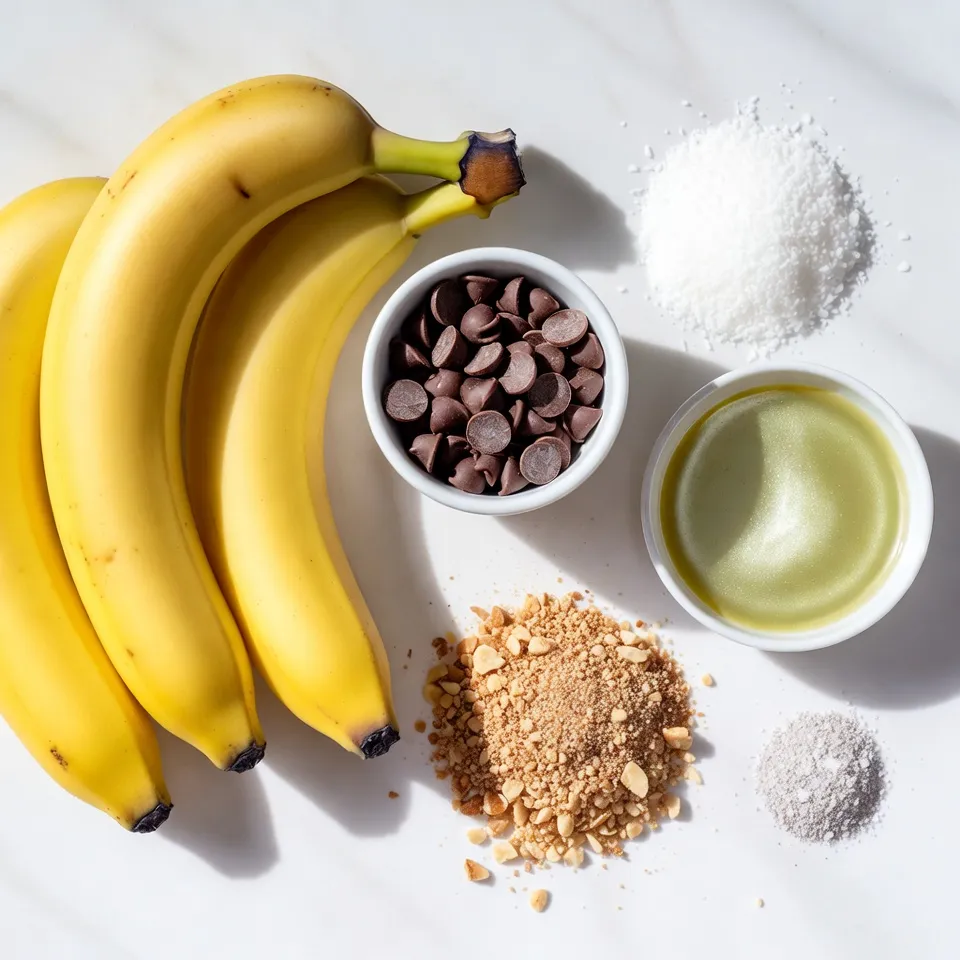
List of Ingredients
– 4 ripe bananas
– 1 cup semi-sweet chocolate chips
– 2 tablespoons coconut oil
– 1/2 cup crushed nuts (e.g., almonds, walnuts, or peanuts)
– 1/2 cup shredded coconut (optional)
– 4 popsicle sticks or wooden skewers
– Sea salt (optional)
To make chocolate covered banana pops, you need simple ingredients. Start with ripe bananas. They should be sweet and soft. Next, grab some semi-sweet chocolate chips. These will give your pops a rich, chocolatey flavor. You also need coconut oil. This helps the chocolate melt smooth and shiny.
Crushed nuts add a nice crunch on top. You can use almonds, walnuts, or peanuts. If you love coconut, add shredded coconut for extra flavor. Don’t forget popsicle sticks or wooden skewers. They will help you hold the pops while dipping. If you want, sprinkle a little sea salt on top. It brings out the sweet taste.
Gather these ingredients, and you’re ready to create a tasty treat!
Step-by-Step Instructions
Preparing the Bananas
Start by peeling the bananas. Use your hands to take off the skin. Slice each banana in half across the middle. Take care to make clean cuts. Next, insert a popsicle stick into the cut end. Push it in gently. Make sure it feels stable and can hold the banana.
Freezing the Banana Pops
Grab a baking sheet. Line it with parchment paper. This helps keep the pops from sticking. Place the banana pops on the sheet in a single layer. Make sure they do not touch. Now, put the sheet in the freezer. Freeze for about 1 hour. You want them to be firm and ready for chocolate.
Melting the Chocolate
While your bananas freeze, it’s time to melt the chocolate. Get a microwave-safe bowl and add the chocolate chips. Add 2 tablespoons of coconut oil for a smooth coat. Heat the bowl in the microwave. Do it in 30-second bursts. Stop and stir after each time. Keep doing this until the chocolate is fully melted and smooth.
Coating the Banana Pops
Take the banana pops out of the freezer. Dip each one into the melted chocolate. Make sure they are fully coated. Let any extra chocolate drip back into the bowl. While the chocolate is still wet, add toppings if you want. You can use crushed nuts or shredded coconut. A sprinkle of sea salt adds a nice touch too.
Final Freezing
Return the coated banana pops to the lined baking sheet. Make sure they are spaced out. Put them back in the freezer for about 30 minutes. This will set the chocolate. You want it firm to the touch. Once set, the banana pops are ready to enjoy!
Tips & Tricks
Chocolate Melting Techniques
To get a smooth coat on your banana pops, melt the chocolate with care. Use a microwave-safe bowl. Microwave the chocolate chips and coconut oil in 30-second bursts. Stir after each burst. This way, you avoid burning the chocolate. If you heat it too long, the chocolate can seize up. Seized chocolate looks dry and clumpy. It won’t coat the bananas well.
– Use a double boiler if you prefer stovetop melting.
– Stir consistently to keep the chocolate smooth.
Customization Options
You can make these pops even more fun! Try different toppings. Crushed nuts, sprinkles, or even cookie crumbs work great. You can also use dark chocolate for a healthier option. Dark chocolate has less sugar and adds rich flavor.
– Get creative with flavors! Consider adding melted peanut butter or white chocolate.
– Use dried fruits or seeds for a unique twist.
Serving Suggestions
Make your banana pops look amazing! Arrange them on a colorful platter. Drizzle leftover melted chocolate over the top for extra flair. You can also sprinkle with more nuts or colorful sprinkles.
For drinks, pair your pops with milk or a fruity smoothie. They also go well with herbal tea for a warm touch.
– Serve them at parties or family gatherings for a fun treat.
– Get kids involved in the decorating process for more fun!
Pro Tips
- Use Ripe Bananas: The riper the bananas, the sweeter and creamier your pops will be. Look for bananas with brown spots for the best flavor.
- Chill Your Chocolate: Allow the melted chocolate to cool slightly before dipping the banana pops. This helps the chocolate adhere better and prevents it from melting the banana.
- Experiment with Toppings: Feel free to get creative with your toppings! Try adding mini marshmallows, crushed cookies, or even sprinkles for a fun twist.
- Store Properly: To maintain freshness, store any leftover banana pops in an airtight container in the freezer. They can last for up to a month!
Variations
Flavor Combinations
You can play with flavors by using different types of chocolate. White chocolate adds a creamy touch. Peanut butter chips bring a nutty twist. You can mix these chocolates for a fun flavor combo. Drizzle melted chocolate on top for extra flair. This lets you create your own unique treats!
Alternative Fruits
If you want to switch it up, consider using other fruits. Strawberries work great and are sweet. Pineapple chunks add a tropical vibe. Apples, cut into wedges, taste delicious when coated. You can even try frozen grapes for a cool treat. Each fruit gives a new taste and texture!
Dietary Adaptations
Making chocolate-covered banana pops can fit many diets. For a vegan version, use dairy-free chocolate. Swap coconut oil with a plant oil like sunflower oil. If you need gluten-free options, the recipe is already safe! Just check your toppings to ensure they are gluten-free. These simple changes help everyone enjoy this treat!
Storage Info
Best Storage Practices
To keep your chocolate-covered banana pops fresh, freezing is key. After you dip the bananas in chocolate, place them back on the lined baking sheet. Make sure they are not touching each other. This helps to prevent sticking. Once they are set, you can transfer them to a freezer-safe bag or container. Be sure to remove as much air as possible to minimize freezer burn.
Shelf Life
These banana pops can stay fresh in the freezer for about two months. That’s right! You can enjoy this sweet treat for weeks to come. Just remember to label your bags with the date so you know when to use them.
Reheating Tips
You don’t really need to reheat these pops. They are best enjoyed straight from the freezer. Just take them out, let them sit for a minute, and then dig in. The chocolate will soften slightly, making each bite a creamy delight. If you want to get fancy, you can drizzle some melted chocolate on top for a gourmet touch before serving. Enjoy!
FAQs
Can I use other types of chocolate?
Yes, you can use many types of chocolate. Dark chocolate gives a rich taste. White chocolate adds sweetness. Milk chocolate is another option for a creamy flavor. You can also try chocolate with flavors like mint or orange. Just melt them the same way as semi-sweet chocolate. Each type will change the taste, so choose what you like!
How can I make this recipe healthier?
To make it healthier, use dark chocolate instead of semi-sweet. Dark chocolate has less sugar and more antioxidants. You can also skip the nuts or use fewer of them. Instead of coconut oil, try using a small amount of almond butter. If you want even less sugar, use cocoa powder mixed with a bit of honey. These changes keep the taste yummy while making it better for you.
Can I use frozen bananas?
Using frozen bananas is possible, but they need some care. Frozen bananas can be mushy when thawed. If you use them, dip them straight from the freezer into the chocolate. This helps keep them firm. You may want to freeze the banana pops a bit longer so they hold up better. Just remember that the texture may not be as good as fresh bananas.
You can make delicious chocolate-covered banana pops at home with simple ingredients. We started with ripe bananas and added toppings like nuts or shredded coconut. I showed you how to melt chocolate and coat the bananas for a sweet treat. There’s room to customize these pops to fit any taste. Finally, I explained storage tips to enjoy them later. Make these treats for a fun snack or dessert, and share them with friends and famil