If you love sweet snacks that are both fun and easy to make, you’re in for a treat! Chocolate Peanut Butter Rice Krispie Treats are a delightful combination of crunchy, creamy, and chocolatey goodness. In this guide, I'll walk you through each step, from gathering your ingredients to enjoying these delicious bites. Let’s dive into this simple and satisfying recipe that will impress your friends and family!
Why I Love This Recipe
- Quick and Easy: This recipe takes only 15 minutes to prepare, making it a perfect last-minute dessert or snack option.
- Delicious Combination: The blend of chocolate and peanut butter creates a rich, indulgent flavor that is hard to resist.
- Customizable: You can easily add your favorite toppings or mix-ins, like nuts or dried fruit, to personalize these treats.
- Kid-Friendly Fun: Making these treats is a fun activity for the whole family, especially for kids who love to help in the kitchen!
Ingredients
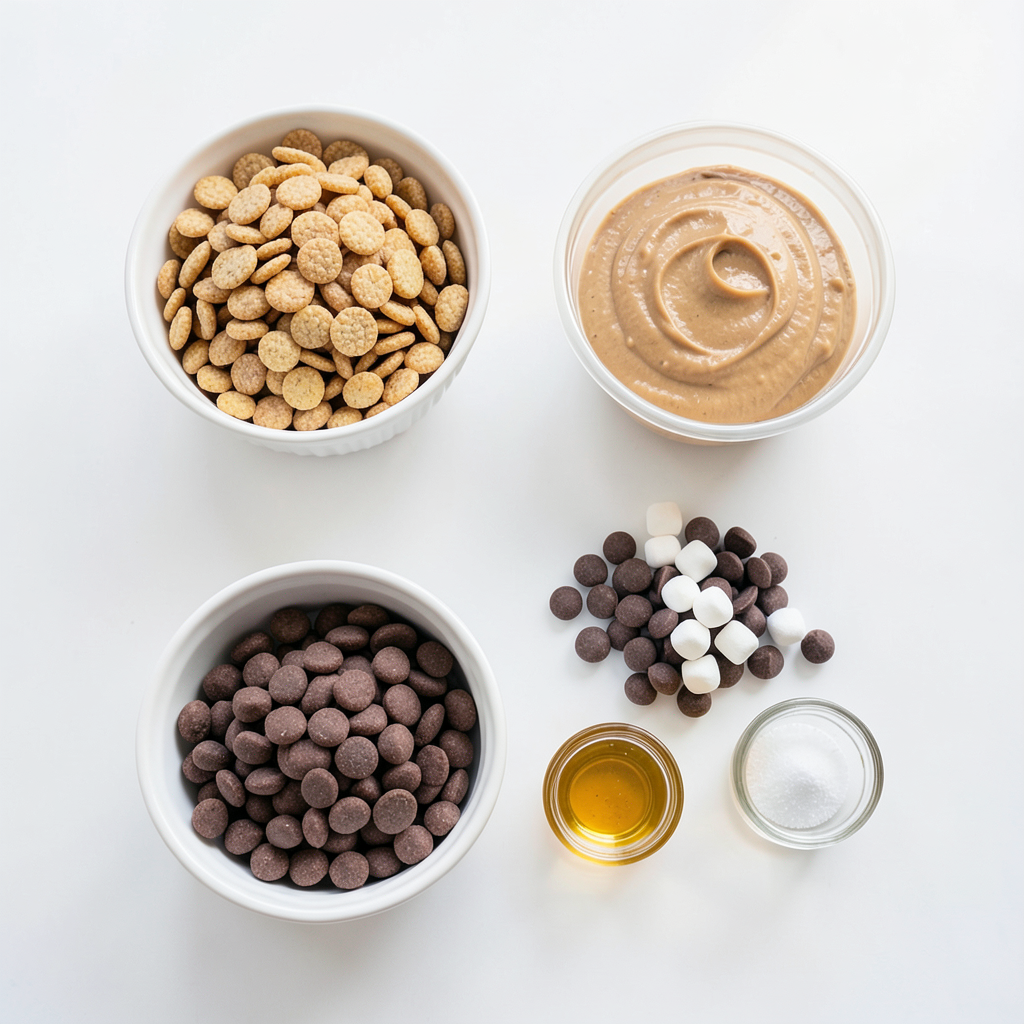
Here’s what you need to make these tasty Chocolate Peanut Butter Rice Krispie Treats:
- 4 cups Rice Krispies cereal
- 1 cup creamy peanut butter
- 1 cup semi-sweet chocolate chips
- 1 cup mini marshmallows
- 1/4 cup honey or maple syrup
- 1 teaspoon vanilla extract
- 1/4 teaspoon salt
This list covers all the key ingredients. Each one plays a big role in the final flavor and texture. The Rice Krispies give crunch, while the peanut butter adds creamy goodness. The chocolate chips bring sweetness, and the mini marshmallows add chewiness. Honey or maple syrup helps bind everything together. The vanilla extract boosts the flavors, and salt balances the sweetness.
Using these ingredients, you can create a treat that delights both kids and adults. These treats are quick to make, perfect for any occasion. Plus, they are a fun way to spend time in the kitchen!
Step-by-Step Instructions
Preparation of the Baking Dish
Start by greasing a 9x13 inch baking dish. You can use cooking spray for an easy release. If you prefer, line the dish with parchment paper. Make sure to leave some paper hanging over the edges. This will help you lift out the treats later.
Melting the Chocolate and Peanut Butter
In a medium saucepan, mix chocolate chips and creamy peanut butter. Add honey or maple syrup and salt. Heat over low flame, stirring all the time. This will prevent burning. Keep stirring until everything melts and becomes smooth. You want a rich and creamy sauce.
Incorporating the Mini Marshmallows
Once your mixture is smooth, take the saucepan off the heat. Quickly stir in the mini marshmallows. Mix fast so they soften and blend well. This step gives your treats a gooey texture, which is key to their charm.
Mixing in the Rice Krispies
Grab a large mixing bowl and pour in the Rice Krispies. Then, pour the warm chocolate-peanut butter mixture over the cereal. Use a spatula to fold the ingredients together gently. Make sure every Rice Krispie gets coated well. Avoid crushing the cereal for the best texture.
Pressing into the Dish
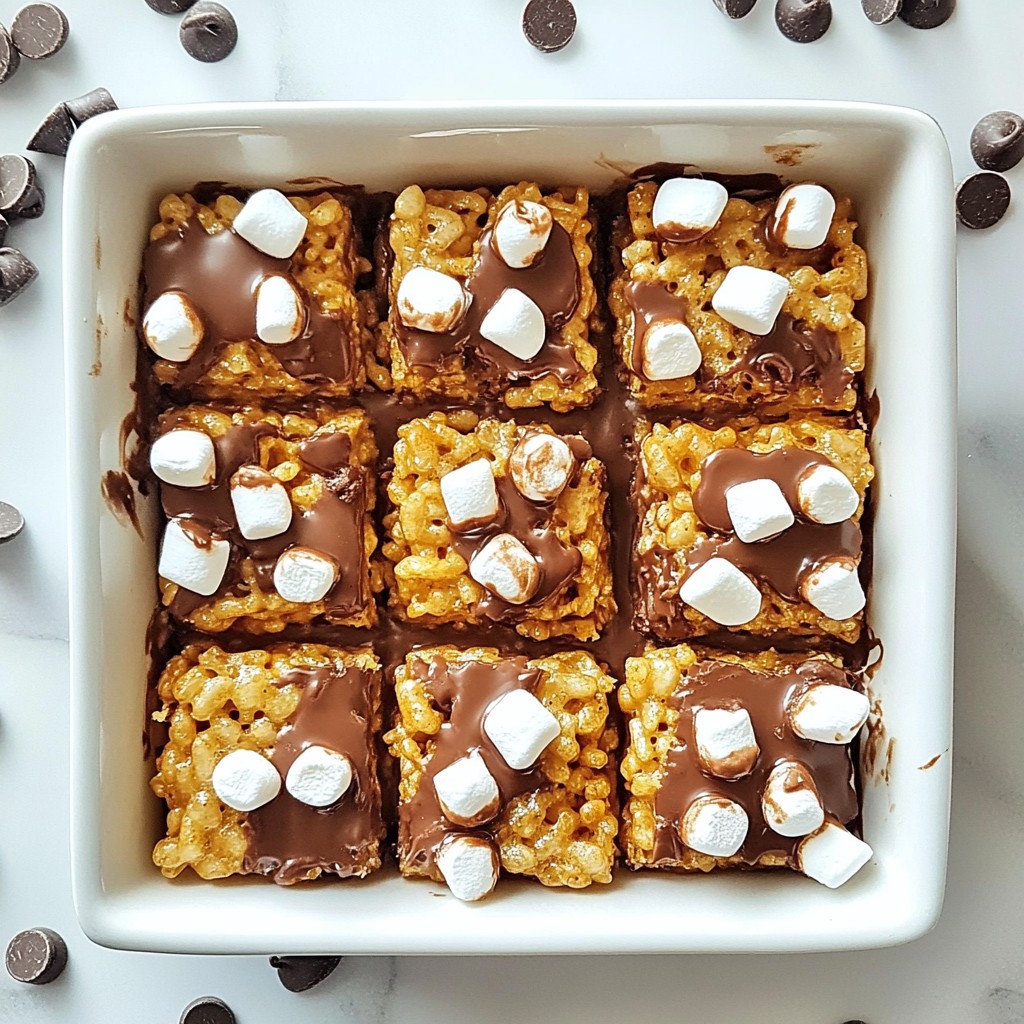
Now, transfer the sticky mixture to your greased baking dish. With slightly damp hands or a spatula, press it down firmly. Make sure it’s even and compact, so the treats hold together after cooling. This step is crucial for the perfect bite.
Cooling and Serving
Let the treats cool at room temperature for about 30 minutes. If you need them ready fast, place the dish in the fridge for 15 minutes. Once they are firm, remove them from the dish using the parchment paper. Cut them into squares or bars, based on your preference. Enjoy your delicious creation!
Tips & Tricks
Common Mistakes to Avoid
- Overheating chocolate and peanut butter: Heat them slowly. If you rush, they can burn. Burnt chocolate and peanut butter taste bad.
- Not coating the cereal evenly: Mix well. You want every piece of cereal covered. This makes each bite delicious.
How to Make the Treats Stick Together
Press down firmly when you add the mixture to the dish. Use damp hands or a spatula. A strong press helps the treats stay together. If you skip this step, they may fall apart.
Serving Suggestions
Make the treats look great! Serve them on a colorful plate. Add some extra chocolate chips or crushed peanuts on top. This adds a nice touch and makes them more fun to eat.
Pro Tips
- Use Fresh Ingredients: Always opt for fresh marshmallows and high-quality chocolate chips to enhance the flavor and texture of your treats.
- Chill for a Firmer Texture: If you prefer your Rice Krispie treats to be firmer, refrigerate them for a longer period after pressing them into the dish.
- Experiment with Add-ins: Feel free to add in toppings like crushed pretzels, nuts, or even a sprinkle of sea salt on top for added flavor and crunch.
- Use a Non-Stick Spray: Lightly spraying your hands or spatula with non-stick cooking spray can help prevent the mixture from sticking while you're pressing it into the pan.
Variations
Adding Flavor
You can make these treats even better by adding flavor. Try mixing in different nuts, like chopped almonds or walnuts. These nuts add a nice crunch and depth. You can also explore extracts. A little almond or coconut extract can change the taste. Just a teaspoon will do. This small change can make your treats unique and fun.
Healthier Alternatives
For a healthier twist, consider sugar-free chocolate chips. They taste great and keep sweetness without added sugar. You can also use alternative sweeteners. Options like agave syrup or stevia work well. These swaps make your treats friendlier for those watching sugar intake. Plus, you won’t lose any of that yummy flavor.
Seasonal Variations
You can adapt these treats for holidays or events. For Halloween, add orange and black sprinkles for fun. During the winter, a sprinkle of crushed candy canes gives a festive touch. For birthdays, use colorful chocolate candies on top. These fun ideas make your treats suitable for any occasion, adding joy to every bite.
Storage Info
Proper Storage Techniques
To keep your Chocolate Peanut Butter Rice Krispie Treats fresh, use an airtight container. Glass or plastic containers work great. You can also wrap them tightly in plastic wrap. This keeps air out and helps maintain their chewy texture.
How Long They Last
At room temperature, these treats last about 3 to 5 days. They stay fresh longer in the fridge, lasting up to a week. Just make sure to seal them well to prevent them from drying out.
Freezing Instructions
To freeze, cut the treats into squares first. Then, wrap each piece in plastic wrap. Place them in a freezer-safe bag or container. They can stay in the freezer for up to 3 months. To thaw, simply take them out and let them sit at room temperature for about 30 minutes. Enjoy that fresh taste again!
FAQs
Can I use crunchy peanut butter instead of creamy?
Yes, you can use crunchy peanut butter! It adds a fun texture. The treats will have little bits of peanut in each bite. This change makes them chewy and adds a nice crunch. If you love the taste of peanuts, go for it!
What can I use instead of honey or maple syrup?
You can try using agave syrup or brown rice syrup. Both work well and keep the treats sticky. If you use agave, the flavor will be lighter. Brown rice syrup is thicker and gives a rich taste. Just remember, each choice can change the texture a bit!
How do I prevent the treats from becoming stale?
To keep your treats fresh, store them in an airtight container. This helps keep them soft and chewy. You can also add a slice of bread in the container. It helps absorb moisture and keeps the treats from getting hard. Enjoy them within a week for the best flavor!
You now have all you need to make delicious Rice Krispie treats. We covered the key ingredients, shared simple steps, and offered helpful tips. Remember to mix quickly and press firmly for the best results. You can also switch things up with new flavors or healthier options. Store your treats in a cool place to keep them fresh. Enjoy making these sweet snacks for yourself or to share with friends and family. It’s a fun project that’s sure to please everyone!