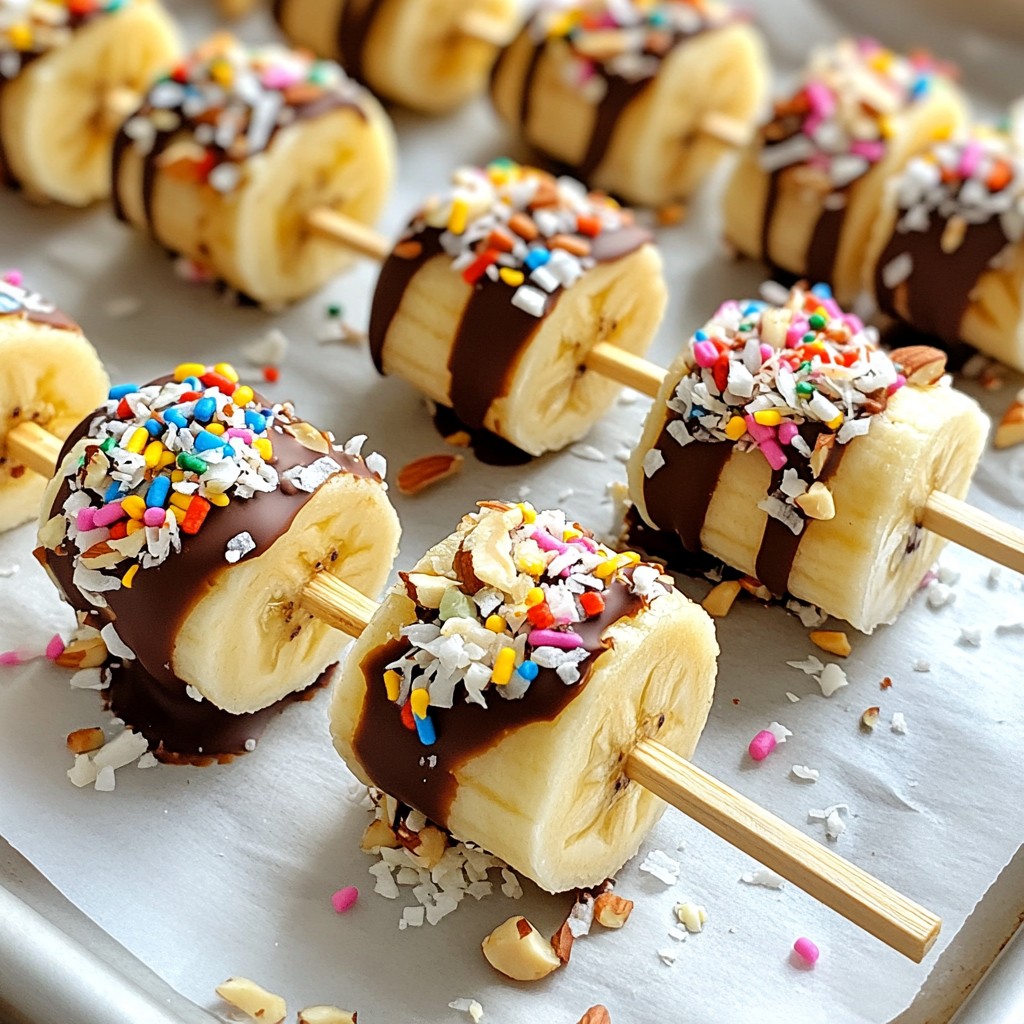
Looking for a fun and tasty treat? You should try making chocolate-covered banana pops! They’re sweet, easy to make, and perfect for kids and adults alike. In this post, I'll guide you through the simple steps to create these delicious pops. You’ll also find tips for variations and ways to make them your own. Let’s dive into this tasty adventure!
Why I Love This Recipe
- Easy to Make: This recipe requires minimal ingredients and simple steps, making it perfect for both beginners and experienced cooks.
- Healthy Treat: Using bananas as a base provides natural sweetness and essential nutrients, making these pops a healthier dessert option.
- Customizable: You can easily switch up the toppings according to your preferences, from nuts to sprinkles or even dried fruits!
- Fun for Kids: This recipe is a great way to involve children in the kitchen, allowing them to help with dipping and decorating the pops.
Ingredients
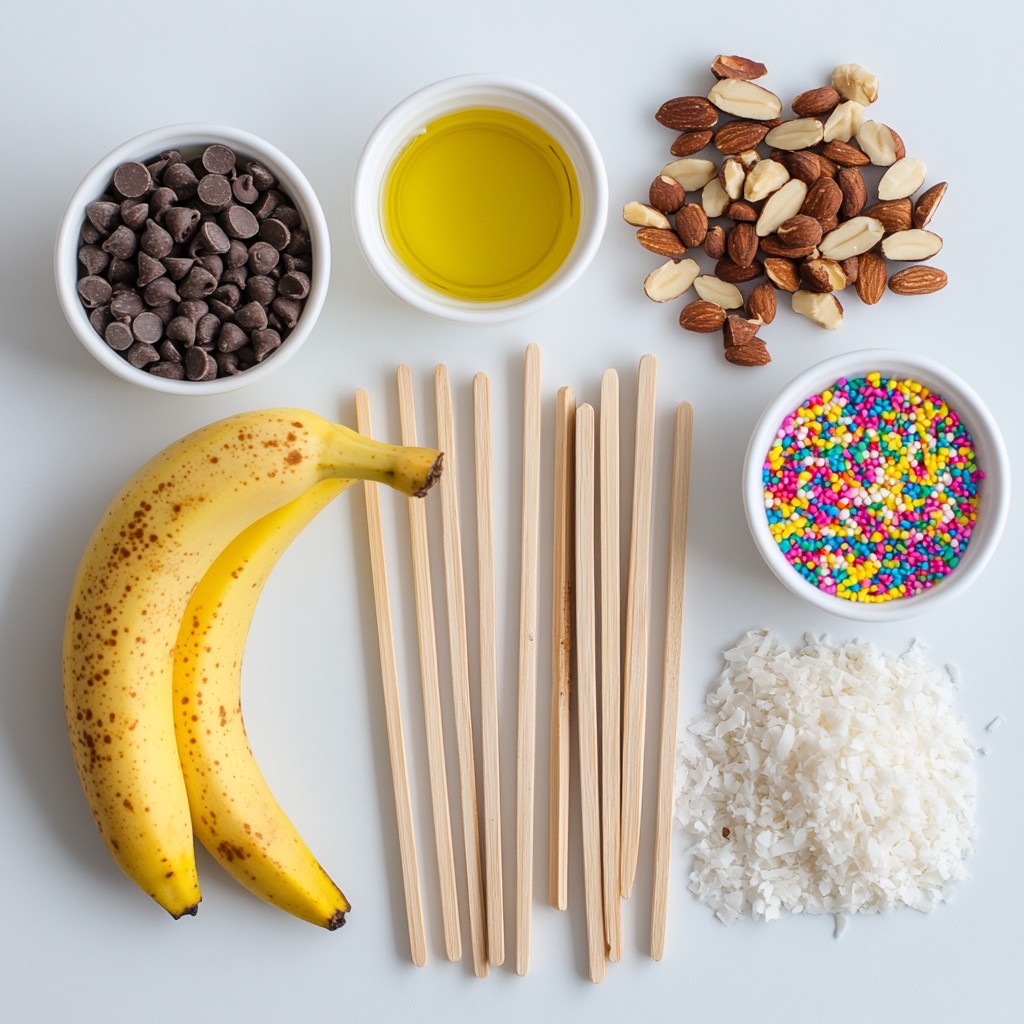
Complete List of Ingredients
To make chocolate-covered banana pops, you need:
- 2 medium ripe bananas
- 1 cup semi-sweet chocolate chips
- 1 tablespoon coconut oil
- 1/2 cup crushed nuts (such as almonds or pistachios)
- 1/4 cup unsweetened shredded coconut
- 1/4 cup colorful sprinkles (optional)
- 4 popsicle sticks
These ingredients give you a tasty treat that is fun to make and eat.
Ingredient Substitutions
You can swap some ingredients for what you have. If you don't have semi-sweet chocolate chips, try dark or milk chocolate chips. You can use any oil if you don't have coconut oil. It helps the chocolate melt smoothly. For nuts, you can use walnuts or pecans.
If you want a nut-free option, skip the nuts. You can add more shredded coconut or use seeds like pumpkin seeds instead.
Optional Toppings and Variations
Toppings add fun and flavor. Here are some options:
- Crushed nuts give a nice crunch.
- Shredded coconut adds a tropical taste.
- Colorful sprinkles make the pops look festive.
- You can also drizzle extra melted chocolate on top.
Get creative! Mix and match toppings to make your banana pops unique and delicious. Enjoy your treat!
Step-by-Step Instructions
Preparation of Banana Pops
Start with 2 medium ripe bananas. Peel them carefully. Cut each banana in half. You will have four pieces. Insert a popsicle stick into the cut end of each piece. Push it in until it feels secure. This step makes it easy to hold later.
Melting the Chocolate
Grab a microwave-safe bowl and add 1 cup of semi-sweet chocolate chips. Add 1 tablespoon of coconut oil to help the chocolate melt smoothly. Microwave the bowl for 30 seconds. Take it out and stir. Repeat this until the chocolate is fully melted. It should be smooth and glossy. This process takes about 1 to 2 minutes.
Coating and Freezing Steps
Dip each banana pop into the melted chocolate. Turn it to coat all sides. Let any extra chocolate drip off back into the bowl. It’s okay to let it sit for a moment. Next, roll the banana pop in your choice of toppings. You can use crushed nuts, shredded coconut, or colorful sprinkles. Make sure to cover it well for added crunch.
Place each coated banana pop on a parchment-lined baking sheet. Keep them spaced apart to avoid sticking. Once all the pops are coated, put the baking sheet in the freezer. Let them chill for at least 1 hour. This will harden the chocolate completely.
After an hour, check if the chocolate is firm. Once ready, serve the banana pops right away. If not eating them right now, store them in an airtight container in the freezer. They will stay fresh for up to a week. Enjoy your tasty treat!
Tips & Tricks
Tips for the Perfect Chocolate Coating
To coat your banana pops well, use good chocolate. I like semi-sweet chocolate chips because they melt nicely. Add a tablespoon of coconut oil to help it coat better. Make sure your bananas are ripe for the best taste. If they are too firm, the chocolate may not stick well.
How to Achieve a Smooth Finish
To get a smooth finish, melt the chocolate slowly. Use a microwave in short bursts. Stir often to avoid burning. When you dip the banana, turn it gently. This helps the chocolate cover all sides evenly. Let the excess chocolate drip off before adding toppings.
Presentation Suggestions for Serving
Serve your banana pops on a pretty platter. You can add a drizzle of melted chocolate on top for flair. Place fresh berries beside the pops for color. This makes the dish look fun and tasty. Enjoy your creation as a sweet treat or a party snack!
Pro Tips
- Use ripe bananas: For the best flavor and texture, choose bananas that are ripe but not overripe. They should be yellow with a few brown spots.
- Experiment with toppings: Mix and match different toppings like crushed cookies, seeds, or dried fruit to create your own unique flavor combinations.
- Double dip for extra chocolate: For a thicker chocolate layer, dip the banana pops in chocolate twice, allowing them to freeze briefly between dips.
- Keep them cold: To ensure the chocolate hardens quickly, work in a cool environment and return the pops to the freezer if the chocolate begins to melt.
Variations
Flavor Combinations
You can get creative with flavor. Try adding peanut butter or caramel to the bananas before you dip them in chocolate. Just spread a thin layer on the banana before inserting the popsicle stick. This makes each bite extra tasty. You could also use flavored chocolate, like mint or orange. This adds a fun twist to the classic treat!
Using Different Types of Chocolate
Chocolate comes in many forms. You can use dark, milk, or white chocolate for your banana pops. Each type adds a unique taste. Dark chocolate gives a rich flavor, while milk chocolate is sweet and creamy. White chocolate adds a smooth, sugary touch. Experiment and see which one you like best! You can even mix them for a layered effect.
Seasonal or Festive Themes
Make your banana pops stand out with fun toppings. Use holiday sprinkles for festive cheer. In fall, try adding crushed candy corn or pumpkin spice. For summer, use bright, colorful sprinkles or fresh berries. You can match the toppings to the season or any special event. This makes your treats look extra special and fun to eat!
Storage Info
Best Methods for Storing Chocolate-Covered Banana Pops
To keep your chocolate-covered banana pops fresh, use an airtight container. Place layers of parchment paper between the pops. This prevents sticking and keeps them safe. Avoid leaving them out at room temperature. They will melt quickly. Instead, always store them in the freezer for the best taste and texture.
How Long They Last in the Freezer
These banana pops can last up to a week in the freezer. After that, they may lose texture and taste. For the best enjoyment, try to eat them within this time frame. If you find you have extras, you can always share with friends!
Tips for Thawing and Serving After Freezing
When you're ready to enjoy your pops, take them out of the freezer. Let them sit for a few minutes at room temperature. This makes them easier to bite into. If you want them cold and firm, serve them right away. For added fun, you can drizzle some melted chocolate on top before serving. Enjoy your tasty treat!
FAQs
Can I use frozen bananas for this recipe?
Yes, you can use frozen bananas. They will work well, but the texture may change. Frozen bananas are softer and can be mushy when thawed. I recommend using ripe bananas for the best taste. If you decide to use frozen ones, let them thaw a bit and then coat them.
How can I make these vegan-friendly?
To make these banana pops vegan, use dairy-free chocolate chips. Brands like Enjoy Life or Lily's offer great options. The coconut oil in the recipe is already vegan, which is perfect. Just ensure your toppings are also vegan-friendly. You can use nuts, coconut, or even vegan sprinkles!
What are some allergy-friendly toppings I can use?
For allergy-friendly toppings, consider using:
- Sunflower seeds
- Pumpkin seeds
- Dried fruit like raisins or cranberries
- Coconut flakes
- Puffed rice
These options can add flavor and crunch without common allergens. Always check labels to ensure they fit your needs!
You learned how to make delicious chocolate-covered banana pops. We covered the best ingredients, like fruits and chocolates. You saw the step-by-step guide, making it easy to follow along. Tips help you get a smooth finish and great presentation. We explored fun variations for every taste and theme.
Remember, you can store these treats for later. They freeze well and taste great when thawed. Enjoy your banana pops anytime, and don’t forget to share your fun results!