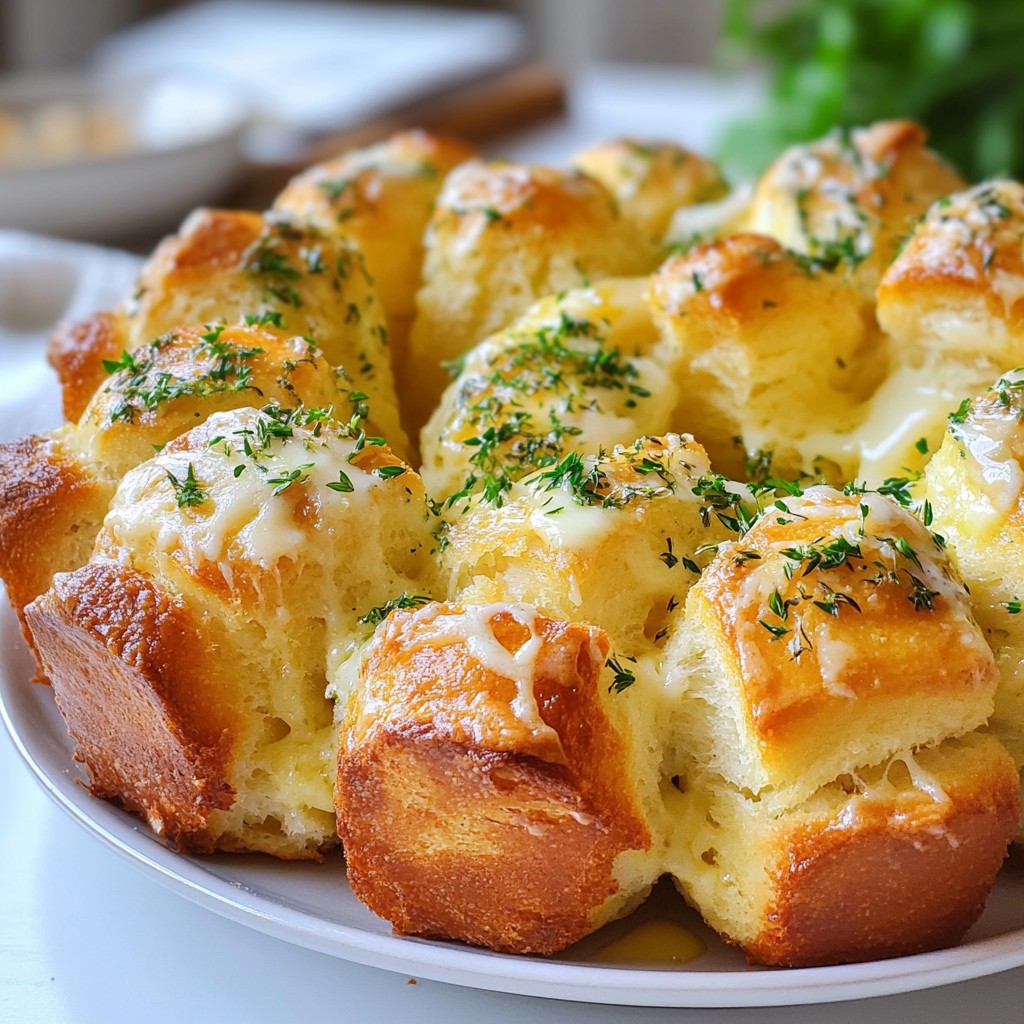
You can’t resist the warm, buttery smell of Garlic Herb Pull-Apart Bread. This delicious treat is easy to make and perfect for any occasion. Whether you’re hosting a gathering or just want a comforting snack, this recipe has you covered. I'll guide you through each step, from the chewy dough to the fragrant garlic herb mix. Get ready to impress your taste buds and your guests with this fresh and flavorful delight!
Why I Love This Recipe
- Delicious Flavor Combination: The garlic and fresh herbs create an irresistible aroma and taste, making this bread a standout at any meal.
- Fun to Make: Rolling and stacking the dough pieces is an enjoyable activity, perfect for involving family or friends in the cooking process.
- Perfect for Sharing: This pull-apart bread is designed for sharing, making it an ideal addition to gatherings, parties, or family dinners.
- Versatile Serving Options: It pairs beautifully with a variety of dips and spreads, enhancing your appetizer or snack game.
Ingredients
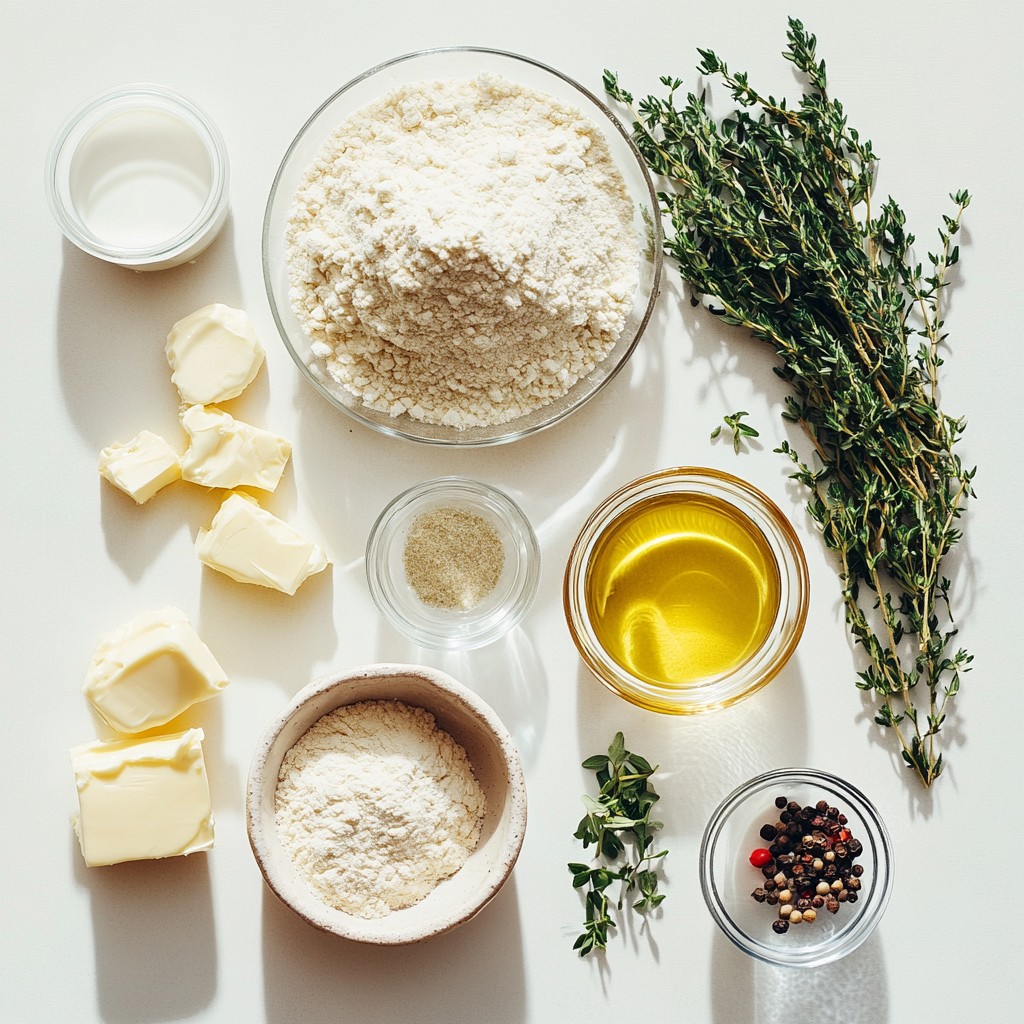
When making Garlic Herb Pull-Apart Bread, fresh ingredients are key. Here is what you will need:
- 3 cups all-purpose flour
- 2 teaspoons instant yeast
- 1 teaspoon salt
- 1 tablespoon granulated sugar
- 1 cup warm water (approximately 110°F / 43°C)
- 4 tablespoons unsalted butter, melted
- 4 cloves garlic, finely minced
- 2 tablespoons fresh parsley, finely chopped
- 1 tablespoon fresh rosemary, finely chopped
- 1 tablespoon fresh thyme, finely chopped
- 1/2 teaspoon freshly ground black pepper
- 1/4 teaspoon red pepper flakes (optional for heat)
- Extra melted butter for brushing
These ingredients work together to create a rich and flavorful bread. Using fresh herbs will boost the taste. The garlic adds a warm and inviting aroma. Instant yeast helps the bread rise quickly, making the process faster. Warm water activates the yeast, so be sure it’s not too hot.
This bread is perfect for sharing. It pairs well with olive oil or balsamic vinegar. You can also enjoy it on its own. The mix of herbs gives it a garden-fresh touch. Each bite is soft and buttery, making it hard to resist.
Step-by-Step Instructions
Activating the Yeast
To start, I take a mixing bowl and combine warm water, sugar, and instant yeast. I stir gently, then let the mixture sit for about five minutes. Soon, the top becomes frothy. This foam shows the yeast is alive and ready to help the bread rise.
Preparing the Dough
Next, I add all-purpose flour and salt to the yeast mix. I use a wooden spoon to stir until a shaggy dough starts to form. Then, I lightly flour a clean surface. I knead the dough for about eight to ten minutes. It should become smooth and elastic, with a slightly tacky feel. This texture is key for great pull-apart bread.
Rising and Shaping the Dough
Once kneaded, I place the dough in a greased bowl. I cover it with a damp towel and set it in a warm spot. After about one hour, the dough should double in size. While it rises, I prepare the garlic herb mixture. I mix melted butter, minced garlic, chopped parsley, rosemary, thyme, black pepper, and optional red pepper flakes in a small bowl. This mix adds lots of flavor. After the dough has risen, I gently punch it down to release air. I roll it out on a floured surface into a rectangle about half an inch thick. Then, using a pizza cutter, I cut it into two-inch squares.
Assembling the Pull-Apart Bread
For assembly, I take a square of dough and dip it into the garlic herb mix. I coat it well and stack it upright in a greased bundt or loaf pan. I repeat this until all the pieces are stacked. I drizzle any leftover garlic herb mix over the top. Next, I cover the pan with a cloth and let it rise for another thirty minutes.
Baking Instructions
During the last ten minutes of rising, I preheat my oven to 375°F (190°C). Once the dough is ready, I bake the bread for twenty-five to thirty minutes. It’s done when the top is golden brown, and it sounds hollow when tapped. For a glossy finish, I brush the top with extra melted butter before serving.
Tips & Tricks
Ensuring Perfect Rise and Texture
To make your bread rise well, keep it warm. A cozy spot helps yeast work. Aim for a room temperature around 75°F (24°C). If your kitchen is cool, place the dough near a warm oven or on a sunny windowsill.
Kneading is key. Knead the dough for about 8-10 minutes. This builds gluten, which gives the bread its structure. The dough should feel smooth and a bit tacky when ready.
Flavor Enhancement Tips
To boost flavor, consider adding a pinch of Italian seasoning or garlic powder. You can also try mixing in grated cheese, like parmesan or mozzarella.
I prefer fresh herbs for this bread. Fresh parsley, rosemary, and thyme bring bright flavors. Dried herbs work too but use less—about one-third of the fresh amount.
Baking Techniques
For a golden crust, preheat your oven well. Bake at 375°F (190°C) for 25-30 minutes. Keep an eye on the bread. It should sound hollow when tapped.
For a glossy finish, brush melted butter over the top before baking. This gives the bread a beautiful sheen and adds more flavor.
Pro Tips
- Use Fresh Herbs: For the best flavor, always opt for fresh herbs instead of dried ones. They elevate the taste and aroma of your bread significantly.
- Check Yeast Freshness: Ensure your yeast is fresh and active. If unsure, test it by mixing it with warm water and sugar before starting the recipe.
- Don’t Rush the Rise: Allow sufficient time for the dough to rise. A longer rise helps develop flavor and texture, making your bread more delicious.
- Experiment with Toppings: Feel free to add other toppings like grated cheese or chopped olives between the layers for a unique twist on the classic pull-apart bread.
Variations
Different Herbs and Spices
You can change the herbs in this recipe. Fresh basil, sage, or thyme work well too. You can also mix in some dried herbs for added flavor. If you want a cheesy twist, add shredded mozzarella or parmesan between the layers. This will melt and create a gooey, tasty treat.
Glazing Options
The type of butter you use can change the taste. Try garlic butter for a stronger flavor. You can also use olive oil for a lighter touch. Mix in herbs or spices into the oil for a fun twist. Seasoned olive oil adds a burst of flavor, making each bite even better.
Dietary Adjustments
If you need gluten-free bread, swap the all-purpose flour with a gluten-free blend. Look for brands that have xanthan gum for better texture. For a vegan option, use plant-based butter and dairy-free cheese. This way, everyone can enjoy this warm, tasty bread.
Storage Info
Storing Leftovers
To store any leftover bread, let it cool completely. Wrap it tightly in plastic wrap or foil. You can also place it in an airtight container. This keeps the bread fresh and moist. Store it in the fridge for up to 3 days. If you want it to last longer, freeze it instead. It can stay in the freezer for up to 3 months without losing flavor.
Reheating Instructions
For reheating, the oven works best. Preheat your oven to 350°F (175°C). Wrap the bread in foil to keep it moist. Heat for about 10-15 minutes, or until warm. You can also use a microwave, but it may dry out the bread. If you choose this method, cover the bread with a damp paper towel. This helps keep the moisture in. Always check the bread to avoid overcooking.
FAQs
Can I make Garlic Herb Pull-Apart Bread ahead of time?
Yes, you can prep the dough in advance. Make the dough and let it rise as normal. After the first rise, shape the dough and place it in the pan. Cover it tightly with plastic wrap. You can store it in the fridge overnight. When ready, let it come to room temperature. Allow it to rise again for about 30 minutes before baking.
How do I store the pull-apart bread?
To keep the bread fresh, wrap it tightly in plastic wrap or aluminum foil. Store it in a cool and dry place. You can also place the wrapped bread in a zip-top bag. This way, it stays soft for about 2-3 days. If you want to enjoy it longer, consider freezing.
Is it possible to freeze this bread?
Yes, freezing Garlic Herb Pull-Apart Bread is easy. Once it cools, wrap it tightly in plastic wrap and then in foil. This helps prevent freezer burn. You can freeze it for up to 3 months. To thaw, place it in the fridge overnight. Then, warm it in the oven before serving.
What can I serve with Garlic Herb Pull-Apart Bread?
This bread pairs well with many dishes. Try serving it with soups, stews, or salads. It also tastes great with dips like olive oil and balsamic vinegar. For a fun twist, enjoy it with cheese spreads or herb-infused butters. The options are endless!
Garlic Herb Pull-Apart Bread is simple to make and full of flavor. You learned about the key ingredients, step-by-step instructions, and helpful tips. Each part, from activating the yeast to baking, plays a vital role in your bread's success. Don't forget the variations to keep things exciting! This recipe is flexible, letting you experiment with different herbs and dietary needs. Enjoy your home-baked bread warm, fresh, and perfect for sharing. Happy baking!