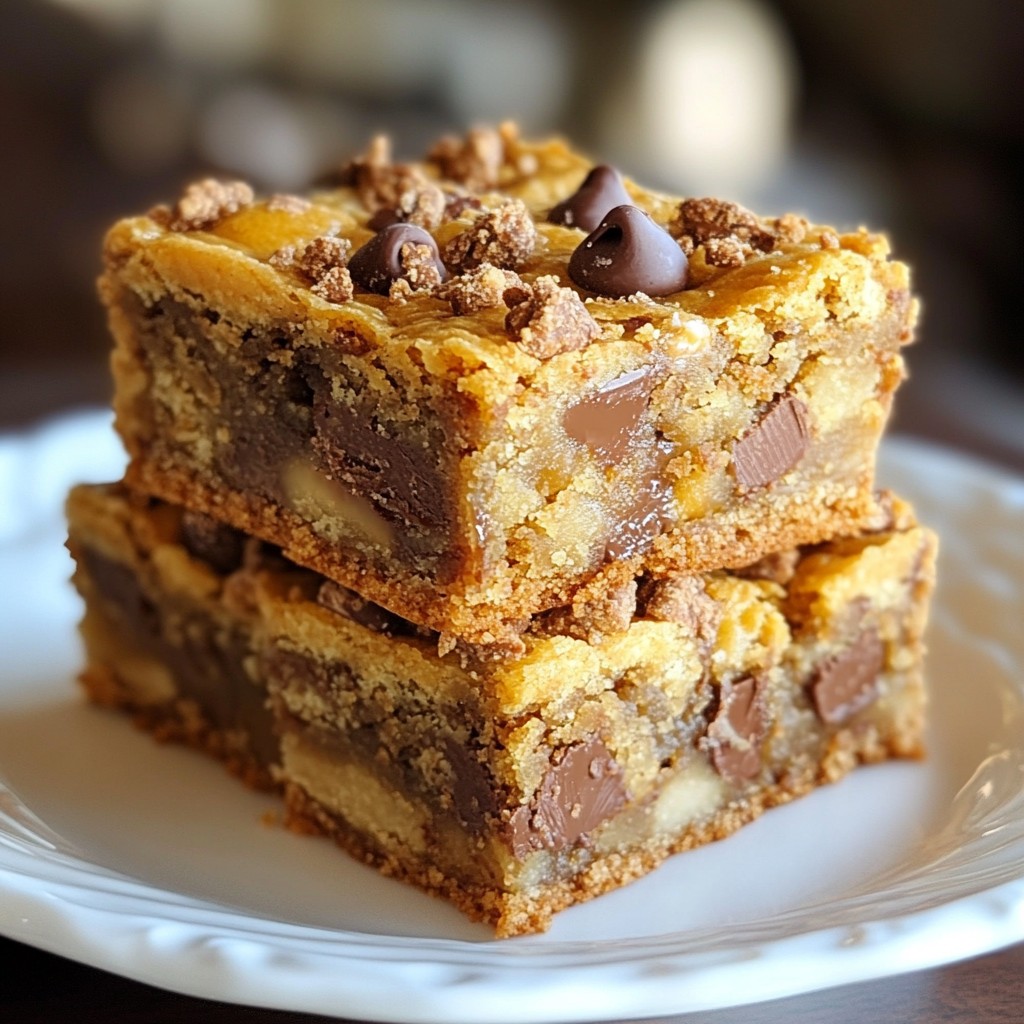
Craving a sweet treat that’s both delicious and easy to make? You’re in the right place! These Irresistible Butterfinger Cookie Bars are the ultimate dessert to satisfy your sweet tooth. With a mix of soft cookie goodness and crunchy Butterfinger pieces, they are sure to wow your family and friends. Let’s dive into this tempting recipe and start baking your new favorite dessert!
Why I Love This Recipe
- Decadent Flavor: The combination of Butterfinger candy bars and chocolate chips creates an irresistible sweet and salty flavor profile that everyone will love.
- Easy to Make: This recipe is straightforward and requires minimal effort, making it perfect for both novice and experienced bakers.
- Perfect for Sharing: Cut them into squares, and you have a delightful treat that’s ideal for parties, gatherings, or just a sweet snack at home.
- Customizable: Feel free to add your favorite nuts or swap out the chocolate chips for white chocolate or peanut butter chips for a unique twist!
Ingredients
Main Ingredients
- 1 cup unsalted butter, softened
- 1 cup packed brown sugar
- 1/2 cup granulated sugar
- 2 large eggs at room temperature
- 2 1/2 cups all-purpose flour
- 1 cup Butterfinger candy bars, chopped
The main ingredients create a rich and sweet base for your cookie bars. Using unsalted butter gives you control over the salt in your recipe. The brown sugar adds moisture and a deep flavor, while granulated sugar provides sweetness. Room temperature eggs help bind the ingredients together. Flour gives the bars structure, and the chopped Butterfinger bars add a delightful crunch.
Optional Toppings
- 1/4 cup crushed Butterfinger bars
- Semi-sweet chocolate chips
Adding toppings can elevate your cookie bars. Crushed Butterfinger bars on top enhance the candy flavor and add texture. Semi-sweet chocolate chips bring extra sweetness and make every bite more indulgent.
Baking Essentials
- Baking soda
- Salt
- Pure vanilla extract
Baking soda acts as a leavening agent, helping the bars rise and become fluffy. A touch of salt balances the sweetness, making every bite tasty. Pure vanilla extract adds warmth and depth to the flavor, making your cookie bars irresistible.
Using fresh ingredients will boost the taste of your Butterfinger cookie bars. Always measure carefully for the best results. Enjoy the process of making these treats!

Step-by-Step Instructions
Preparing the Ingredients
1. Preheat the oven: Set your oven to 350°F (175°C). This helps cook the bars evenly.
2. Prepare the baking dish: Grab a 9x13 inch baking dish. Lightly grease it with butter or line it with parchment paper. This makes it easy to remove the bars later.
Mixing the Batter
1. Creaming the butter and sugars: In a large bowl, mix 1 cup of softened butter with 1 cup of packed brown sugar and 1/2 cup of granulated sugar. Beat this mixture with an electric mixer on medium speed. Do this for about 2-3 minutes until it’s light and fluffy.
2. Incorporating eggs and vanilla: Add 2 large eggs, one at a time, mixing well after each. Then stir in 1 teaspoon of pure vanilla extract until it is well combined.
Combining Dry Ingredients
1. Whisking the flour mix: In a separate bowl, whisk together 2 1/2 cups of all-purpose flour, 1 teaspoon of baking soda, and 1/2 teaspoon of salt. This helps the baking soda spread evenly.
2. Incorporating flour gradually: Gradually add the dry mix into the wet mixture. Stir just until you no longer see the flour. Be careful not to overmix; the dough should be thick.
Folding in Additions
1. Adding Butterfinger candy and chocolate chips: Gently fold in 1 cup of chopped Butterfinger candy and 1 cup of semi-sweet chocolate chips. Use a spatula or wooden spoon to mix until they are evenly spread.
Baking the Cookie Bars
1. Pouring the batter into the dish: Pour the thick cookie dough into the prepared baking dish. Spread it out evenly and smooth the top.
2. Baking time and testing for done-ness: Bake the bars in your preheated oven for 25-30 minutes. They are done when the edges turn golden brown, and the center is set but soft. It will firm up as it cools.
Finishing Touches
1. Adding crushed Butterfinger on top: As soon as you take the bars out of the oven, sprinkle 1/4 cup of crushed Butterfinger bars over the top. Gently press them in so they stick well.
2. Cooling and cutting the bars: Let the bars cool in the pan for about 10-15 minutes. Then, transfer them to a wire rack to cool completely. Once they are cool, cut them into squares or rectangles to serve.
Tips & Tricks
Perfecting the Texture
To get a soft center, do not bake too long. Check the bars when the edges turn golden. You want the middle to look set but still soft. It will firm up as it cools.
Avoiding overmixing is key. When you add the flour, mix just until you see no dry bits. If you mix too much, your bars can become tough. Gentle folding is best when adding the Butterfinger and chocolate chips.
Flavor Enhancements
You can use different chocolates for fun flavors. Try dark chocolate or white chocolate chips. Each type adds its own twist to the bars.
Adding nuts can give a nice crunch. Chopped walnuts or pecans work great. They add texture and flavor that pairs well with the Butterfinger.
Serving Suggestions
For a lovely presentation, serve the bars on a pretty plate. Drizzle melted chocolate over the top for a gourmet look.
Pair these cookie bars with ice cream or whipped cream. The cold and creamy textures balance the sweet, crunchy bars perfectly. Enjoy!
Pro Tips
- Room Temperature Eggs: Ensure that your eggs are at room temperature before adding them to the batter. This helps to create a smoother mixture and better texture in your cookie bars.
- Don’t Overmix: Mix the dough just until the flour is incorporated. Overmixing can lead to tough cookie bars, so stop as soon as you no longer see any dry flour.
- Chill the Dough: For even thicker cookie bars, consider chilling the dough for about 30 minutes before spreading it in the baking dish. This will help them hold their shape while baking.
- Use Parchment Paper: Lining your baking dish with parchment paper makes it easy to lift the cookie bars out once cooled. This ensures clean cuts and a beautiful presentation.
Variations
Alternative Candy Mix-ins
You can switch Butterfinger for other candies. Try Reese’s for a peanut butter twist. Snickers also works well for a chewy, nutty flavor. Each option adds a new taste to your cookie bars. Just chop the candy into small pieces before mixing them in. Your friends will love these tasty changes!
Dietary Adjustments
If you need gluten-free bars, use gluten-free flour. It works just like regular flour and holds the bars together. For dairy-free options, swap the butter for a dairy-free spread. Coconut oil is another good choice. These changes make the bars fit many diets while keeping them delicious.
Flavor Experimentation
Want to spice things up? Add a pinch of cinnamon or nutmeg to the dough. These spices add warmth and depth to your cookie bars. You can also try a dash of sea salt on top for a sweet and salty mix. Experiment with flavors to make these bars your own!
Storage Info
Best Storage Practices
Store your Butterfinger cookie bars in an airtight container. This keeps them fresh and tasty. You can keep them at room temperature for a few days. If you want them to last longer, put them in the fridge. Just remember to use a container that seals well to keep out air and moisture.
Freezing Instructions
To freeze your cookie bars, cut them into squares first. Then, wrap each piece in plastic wrap. After that, place them in a freezer-safe bag. This helps keep them fresh for up to three months. When you want to eat them, take out what you need. Let them thaw in the fridge for a few hours, or at room temperature for about 30 minutes.
Shelf Life
At room temperature, these cookie bars stay fresh for about 3 to 5 days. In the fridge, they can last up to a week. Always check for any signs of spoilage before enjoying. Keeping them in an airtight container helps extend their shelf life.
FAQs
Can I use other types of chocolate in the recipe?
Yes, you can use different chocolates. Milk chocolate or dark chocolate chips work well. You might even try white chocolate for a sweet twist. Each chocolate brings a unique flavor. Just remember, the sweetness of your bars may change based on your choice.
What should I do if my cookie bars are too dry?
If your cookie bars turn out dry, check a few things. First, make sure you measured your flour correctly. Too much flour can make them dry. Also, avoid overbaking; they should be soft in the center. Adding a bit more butter or an extra egg can help. Try storing them in an airtight container to keep them moist.
How can I adjust the recipe for a smaller batch?
To make a smaller batch, cut the recipe in half. Use ½ cup of butter and ½ cup of brown sugar. For eggs, you can use one large egg and a bit of extra yolk. Remember to adjust baking time as well since smaller bars may bake faster. Check for doneness a few minutes early.
Can I make these cookie bars ahead of time?
Yes, you can make these cookie bars in advance. Bake them and let them cool completely. Then, wrap them tightly in plastic wrap or foil. Store them in the fridge for up to a week. You can also freeze them for longer storage. Just thaw them before serving for the best taste.
This article covered how to make delicious Butterfinger cookie bars. You learned about key ingredients, step-by-step baking instructions, and tips for perfect texture. We also explored fun variations and storage options. With these ideas, you can delight friends and family with great treats. Baking allows for creativity, so don't be afraid to try new flavors. Enjoy your baking journey and share your tasty results!