Dive into the world of Mexican Chocolate Brownies, where rich flavors meet pure indulgence. This guide gives you all the steps to create decadent treats that wow your taste buds. You’ll learn about key ingredients, simple baking tips, and unique variations that elevate your brownies. Whether you crave a sweet twist or want to impress guests, this recipe has you covered. Let’s start baking something unforgettable together!
Why I Love This Recipe
- Unique Flavor Profile: The combination of rich chocolate with a hint of spice creates a truly unique and delightful flavor experience.
- Simple Preparation: This recipe is easy to follow and requires only common ingredients, making it accessible for bakers of all levels.
- Perfect for Sharing: Cut into squares, these brownies are perfect for sharing at gatherings or events, impressing guests with their delicious taste.
- Customizable Kick: Adjust the amount of cayenne pepper to suit your spice preference, allowing for a personalized touch to each batch.
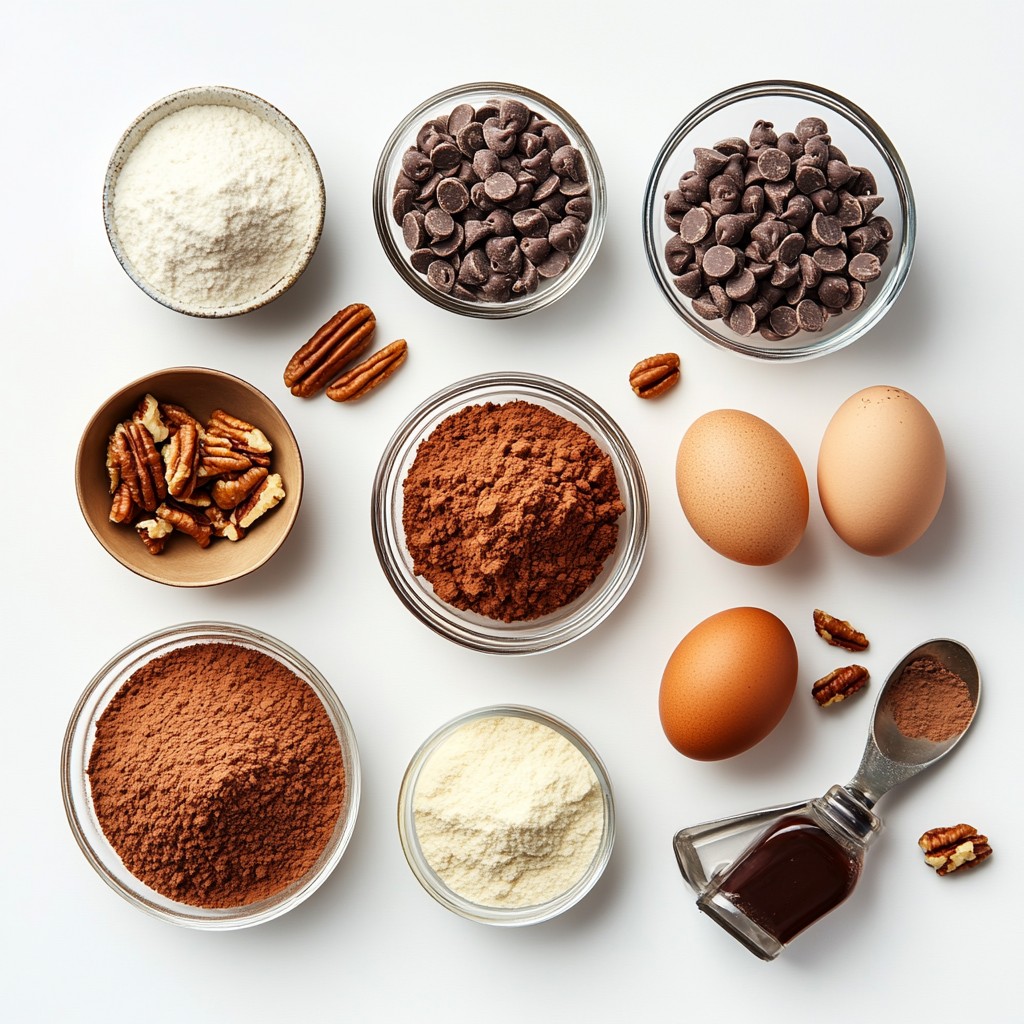
Ingredients
Key Ingredients List
- 1 cup unsweetened cocoa powder
- 1 cup all-purpose flour
- 1 cup granulated sugar
- 1/2 cup packed brown sugar
- 1/2 cup unsalted butter, melted
- 3 large eggs
- 1 teaspoon vanilla extract
- 1 teaspoon ground cinnamon
- 1/2 teaspoon cayenne pepper (adjust based on spice preference)
- 1/2 teaspoon baking powder
- 1/4 teaspoon salt
- 1 cup semi-sweet chocolate chips
- 1/2 cup chopped nuts (optional; pecans or walnuts work excellently)
Importance of Mexican Chocolate
Mexican chocolate is special. It has a unique texture and taste. This chocolate often includes spices like cinnamon and cayenne. This blend gives brownies a rich, warm flavor. The spices create depth and a subtle kick. Using Mexican chocolate in your brownies makes them stand out. It brings a taste of Mexico right to your home.
Substitutions for Common Ingredients
You can swap some ingredients if needed. If you want a gluten-free version, use gluten-free flour. Instead of granulated sugar, you can use coconut sugar for a natural sweetener. If you don’t have butter, try coconut oil for a dairy-free option. You can also replace eggs with flax eggs for a vegan choice. Just mix one tablespoon of ground flaxseed with two and a half tablespoons of water. Let it sit until it thickens. This option works well in brownies.
Step-by-Step Instructions
Prepping the Oven and Baking Pan
Start by preheating your oven to 350°F (175°C). This helps the brownies bake evenly. Next, grab a 9x9 inch baking pan. Grease it lightly with butter or line it with parchment paper. This makes it easy to remove the brownies later.
Mixing Wet Ingredients
In a large mixing bowl, combine 1/2 cup of melted unsalted butter with 1 cup of granulated sugar and 1/2 cup of packed brown sugar. Mix them well using a whisk or a wooden spoon. You want a smooth, creamy mixture. Next, add 3 large eggs one at a time. Mix well after each egg. Stir in 1 teaspoon of vanilla extract to enhance the flavor.
Combining Dry Ingredients
In another bowl, sift together 1 cup of unsweetened cocoa powder, 1 cup of all-purpose flour, 1 teaspoon of ground cinnamon, 1/2 teaspoon of cayenne pepper, 1/2 teaspoon of baking powder, and 1/4 teaspoon of salt. Sifting helps aerate the dry mix. This step ensures that all flavors blend well in your brownies.
Folding Ingredients and Baking Tips
Now, gently fold the dry ingredients into the wet mixture. Use a spatula and stir just until combined. Be careful not to overmix; this keeps your brownies soft. Next, fold in 1 cup of semi-sweet chocolate chips and 1/2 cup of chopped nuts if you like. This adds extra flavor and texture.
Checking for Doneness
Pour your brownie batter into the prepared baking pan. Spread it evenly with a spatula. Place the pan in the oven and bake for 25 to 30 minutes. To check if they’re done, insert a toothpick into the center. It should come out with a few moist crumbs attached, not wet batter. After baking, let the brownies cool in the pan for about 10 minutes. Then, transfer them to a wire rack to cool completely.
Tips & Tricks
Achieving the Perfect Brownie Texture
To make brownies that are chewy and fudgy, focus on mixing. Combine the wet and dry ingredients just enough. Overmixing can lead to cake-like brownies. When you fold in the chocolate chips, be gentle. This keeps your brownies dense and rich. Don't forget to check the baking time. A toothpick should have a few moist crumbs when done.
How to Enhance the Chocolate Flavor
To boost the chocolate flavor, use high-quality cocoa powder. Adding a pinch of sea salt also brings out the chocolate's depth. The hint of cinnamon adds warmth. If you love spice, adjust the cayenne pepper. A little extra can make a big difference. For an even richer taste, consider using dark chocolate chips instead of semi-sweet.
Recommended Serving Suggestions
Serve your brownies warm for the best experience. A scoop of vanilla ice cream on the side is perfect. Drizzle some melted chocolate on top for added richness. You can also sprinkle a bit of chili flakes for a fun twist. If you want a rustic look, place them on a wooden board. Dust with powdered sugar or cinnamon for a beautiful finish.
Pro Tips
- Use Quality Chocolate: Opt for high-quality semi-sweet chocolate chips to enhance the richness of the brownies. The better the chocolate, the more decadent your brownies will taste.
- Let Them Cool: Allow the brownies to cool completely before cutting. This helps them set properly and makes for cleaner, prettier slices.
- Adjusting Spice Levels: If you prefer a milder kick, start with 1/4 teaspoon of cayenne pepper. You can always add more to taste after baking if you want it spicier!
- Storage Tips: Store leftover brownies in an airtight container at room temperature for up to 3 days, or refrigerate for longer freshness. They can also be frozen for up to 3 months!
Variations
Adding Traditional Mexican Spices
You can enhance your brownies by adding traditional Mexican spices. Ground cinnamon is a must-have. It adds warmth and depth. You can also try a pinch of nutmeg for a unique twist. For those who love heat, cayenne pepper gives a nice kick. Adjust the amount to suit your taste. Just remember, a little goes a long way!
Nuts and Other Add-ins
Nuts can add a lovely crunch to your brownies. I love using pecans or walnuts. They pair well with the rich chocolate flavor. If you want more texture, try adding chocolate chips. You can even use white chocolate or caramel bits for a fun surprise. Feel free to mix and match to find your favorite combo!
Unique Toppings and Serve Options
Toppings can make your brownies even more special. A light dusting of powdered sugar looks great. You can also sprinkle cinnamon on top for extra flavor. Want something indulgent? Drizzle melted chocolate over the brownies. For a cool contrast, serve with whipped cream or vanilla ice cream. Add a few chili flakes on top for a fun, spicy touch.
Storage Info
Best Practices for Storing Brownies
To keep your Mexican chocolate brownies fresh, store them in an airtight container. Make sure they cool completely before sealing. This step prevents moisture buildup. You can place parchment paper between layers to avoid sticking. For the best taste, enjoy them within a week.
How to Freeze and Reheat Brownies
You can freeze brownies to keep them longer. Cut them into squares first. Wrap each square in plastic wrap, then place them in a freezer bag. They can stay good for up to three months. When ready to eat, thaw them in the fridge overnight or microwave them for a few seconds. Enjoy warm for the best flavor.
Shelf Life of Mexican Chocolate Brownies
Mexican chocolate brownies last about five days at room temperature. If you store them in the fridge, they can last up to a week. Freezing can extend their life to three months. Keep an eye on them for any signs of spoilage, like an off smell or mold.
FAQs
What type of chocolate should I use?
I recommend using semi-sweet chocolate. It gives the brownies a rich and balanced flavor. The chocolate chips melt into the batter, creating gooey pockets of chocolate. You can also use high-quality cocoa powder for a deep chocolate taste.
Can I make these brownies gluten-free?
Yes, you can! Just swap the all-purpose flour with a gluten-free blend. Make sure the blend includes xanthan gum. This will help to keep the texture nice and chewy. Follow the same measurements in the recipe for best results.
How can I adjust the spice level?
You can control the heat by adjusting the amount of cayenne pepper. If you prefer less spice, reduce it to 1/4 teaspoon. For a kick, add more! Taste the batter before baking to find the right heat for you.
What pairs well with Mexican Chocolate Brownies?
These brownies pair well with a scoop of vanilla ice cream. The creaminess cools the spice. You might also try serving them with whipped cream or a drizzle of caramel sauce. Fresh berries can add a nice contrast, too.
Can I use dark chocolate instead of semi-sweet?
Absolutely! Dark chocolate will add a richer flavor. Just remember that it may make the brownies less sweet. If you like a deeper chocolate taste, dark chocolate is a great option. Adjust the sugar to balance the flavors if needed.
In this post, we explored the key ingredients and their importance, especially Mexican chocolate. We covered step-by-step instructions for baking, tips for perfect texture, and ways to enhance flavor. You can also try exciting variations and learn proper storage methods. Remember, baking brownies offers room for creativity. Experiment with flavors and spices that excite you. Enjoy the delicious results and share them with friends. Brownies not only please but also create joy in cooking. Keep baking and savor every bite!