No Bake Mocha Cheesecake Cups Creamy Dessert Delight

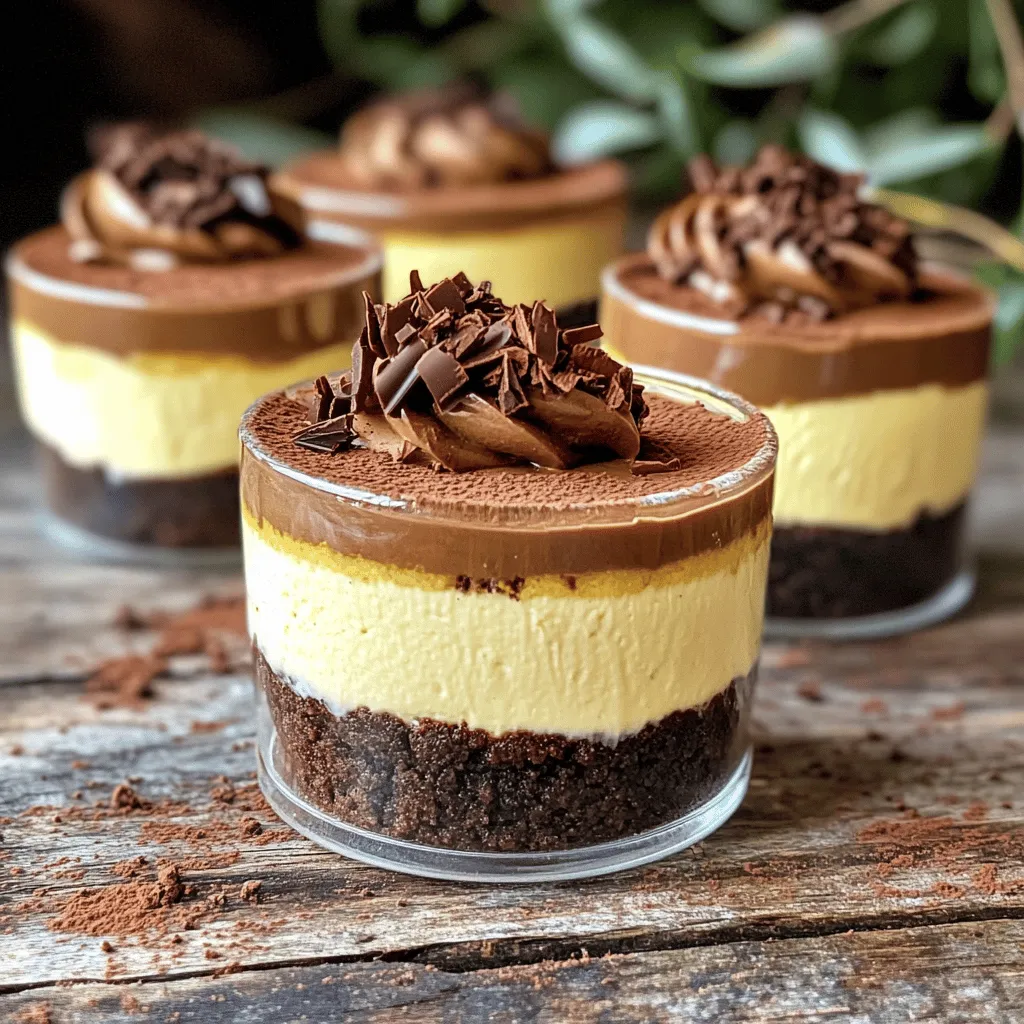
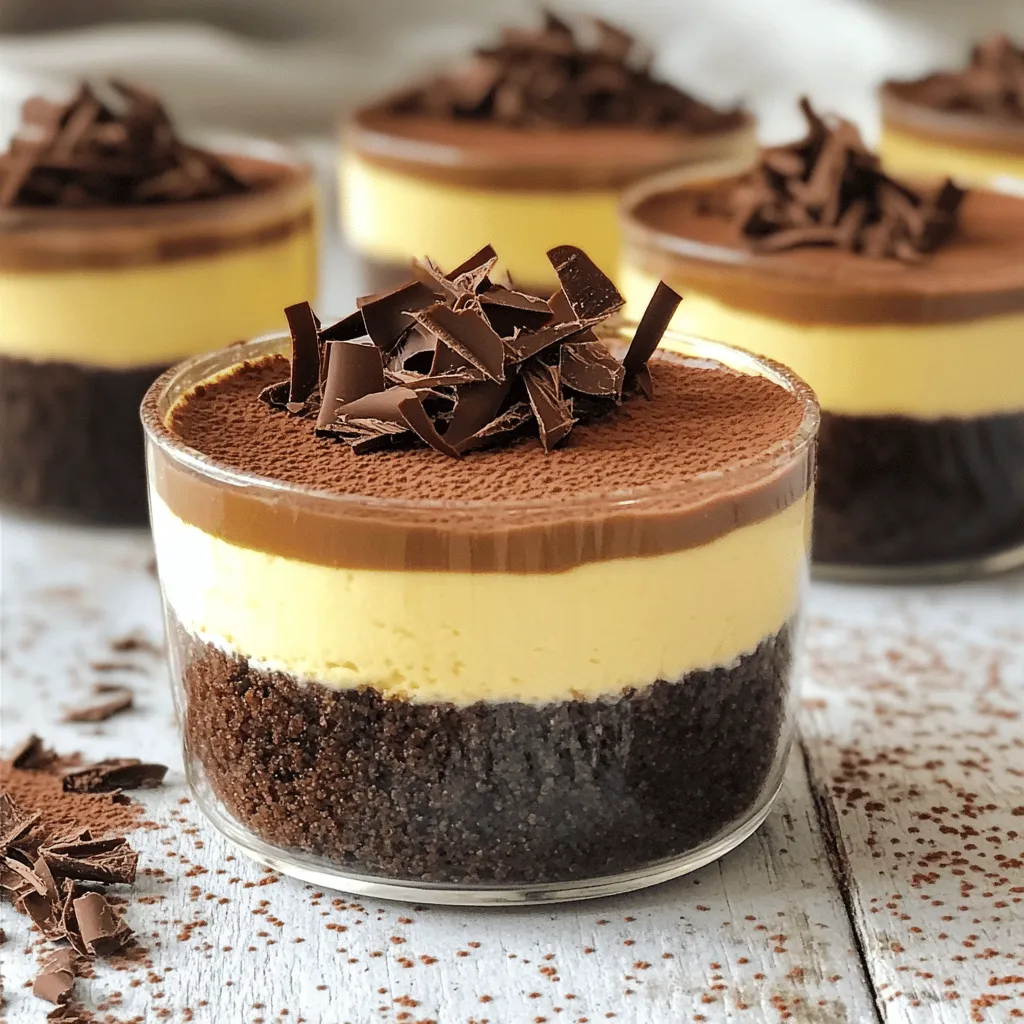
If you love coffee and cream, you’re in for a treat! No bake mocha cheesecake cups are simple to make and perfect for any event. Imagine indulging in rich, creamy layers that blend the bold taste of coffee with smooth cheesecake. This dessert not only looks amazing but tastes incredible too. Join me as I guide you through every step of this delightful recipe! Get ready to impress your friends and family.

For the No Bake Mocha Cheesecake Cups, you will need: - 1 cup chocolate cookie crumbs - 4 tablespoons unsalted butter, melted - 1 cup cream cheese, softened - 1 cup heavy whipping cream - 1/2 cup powdered sugar - 1/4 cup cocoa powder - 1/4 cup strong brewed coffee, cooled - 1 teaspoon vanilla extract - A pinch of salt These ingredients create a rich, creamy base with a delightful chocolate flavor. You can enhance your cheesecake cups with: - Chocolate shavings for garnish - Additional cocoa powder for a dusting These extras add a nice touch to your dessert and make it look fancy. To make this dessert, you will need: - Mixing bowls - Electric mixer or hand mixer - Measuring cups and spoons - A spatula - Serving cups or glasses - Piping bag (optional) Having the right tools makes the process easier and more enjoyable. Start by gathering your ingredients. You need 1 cup of chocolate cookie crumbs and 4 tablespoons of melted unsalted butter. In a medium bowl, mix these two together. Stir until the crumbs are moist and look sandy. This mixture will be your crust. Next, take your serving cups. Spoon about 2 tablespoons of the crumb mixture into each cup. Use the back of a spoon to press the crumbs down firmly. This step makes the base solid. Place the cups in the fridge for 10 to 15 minutes. This helps the crust set before adding the filling. For the filling, grab a large mixing bowl. Beat 1 cup of softened cream cheese with an electric mixer. Mix until it’s smooth and creamy. This part is key; you want no lumps. Gradually add in 1/2 cup of powdered sugar and 1/4 cup of cocoa powder. Mix on low speed. In a separate bowl, pour in 1 cup of heavy whipping cream. Use a hand mixer on high speed. Whip until you see stiff peaks form. This means the cream is fluffy and ready. Now, carefully fold the whipped cream into the cream cheese mixture. Use a spatula for this. Gently mix until it’s well combined but still airy. This folding keeps the filling light and creamy. Remove your crust-filled cups from the fridge. Spoon or pipe the mocha cheesecake mixture into each cup. For a neat look, use a piping bag if you have one. Cover the cups with plastic wrap and place them back in the fridge for at least 4 hours. This chilling time helps the cheesecake set. When you’re ready to serve, take the cups out of the refrigerator. Garnish with chocolate shavings or a dusting of cocoa powder for a nice touch. You can also add a mint leaf on top for color. Enjoy your no bake mocha cheesecake cups! You can swap chocolate cookie crumbs for graham cracker crumbs. This change gives a different flavor. If you want a healthier option, use whole grain or gluten-free cookies. For cream cheese, try mascarpone cheese for a richer taste. If you avoid sugar, use a sugar substitute like Stevia or erythritol. To make great whipped cream, chill your mixing bowl in the fridge first. Use heavy whipping cream for the best results. Beat on high speed until stiff peaks form. This means the cream holds its shape well. Don’t overbeat, or it may turn into butter. If your cheesecake mixture is lumpy, beat the cream cheese longer. Mix until smooth before adding other ingredients. If the filling is too runny, make sure your cream is whipped well. Also, ensure you chill the cups long enough to set. If the crust falls apart, press it down more firmly in the cups. {{image_4}} You can switch up the flavor of your mocha cheesecake. Try using different cookie crumbs for the base. Graham cracker crumbs give a sweet taste. You can even use vanilla wafers for a twist! For a richer flavor, swap cocoa powder for dark chocolate. You can also use flavored coffee or espresso instead of regular coffee. This adds a fun layer of taste. If you need a dairy-free option, use dairy-free cream cheese and whipped cream. You can find these at most stores. For a gluten-free version, choose gluten-free cookie crumbs. Make sure to check the labels for any hidden ingredients. To cut sugar, use a sugar substitute like stevia or monk fruit sweetener. These swaps still give you that creamy delight. Garnishing elevates the look of your cheesecake cups. Chocolate shavings add charm and taste. You can sprinkle extra cocoa powder on top for a touch of elegance. For a fruity twist, add fresh berries like raspberries or strawberries. A mint leaf on top adds a pop of color and freshness. Each of these options makes your dessert even more special! After you make the No Bake Mocha Cheesecake Cups, store them in the fridge. Cover each cup with plastic wrap or a lid. This keeps them fresh and prevents drying out. The cool temperature helps set the cheesecake and keeps it creamy. Always place them on a flat surface to avoid spills. You can freeze these cheesecake cups if you want to keep them longer. Just make sure they are well covered. Use plastic wrap or airtight containers to prevent freezer burn. When you're ready to enjoy them, thaw them in the fridge overnight. Do not freeze the cups with any toppings. Add your garnishes just before serving. These cheesecake cups last about 4 days in the fridge. If you freeze them, they can last up to a month. After that, they may lose their taste and texture. Always check for any off smells or changes in appearance before eating. Enjoy them while they're fresh for the best flavor! You can easily make this dessert dairy-free. Substitute cream cheese with a dairy-free alternative, like cashew cream or coconut cream. For the heavy whipping cream, use coconut whipped cream. Choose dairy-free chocolate cookie crumbs for the crust. This way, you can still enjoy the rich flavors without dairy. Yes, you can use other cookie crumbs for the crust. Graham cracker crumbs work well for a different flavor. You could also try vanilla wafer crumbs or Oreo crumbs. Each option adds its own unique twist to the cheesecake cups. You can keep the cheesecake cups in the fridge for up to five days. Make sure to cover them tightly. This helps keep them fresh. The longer they sit, the more the flavors blend, which can enhance taste. These cheesecake cups pair well with many treats. Fresh berries add a nice touch. You might also serve them with a drizzle of chocolate sauce or a dollop of whipped cream. A small cup of coffee or espresso complements the mocha flavor perfectly. Absolutely! You can prepare the cheesecake cups a day in advance. Just make sure to chill them for at least four hours. This allows the cheesecake to set properly and saves you time on the day you plan to serve them. This article covered key steps to make No Bake Mocha Cheesecake Cups. You learned about ingredients, equipment, and step-by-step instructions. We also discussed tips, variations, and storage options. Making these treats is fun and easy. With the right tools and a few tricks, anyone can enjoy tasty cheesecake cups. Don't hesitate to try different flavors or toppings. Your creativity will make these desserts shine. Enjoy your delicious cheesecake cups, and share them with friends and family!

Ingredients

Main Components

For the No Bake Mocha Cheesecake Cups, you will need:

– 1 cup chocolate cookie crumbs

– 4 tablespoons unsalted butter, melted

– 1 cup cream cheese, softened

– 1 cup heavy whipping cream

– 1/2 cup powdered sugar

– 1/4 cup cocoa powder

– 1/4 cup strong brewed coffee, cooled

– 1 teaspoon vanilla extract

– A pinch of salt

These ingredients create a rich, creamy base with a delightful chocolate flavor.

Optional Ingredients

You can enhance your cheesecake cups with:

– Chocolate shavings for garnish

– Additional cocoa powder for a dusting

These extras add a nice touch to your dessert and make it look fancy.

Equipment Needed

To make this dessert, you will need:

– Mixing bowls

– Electric mixer or hand mixer

– Measuring cups and spoons

– A spatula

– Serving cups or glasses

– Piping bag (optional)

Having the right tools makes the process easier and more enjoyable.

Step-by-Step Instructions

Preparing the Crust

Start by gathering your ingredients. You need 1 cup of chocolate cookie crumbs and 4 tablespoons of melted unsalted butter. In a medium bowl, mix these two together. Stir until the crumbs are moist and look sandy. This mixture will be your crust.

Assembling the Base

Next, take your serving cups. Spoon about 2 tablespoons of the crumb mixture into each cup. Use the back of a spoon to press the crumbs down firmly. This step makes the base solid. Place the cups in the fridge for 10 to 15 minutes. This helps the crust set before adding the filling.

Making the Cheesecake Filling

For the filling, grab a large mixing bowl. Beat 1 cup of softened cream cheese with an electric mixer. Mix until it’s smooth and creamy. This part is key; you want no lumps. Gradually add in 1/2 cup of powdered sugar and 1/4 cup of cocoa powder. Mix on low speed.

Whipping the Cream

In a separate bowl, pour in 1 cup of heavy whipping cream. Use a hand mixer on high speed. Whip until you see stiff peaks form. This means the cream is fluffy and ready.

Folding In Ingredients

Now, carefully fold the whipped cream into the cream cheese mixture. Use a spatula for this. Gently mix until it’s well combined but still airy. This folding keeps the filling light and creamy.

Filling and Chilling the Cups

Remove your crust-filled cups from the fridge. Spoon or pipe the mocha cheesecake mixture into each cup. For a neat look, use a piping bag if you have one. Cover the cups with plastic wrap and place them back in the fridge for at least 4 hours. This chilling time helps the cheesecake set.

Serving Suggestions

When you’re ready to serve, take the cups out of the refrigerator. Garnish with chocolate shavings or a dusting of cocoa powder for a nice touch. You can also add a mint leaf on top for color. Enjoy your no bake mocha cheesecake cups!

Tips & Tricks

Ingredient Substitutions

You can swap chocolate cookie crumbs for graham cracker crumbs. This change gives a different flavor. If you want a healthier option, use whole grain or gluten-free cookies. For cream cheese, try mascarpone cheese for a richer taste. If you avoid sugar, use a sugar substitute like Stevia or erythritol.

Achieving the Perfect Whipped Cream

To make great whipped cream, chill your mixing bowl in the fridge first. Use heavy whipping cream for the best results. Beat on high speed until stiff peaks form. This means the cream holds its shape well. Don’t overbeat, or it may turn into butter.

Troubleshooting Common Issues

If your cheesecake mixture is lumpy, beat the cream cheese longer. Mix until smooth before adding other ingredients. If the filling is too runny, make sure your cream is whipped well. Also, ensure you chill the cups long enough to set. If the crust falls apart, press it down more firmly in the cups.

Variations

Flavor Swaps

You can switch up the flavor of your mocha cheesecake. Try using different cookie crumbs for the base. Graham cracker crumbs give a sweet taste. You can even use vanilla wafers for a twist! For a richer flavor, swap cocoa powder for dark chocolate. You can also use flavored coffee or espresso instead of regular coffee. This adds a fun layer of taste.

Dietary Adjustments

If you need a dairy-free option, use dairy-free cream cheese and whipped cream. You can find these at most stores. For a gluten-free version, choose gluten-free cookie crumbs. Make sure to check the labels for any hidden ingredients. To cut sugar, use a sugar substitute like stevia or monk fruit sweetener. These swaps still give you that creamy delight.

Toppings and Garnishes

Garnishing elevates the look of your cheesecake cups. Chocolate shavings add charm and taste. You can sprinkle extra cocoa powder on top for a touch of elegance. For a fruity twist, add fresh berries like raspberries or strawberries. A mint leaf on top adds a pop of color and freshness. Each of these options makes your dessert even more special!

Storage Info

Refrigeration Tips

After you make the No Bake Mocha Cheesecake Cups, store them in the fridge. Cover each cup with plastic wrap or a lid. This keeps them fresh and prevents drying out. The cool temperature helps set the cheesecake and keeps it creamy. Always place them on a flat surface to avoid spills.

Freezing Instructions

You can freeze these cheesecake cups if you want to keep them longer. Just make sure they are well covered. Use plastic wrap or airtight containers to prevent freezer burn. When you’re ready to enjoy them, thaw them in the fridge overnight. Do not freeze the cups with any toppings. Add your garnishes just before serving.

Shelf Life

These cheesecake cups last about 4 days in the fridge. If you freeze them, they can last up to a month. After that, they may lose their taste and texture. Always check for any off smells or changes in appearance before eating. Enjoy them while they’re fresh for the best flavor!

FAQs

How can I make this recipe dairy-free?

You can easily make this dessert dairy-free. Substitute cream cheese with a dairy-free alternative, like cashew cream or coconut cream. For the heavy whipping cream, use coconut whipped cream. Choose dairy-free chocolate cookie crumbs for the crust. This way, you can still enjoy the rich flavors without dairy.

Can I use other cookie crumbs for the crust?

Yes, you can use other cookie crumbs for the crust. Graham cracker crumbs work well for a different flavor. You could also try vanilla wafer crumbs or Oreo crumbs. Each option adds its own unique twist to the cheesecake cups.

How long can I keep the cheesecake cups in the fridge?

You can keep the cheesecake cups in the fridge for up to five days. Make sure to cover them tightly. This helps keep them fresh. The longer they sit, the more the flavors blend, which can enhance taste.

What can I serve with No Bake Mocha Cheesecake Cups?

These cheesecake cups pair well with many treats. Fresh berries add a nice touch. You might also serve them with a drizzle of chocolate sauce or a dollop of whipped cream. A small cup of coffee or espresso complements the mocha flavor perfectly.

Can I prep this dessert ahead of time?

Absolutely! You can prepare the cheesecake cups a day in advance. Just make sure to chill them for at least four hours. This allows the cheesecake to set properly and saves you time on the day you plan to serve them.

This article covered key steps to make No Bake Mocha Cheesecake Cups. You learned about ingredients, equipment, and step-by-step instructions. We also discussed tips, variations, and storage options. Making these treats is fun and easy. With the right tools and a few tricks, anyone can enjoy tasty cheesecake cups. Don’t hesitate to try different flavors or toppings. Your creativity will make these desserts shine. Enjoy your delicious cheesecake cups, and share them with friends and family!

For the No Bake Mocha Cheesecake Cups, you will need: - 1 cup chocolate cookie crumbs - 4 tablespoons unsalted butter, melted - 1 cup cream cheese, softened - 1 cup heavy whipping cream - 1/2 cup powdered sugar - 1/4 cup cocoa powder - 1/4 cup strong brewed coffee, cooled - 1 teaspoon vanilla extract - A pinch of salt These ingredients create a rich, creamy base with a delightful chocolate flavor. You can enhance your cheesecake cups with: - Chocolate shavings for garnish - Additional cocoa powder for a dusting These extras add a nice touch to your dessert and make it look fancy. To make this dessert, you will need: - Mixing bowls - Electric mixer or hand mixer - Measuring cups and spoons - A spatula - Serving cups or glasses - Piping bag (optional) Having the right tools makes the process easier and more enjoyable. Start by gathering your ingredients. You need 1 cup of chocolate cookie crumbs and 4 tablespoons of melted unsalted butter. In a medium bowl, mix these two together. Stir until the crumbs are moist and look sandy. This mixture will be your crust. Next, take your serving cups. Spoon about 2 tablespoons of the crumb mixture into each cup. Use the back of a spoon to press the crumbs down firmly. This step makes the base solid. Place the cups in the fridge for 10 to 15 minutes. This helps the crust set before adding the filling. For the filling, grab a large mixing bowl. Beat 1 cup of softened cream cheese with an electric mixer. Mix until it’s smooth and creamy. This part is key; you want no lumps. Gradually add in 1/2 cup of powdered sugar and 1/4 cup of cocoa powder. Mix on low speed. In a separate bowl, pour in 1 cup of heavy whipping cream. Use a hand mixer on high speed. Whip until you see stiff peaks form. This means the cream is fluffy and ready. Now, carefully fold the whipped cream into the cream cheese mixture. Use a spatula for this. Gently mix until it’s well combined but still airy. This folding keeps the filling light and creamy. Remove your crust-filled cups from the fridge. Spoon or pipe the mocha cheesecake mixture into each cup. For a neat look, use a piping bag if you have one. Cover the cups with plastic wrap and place them back in the fridge for at least 4 hours. This chilling time helps the cheesecake set. When you’re ready to serve, take the cups out of the refrigerator. Garnish with chocolate shavings or a dusting of cocoa powder for a nice touch. You can also add a mint leaf on top for color. Enjoy your no bake mocha cheesecake cups! You can swap chocolate cookie crumbs for graham cracker crumbs. This change gives a different flavor. If you want a healthier option, use whole grain or gluten-free cookies. For cream cheese, try mascarpone cheese for a richer taste. If you avoid sugar, use a sugar substitute like Stevia or erythritol. To make great whipped cream, chill your mixing bowl in the fridge first. Use heavy whipping cream for the best results. Beat on high speed until stiff peaks form. This means the cream holds its shape well. Don’t overbeat, or it may turn into butter. If your cheesecake mixture is lumpy, beat the cream cheese longer. Mix until smooth before adding other ingredients. If the filling is too runny, make sure your cream is whipped well. Also, ensure you chill the cups long enough to set. If the crust falls apart, press it down more firmly in the cups. {{image_4}} You can switch up the flavor of your mocha cheesecake. Try using different cookie crumbs for the base. Graham cracker crumbs give a sweet taste. You can even use vanilla wafers for a twist! For a richer flavor, swap cocoa powder for dark chocolate. You can also use flavored coffee or espresso instead of regular coffee. This adds a fun layer of taste. If you need a dairy-free option, use dairy-free cream cheese and whipped cream. You can find these at most stores. For a gluten-free version, choose gluten-free cookie crumbs. Make sure to check the labels for any hidden ingredients. To cut sugar, use a sugar substitute like stevia or monk fruit sweetener. These swaps still give you that creamy delight. Garnishing elevates the look of your cheesecake cups. Chocolate shavings add charm and taste. You can sprinkle extra cocoa powder on top for a touch of elegance. For a fruity twist, add fresh berries like raspberries or strawberries. A mint leaf on top adds a pop of color and freshness. Each of these options makes your dessert even more special! After you make the No Bake Mocha Cheesecake Cups, store them in the fridge. Cover each cup with plastic wrap or a lid. This keeps them fresh and prevents drying out. The cool temperature helps set the cheesecake and keeps it creamy. Always place them on a flat surface to avoid spills. You can freeze these cheesecake cups if you want to keep them longer. Just make sure they are well covered. Use plastic wrap or airtight containers to prevent freezer burn. When you're ready to enjoy them, thaw them in the fridge overnight. Do not freeze the cups with any toppings. Add your garnishes just before serving. These cheesecake cups last about 4 days in the fridge. If you freeze them, they can last up to a month. After that, they may lose their taste and texture. Always check for any off smells or changes in appearance before eating. Enjoy them while they're fresh for the best flavor! You can easily make this dessert dairy-free. Substitute cream cheese with a dairy-free alternative, like cashew cream or coconut cream. For the heavy whipping cream, use coconut whipped cream. Choose dairy-free chocolate cookie crumbs for the crust. This way, you can still enjoy the rich flavors without dairy. Yes, you can use other cookie crumbs for the crust. Graham cracker crumbs work well for a different flavor. You could also try vanilla wafer crumbs or Oreo crumbs. Each option adds its own unique twist to the cheesecake cups. You can keep the cheesecake cups in the fridge for up to five days. Make sure to cover them tightly. This helps keep them fresh. The longer they sit, the more the flavors blend, which can enhance taste. These cheesecake cups pair well with many treats. Fresh berries add a nice touch. You might also serve them with a drizzle of chocolate sauce or a dollop of whipped cream. A small cup of coffee or espresso complements the mocha flavor perfectly. Absolutely! You can prepare the cheesecake cups a day in advance. Just make sure to chill them for at least four hours. This allows the cheesecake to set properly and saves you time on the day you plan to serve them. This article covered key steps to make No Bake Mocha Cheesecake Cups. You learned about ingredients, equipment, and step-by-step instructions. We also discussed tips, variations, and storage options. Making these treats is fun and easy. With the right tools and a few tricks, anyone can enjoy tasty cheesecake cups. Don't hesitate to try different flavors or toppings. Your creativity will make these desserts shine. Enjoy your delicious cheesecake cups, and share them with friends and family!

No Bake Mocha Cheesecake Cups

Indulge in the delightful taste of No Bake Mocha Cheesecake Cups! This easy-to-follow recipe features layers of rich chocolate cookie crust and creamy mocha filling, all topped with chocolate shavings. Perfect for impressing guests or enjoying a sweet treat at home, these cups are ready to chill in just 20 minutes. Click through to discover the complete recipe and elevate your dessert game today!

Ingredients
  

1 cup chocolate cookie crumbs (alternatively, use graham cracker crumbs for a different flavor)

4 tablespoons unsalted butter, melted

1 cup cream cheese, softened to room temperature

1 cup heavy whipping cream

1/2 cup powdered sugar

1/4 cup cocoa powder

1/4 cup strong brewed coffee, cooled to room temperature

1 teaspoon vanilla extract

A pinch of salt

Chocolate shavings or additional cocoa powder for garnish

Instructions
 

Prepare the Crust: In a medium mixing bowl, combine the chocolate cookie crumbs with the melted butter. Mix thoroughly until the crumbs are evenly coated with butter, forming a sandy texture.

    Assemble the Base: Spoon approximately 2 tablespoons of the crumb mixture into the bottom of each serving cup or glass. Press down firmly with the back of a spoon to create a compact, solid base. Once done, place the cups in the refrigerator for 10-15 minutes to allow the crust to firm up while you prepare the filling.

      Make the Cheesecake Filling: In a large mixing bowl, utilize an electric mixer to beat the softened cream cheese on medium speed until it’s smooth and creamy, removing any lumps for a silky texture.

        Add Sweeteners and Flavors: Gradually incorporate the powdered sugar and cocoa powder while mixing on low speed. Then add the cooled brewed coffee, vanilla extract, and a pinch of salt. Beat the mixture until everything is fully blended and smooth, ensuring no dry pockets remain.

          Whip the Cream: In a separate, chilled bowl, whip the heavy cream with a hand mixer, or stand mixer, on high speed until stiff peaks form, indicating the cream is whipped to a fluffy texture.

            Fold Together: Carefully fold the whipped cream into the chocolate-mocha cream cheese mixture using a spatula. Make sure to gently mix to maintain the airiness of the whipped cream, which gives the filling its light and creamy consistency.

              Fill the Cups: Take the crust-filled cups out of the refrigerator. Spoon or pipe the mocha cheesecake mixture on top of the crust layer. For a neat presentation, you may use a piping bag with a star tip.

                Chill: Once filled, cover each cup with plastic wrap or a lid and place them in the refrigerator for a minimum of 4 hours, allowing the cheesecake to set properly.

                  Serve: Prior to serving, garnish each mocha cheesecake cup with chocolate shavings or a light dusting of cocoa powder on top for an elegant finish.

                    Prep Time, Total Time, Servings: 20 minutes | 4 hours chill time | 6 servings.

                      - Presentation Tips: Opt for clear cups or glasses to beautifully showcase the distinct layers of the crust and creamy cheesecake filling. Add a fresh mint leaf on top for an eye-catching color contrast, and consider serving each cup alongside a small piece of chocolate or a coffee treat for an extra touch of indulgence.