No-Bake Peanut Butter Rice Krispie Treats Delight

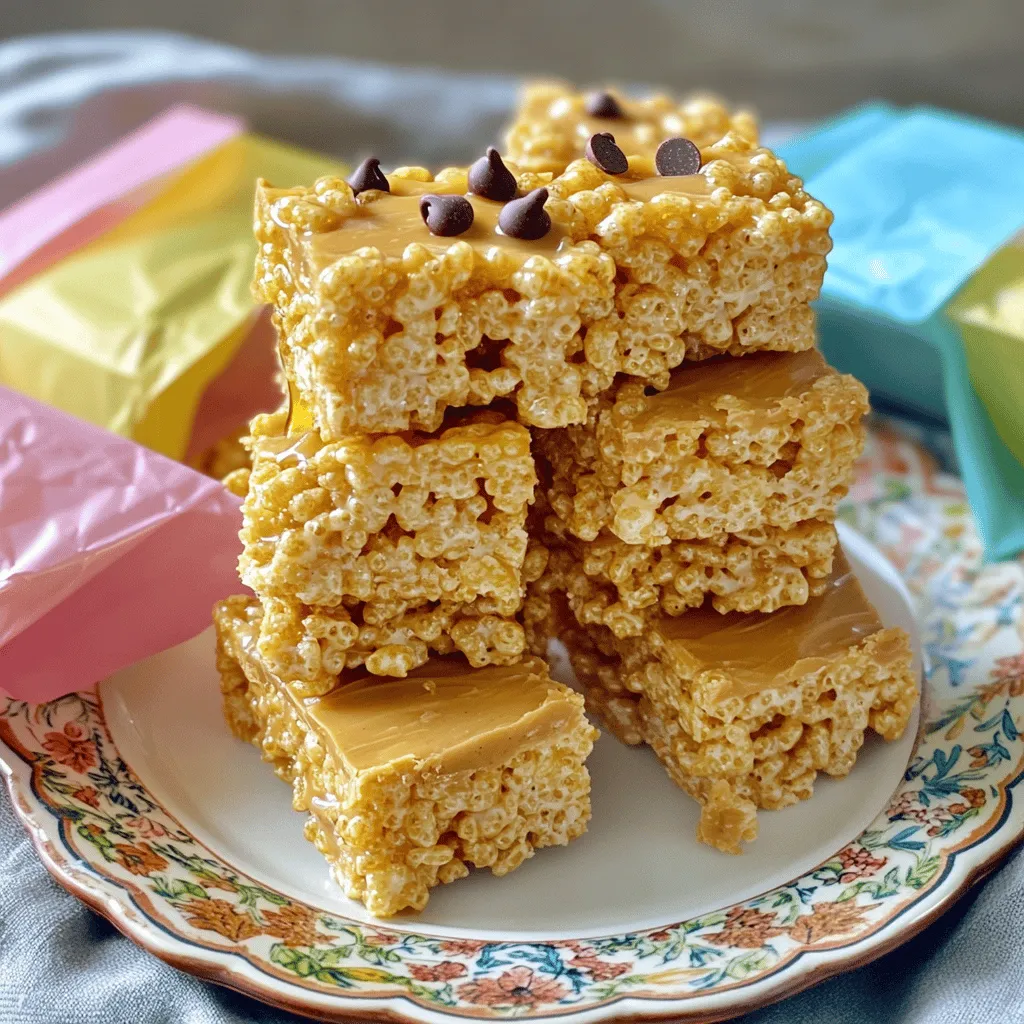
Are you ready for a tasty treat that’s simple and quick? In this post, I’ll show you how to make No-Bake Peanut Butter Rice Krispie Treats. With just a few ingredients, including creamy peanut butter and crispy rice cereal, you’ll whip up a delicious snack in no time. Let’s dive into the steps and satisfy your craving for something sweet and crunchy!

To create No-Bake Peanut Butter Rice Krispie Treats, gather these simple ingredients: - 3 cups Rice Krispies cereal - 1 cup creamy peanut butter - 1/2 cup honey or maple syrup - 1/2 cup powdered sugar - 1 teaspoon vanilla extract - 1/4 cup mini chocolate chips (optional) - A pinch of salt These ingredients come together to form a sweet, crunchy treat. The creamy peanut butter adds richness. Honey or maple syrup provides a natural sweetness. Powdered sugar thickens the mixture, making it easy to shape into bars. Don't forget the vanilla extract; it boosts flavor. Optionally, mini chocolate chips add a fun touch. Using fresh ingredients ensures the best taste. I love how these treats have a balance of flavors and textures. You can easily customize them too. Consider using almond butter instead of peanut butter for a twist. First, grab a large mixing bowl. Add 1 cup of creamy peanut butter and 1/2 cup of honey or maple syrup. Microwave the bowl for about 30 seconds. This warms the mixture, making it easy to stir. Mix until it’s smooth and well combined. Next, add 1/2 cup of powdered sugar, 1 teaspoon of vanilla extract, and a pinch of salt. Stir everything together. You want a thick and sticky mix, so make sure it’s well combined. Now, it's time to fold in 3 cups of Rice Krispies cereal. Add them gradually to the mix. Make sure each piece gets coated with the peanut butter mixture. If you like, you can fold in 1/4 cup of mini chocolate chips at this point for extra sweetness. Take an 8x8-inch baking pan and line it with parchment paper. Leave some paper hanging over the edges. This helps you lift the bars out later. After that, transfer the peanut butter mixture into the lined pan. Press the mixture down firmly and evenly. Make sure it’s compact. Put the pan in the refrigerator. Let the bars chill for at least 1 hour. This helps them firm up nicely. Once set, lift the bars out using the parchment paper. Cut them into squares or rectangles. Enjoy your tasty treats! To get the right texture, mix the peanut butter and honey well. Warm them in the microwave. This makes mixing easier. Use a spatula to blend until smooth. If you want a creamier treat, add more peanut butter. For a firmer texture, use less. The key is to find what you like best. Store leftovers in an airtight container. This keeps them fresh and tasty. You can also wrap each bar in wax paper. This method is great for on-the-go snacks. For longer freshness, place them in the fridge. They can last up to a week when stored properly. For a fun serving idea, arrange the bars on a colorful plate. Add extra mini chocolate chips on top for flair. You can also cut them into fun shapes. Wrapping them in fun paper makes them great gifts too. This makes snack time more exciting! {{image_4}} You can switch out peanut butter for different nut butters. Almond butter works well too. Sunflower seed butter is a tasty choice for nut-free needs. For sweeteners, try agave syrup instead of honey. Maple syrup adds a nice flavor, too. Want to mix things up? Add a splash of vanilla extract for depth. A sprinkle of cinnamon gives a warm touch. Cocoa powder provides a rich chocolate flavor. You can also toss in seeds or chopped nuts for extra crunch. If you need gluten-free treats, use certified gluten-free Rice Krispies. For vegan options, simply swap honey with maple syrup. These easy changes keep your treats tasty and fit for many diets. To keep your no-bake peanut butter Rice Krispie treats fresh, store them in an airtight container. Place them at room temperature for short-term storage. They stay good for about 3 days this way. If you want to keep them longer, store them in the fridge. They can last up to a week when chilled. Just remember, they can get a bit hard in the fridge. Freezing these treats is easy and a great option for long-term storage. First, cut them into squares. Then, wrap each piece tightly in plastic wrap. Place the wrapped treats in a freezer bag or container. They can freeze well for up to 3 months. When you're ready to enjoy them, take out a treat and let it thaw at room temperature. For the best taste, enjoy them within a few days after thawing. Yes, you can use crunchy peanut butter. It adds a fun texture. The treats will still taste great, just a bit different. You can use other cereals like Cornflakes or puffed rice. Granola works too. Each option gives a unique taste and texture. To make these treats vegan, use maple syrup as a sweetener. Replace creamy peanut butter with a vegan brand. Make sure all ingredients are plant-based. These treats last up to one week if stored properly. Keep them in an airtight container. Refrigeration helps keep them fresh longer. Absolutely! You can add dried fruit like raisins or cranberries. Nuts also work well for added crunch. Just make sure to mix them in gently. This blog post showed you how to make tasty no-bake peanut butter Rice Krispie treats. We covered all steps, from mixing to storage tips. Remember to chill your treats well for the best taste. Don’t be afraid to try new ingredients or flavors. With just a few tweaks, you can fit your needs or mood. Now, grab some ingredients and start making these easy snacks today! Enjoy every crunchy bite!

Ingredients

To create No-Bake Peanut Butter Rice Krispie Treats, gather these simple ingredients:

– 3 cups Rice Krispies cereal

– 1 cup creamy peanut butter

– 1/2 cup honey or maple syrup

– 1/2 cup powdered sugar

– 1 teaspoon vanilla extract

– 1/4 cup mini chocolate chips (optional)

– A pinch of salt

These ingredients come together to form a sweet, crunchy treat. The creamy peanut butter adds richness. Honey or maple syrup provides a natural sweetness. Powdered sugar thickens the mixture, making it easy to shape into bars. Don’t forget the vanilla extract; it boosts flavor. Optionally, mini chocolate chips add a fun touch.

Using fresh ingredients ensures the best taste. I love how these treats have a balance of flavors and textures. You can easily customize them too. Consider using almond butter instead of peanut butter for a twist.

Step-by-Step Instructions

Mixing the Peanut Butter Mixture

First, grab a large mixing bowl. Add 1 cup of creamy peanut butter and 1/2 cup of honey or maple syrup. Microwave the bowl for about 30 seconds. This warms the mixture, making it easy to stir. Mix until it’s smooth and well combined.

Incorporating Dry Ingredients

Next, add 1/2 cup of powdered sugar, 1 teaspoon of vanilla extract, and a pinch of salt. Stir everything together. You want a thick and sticky mix, so make sure it’s well combined.

Folding in Rice Krispies

Now, it’s time to fold in 3 cups of Rice Krispies cereal. Add them gradually to the mix. Make sure each piece gets coated with the peanut butter mixture. If you like, you can fold in 1/4 cup of mini chocolate chips at this point for extra sweetness.

Preparing the Baking Pan

Take an 8×8-inch baking pan and line it with parchment paper. Leave some paper hanging over the edges. This helps you lift the bars out later. After that, transfer the peanut butter mixture into the lined pan. Press the mixture down firmly and evenly. Make sure it’s compact.

Chilling the Bars

Put the pan in the refrigerator. Let the bars chill for at least 1 hour. This helps them firm up nicely. Once set, lift the bars out using the parchment paper. Cut them into squares or rectangles. Enjoy your tasty treats!

Tips & Tricks

Achieving the Perfect Consistency

To get the right texture, mix the peanut butter and honey well. Warm them in the microwave. This makes mixing easier. Use a spatula to blend until smooth. If you want a creamier treat, add more peanut butter. For a firmer texture, use less. The key is to find what you like best.

Storage Tips

Store leftovers in an airtight container. This keeps them fresh and tasty. You can also wrap each bar in wax paper. This method is great for on-the-go snacks. For longer freshness, place them in the fridge. They can last up to a week when stored properly.

Presentation Suggestions

For a fun serving idea, arrange the bars on a colorful plate. Add extra mini chocolate chips on top for flair. You can also cut them into fun shapes. Wrapping them in fun paper makes them great gifts too. This makes snack time more exciting!

Variations

Ingredient Substitutions

You can switch out peanut butter for different nut butters. Almond butter works well too. Sunflower seed butter is a tasty choice for nut-free needs. For sweeteners, try agave syrup instead of honey. Maple syrup adds a nice flavor, too.

Flavor Enhancements

Want to mix things up? Add a splash of vanilla extract for depth. A sprinkle of cinnamon gives a warm touch. Cocoa powder provides a rich chocolate flavor. You can also toss in seeds or chopped nuts for extra crunch.

Dietary Considerations

If you need gluten-free treats, use certified gluten-free Rice Krispies. For vegan options, simply swap honey with maple syrup. These easy changes keep your treats tasty and fit for many diets.

Storage Info

Recommended Storage Conditions

To keep your no-bake peanut butter Rice Krispie treats fresh, store them in an airtight container. Place them at room temperature for short-term storage. They stay good for about 3 days this way. If you want to keep them longer, store them in the fridge. They can last up to a week when chilled. Just remember, they can get a bit hard in the fridge.

Freezing Instructions

Freezing these treats is easy and a great option for long-term storage. First, cut them into squares. Then, wrap each piece tightly in plastic wrap. Place the wrapped treats in a freezer bag or container. They can freeze well for up to 3 months. When you’re ready to enjoy them, take out a treat and let it thaw at room temperature. For the best taste, enjoy them within a few days after thawing.

FAQs

Can I use crunchy peanut butter instead of creamy?

Yes, you can use crunchy peanut butter. It adds a fun texture. The treats will still taste great, just a bit different.

What can I substitute for Rice Krispies?

You can use other cereals like Cornflakes or puffed rice. Granola works too. Each option gives a unique taste and texture.

How do I make these treats vegan-friendly?

To make these treats vegan, use maple syrup as a sweetener. Replace creamy peanut butter with a vegan brand. Make sure all ingredients are plant-based.

How long do No-Bake Peanut Butter Rice Krispie Treats last?

These treats last up to one week if stored properly. Keep them in an airtight container. Refrigeration helps keep them fresh longer.

Can I add other mix-ins like dried fruit or nuts?

Absolutely! You can add dried fruit like raisins or cranberries. Nuts also work well for added crunch. Just make sure to mix them in gently.

This blog post showed you how to make tasty no-bake peanut butter Rice Krispie treats. We covered all steps, from mixing to storage tips. Remember to chill your treats well for the best taste. Don’t be afraid to try new ingredients or flavors. With just a few tweaks, you can fit your needs or mood. Now, grab some ingredients and start making these easy snacks today! Enjoy every crunchy bite!

To create No-Bake Peanut Butter Rice Krispie Treats, gather these simple ingredients: - 3 cups Rice Krispies cereal - 1 cup creamy peanut butter - 1/2 cup honey or maple syrup - 1/2 cup powdered sugar - 1 teaspoon vanilla extract - 1/4 cup mini chocolate chips (optional) - A pinch of salt These ingredients come together to form a sweet, crunchy treat. The creamy peanut butter adds richness. Honey or maple syrup provides a natural sweetness. Powdered sugar thickens the mixture, making it easy to shape into bars. Don't forget the vanilla extract; it boosts flavor. Optionally, mini chocolate chips add a fun touch. Using fresh ingredients ensures the best taste. I love how these treats have a balance of flavors and textures. You can easily customize them too. Consider using almond butter instead of peanut butter for a twist. First, grab a large mixing bowl. Add 1 cup of creamy peanut butter and 1/2 cup of honey or maple syrup. Microwave the bowl for about 30 seconds. This warms the mixture, making it easy to stir. Mix until it’s smooth and well combined. Next, add 1/2 cup of powdered sugar, 1 teaspoon of vanilla extract, and a pinch of salt. Stir everything together. You want a thick and sticky mix, so make sure it’s well combined. Now, it's time to fold in 3 cups of Rice Krispies cereal. Add them gradually to the mix. Make sure each piece gets coated with the peanut butter mixture. If you like, you can fold in 1/4 cup of mini chocolate chips at this point for extra sweetness. Take an 8x8-inch baking pan and line it with parchment paper. Leave some paper hanging over the edges. This helps you lift the bars out later. After that, transfer the peanut butter mixture into the lined pan. Press the mixture down firmly and evenly. Make sure it’s compact. Put the pan in the refrigerator. Let the bars chill for at least 1 hour. This helps them firm up nicely. Once set, lift the bars out using the parchment paper. Cut them into squares or rectangles. Enjoy your tasty treats! To get the right texture, mix the peanut butter and honey well. Warm them in the microwave. This makes mixing easier. Use a spatula to blend until smooth. If you want a creamier treat, add more peanut butter. For a firmer texture, use less. The key is to find what you like best. Store leftovers in an airtight container. This keeps them fresh and tasty. You can also wrap each bar in wax paper. This method is great for on-the-go snacks. For longer freshness, place them in the fridge. They can last up to a week when stored properly. For a fun serving idea, arrange the bars on a colorful plate. Add extra mini chocolate chips on top for flair. You can also cut them into fun shapes. Wrapping them in fun paper makes them great gifts too. This makes snack time more exciting! {{image_4}} You can switch out peanut butter for different nut butters. Almond butter works well too. Sunflower seed butter is a tasty choice for nut-free needs. For sweeteners, try agave syrup instead of honey. Maple syrup adds a nice flavor, too. Want to mix things up? Add a splash of vanilla extract for depth. A sprinkle of cinnamon gives a warm touch. Cocoa powder provides a rich chocolate flavor. You can also toss in seeds or chopped nuts for extra crunch. If you need gluten-free treats, use certified gluten-free Rice Krispies. For vegan options, simply swap honey with maple syrup. These easy changes keep your treats tasty and fit for many diets. To keep your no-bake peanut butter Rice Krispie treats fresh, store them in an airtight container. Place them at room temperature for short-term storage. They stay good for about 3 days this way. If you want to keep them longer, store them in the fridge. They can last up to a week when chilled. Just remember, they can get a bit hard in the fridge. Freezing these treats is easy and a great option for long-term storage. First, cut them into squares. Then, wrap each piece tightly in plastic wrap. Place the wrapped treats in a freezer bag or container. They can freeze well for up to 3 months. When you're ready to enjoy them, take out a treat and let it thaw at room temperature. For the best taste, enjoy them within a few days after thawing. Yes, you can use crunchy peanut butter. It adds a fun texture. The treats will still taste great, just a bit different. You can use other cereals like Cornflakes or puffed rice. Granola works too. Each option gives a unique taste and texture. To make these treats vegan, use maple syrup as a sweetener. Replace creamy peanut butter with a vegan brand. Make sure all ingredients are plant-based. These treats last up to one week if stored properly. Keep them in an airtight container. Refrigeration helps keep them fresh longer. Absolutely! You can add dried fruit like raisins or cranberries. Nuts also work well for added crunch. Just make sure to mix them in gently. This blog post showed you how to make tasty no-bake peanut butter Rice Krispie treats. We covered all steps, from mixing to storage tips. Remember to chill your treats well for the best taste. Don’t be afraid to try new ingredients or flavors. With just a few tweaks, you can fit your needs or mood. Now, grab some ingredients and start making these easy snacks today! Enjoy every crunchy bite!

No-Bake Peanut Butter Rice Krispie Treats

Indulge in the deliciousness of Crunchy Peanut Butter Bliss Bars! These easy-to-make treats combine Rice Krispies and creamy peanut butter for a perfect snack. With just a few simple ingredients, you can whip up a batch in no time. Chill until firm, cut into squares, and enjoy a sweet and crunchy delight. Ready to treat yourself? Click through for the full recipe and make these blissful bars today!

Ingredients
  

3 cups Rice Krispies cereal

1 cup creamy peanut butter

1/2 cup honey or maple syrup

1/2 cup powdered sugar

1 teaspoon vanilla extract

1/4 cup mini chocolate chips (optional)

A pinch of salt

Instructions
 

In a large mixing bowl, combine the creamy peanut butter and honey (or maple syrup). Microwave the mixture for approximately 30 seconds to 1 minute, or until it is warm and easily mixable. Stir thoroughly until the mixture is smooth and well combined.

    Next, add the powdered sugar, vanilla extract, and a pinch of salt to the warmed peanut butter mixture. Mix everything together until it is fully incorporated. Expect a thick consistency.

      Gradually fold in the Rice Krispies cereal, ensuring that each piece is evenly coated with the peanut butter mixture. If you choose to include them, gently fold in the mini chocolate chips at this stage.

        Prepare an 8x8-inch square baking pan by lining it with parchment paper. Leave some overhang on the edges for easy removal of the bars later.

          Transfer the peanut butter mixture into the lined baking pan. Use a spatula or your hands to firmly and evenly press the mixture down into the pan. Ensure it's compact and holds together well.

            Place the pan in the refrigerator and let it chill for a minimum of 1 hour, allowing the bars to firm up. Once set, carefully lift the bars out of the pan using the parchment paper and cut them into squares or rectangles.

              Vorbereitungszeit: 15 Minuten | Gesamtzeit: 1 Stunde 15 Minuten | Portionen: 12

                - Präsentationstipps: Arrange the bliss bar squares on a decorative plate and sprinkle additional mini chocolate chips on top for an enticing presentation. For a delightful and portable snack, wrap each individual bar in colorful wax paper!