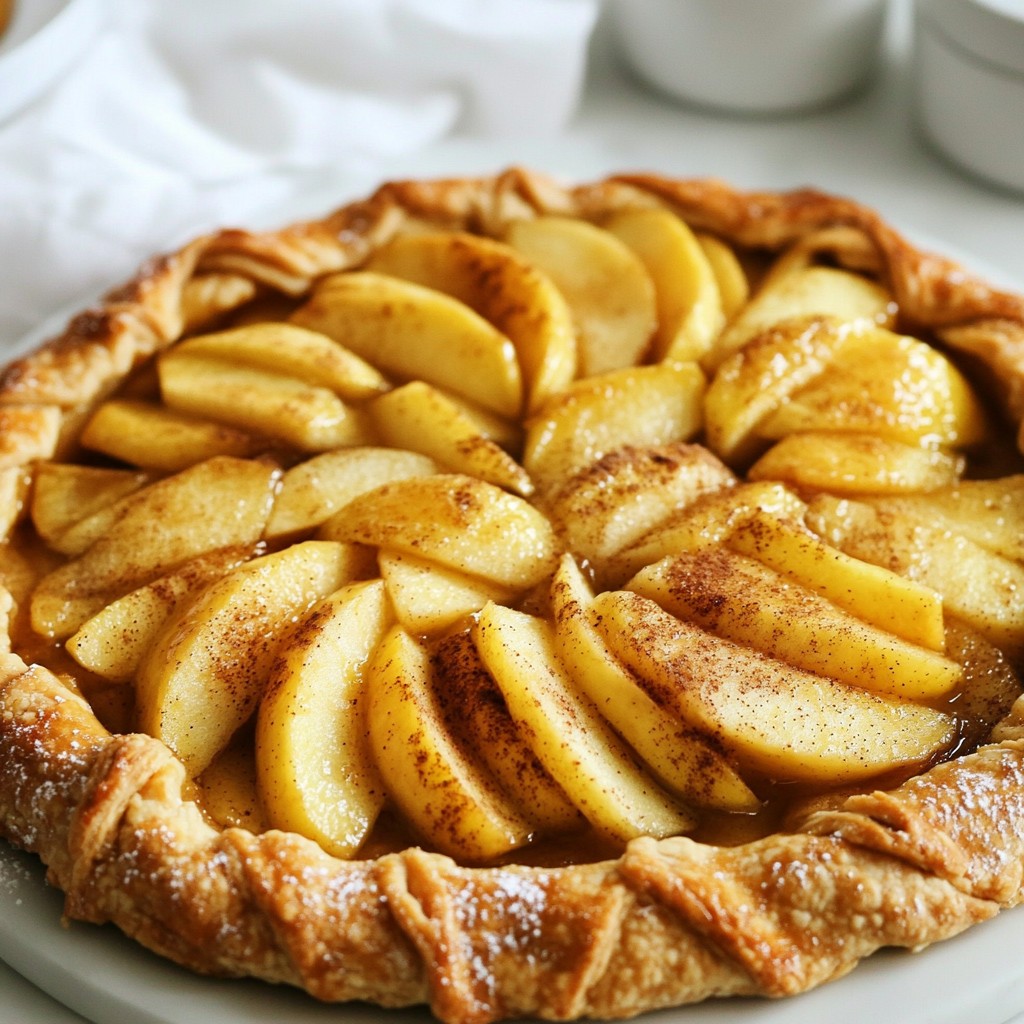
Are you ready to impress your friends and family with a rustic apple cinnamon galette? This easy homemade delight transforms simple ingredients into a warm, cozy dessert that's perfect for any occasion. With flaky crust and sweet apple filling, this galette fits right into your baking repertoire. In this post, I'll guide you step-by-step through creating this delicious treat, along with tips and variations to make it your own. Let's get started!
Why I Love This Recipe
- Simple and Rustic: This galette is incredibly easy to prepare, making it a perfect dessert for both novice and experienced bakers alike.
- Seasonal Flavors: The combination of apples and warm spices like cinnamon and nutmeg evokes the cozy essence of fall, perfect for any gathering.
- Versatile Ingredients: With just a few ingredients, you can customize the filling with your favorite fruits or nuts, making it adaptable to your taste.
- Beautiful Presentation: The rustic appearance of the galette, with its golden crust and juicy apple filling, makes for an impressive centerpiece at any table.
Ingredients
List of Ingredients
- 2 cups all-purpose flour
- 1/2 teaspoon salt
- 1 tablespoon granulated sugar
- 1/2 cup cold unsalted butter, cut into small cubes
- 6-8 tablespoons ice-cold water
- 4 medium apples (like Granny Smith or Honeycrisp), peeled, cored, and thinly sliced
- 1 tablespoon fresh lemon juice
- 1/4 cup packed brown sugar
- 1 teaspoon ground cinnamon
- 1/4 teaspoon ground nutmeg
- 1 tablespoon cornstarch
- 1 egg, beaten (for egg wash)
- Turbinado sugar, for sprinkling
Gathering fresh ingredients is key. I always choose apples that are crisp and sweet. Granny Smith adds a nice tartness, while Honeycrisp brings sweetness. The mix of these apples gives a great flavor.
I also use cold unsalted butter. It helps make the crust flaky. Ice-cold water is a must too. It keeps the dough from getting too warm as you mix.
The spices are simple but powerful. Cinnamon and nutmeg bring warmth to the apples. The brown sugar adds a deep sweetness. The cornstarch helps thicken the juices from the apples.
Lastly, the egg wash gives the crust a golden color. A sprinkle of turbinado sugar adds a nice crunch and shine. Each ingredient plays its part in making this galette a delicious treat. Enjoy gathering these items; they set the stage for a fantastic homemade delight!
Step-by-Step Instructions
Preparing the Dough
Start by mixing the dry ingredients. In a large bowl, whisk together 2 cups of all-purpose flour, 1/2 teaspoon of salt, and 1 tablespoon of granulated sugar. This mix forms the base of your dough.
Next, add in 1/2 cup of cold unsalted butter, cut into small cubes. Use a pastry cutter or your fingers to blend the butter until the mixture looks like coarse crumbs. You want pea-sized pieces of butter in this mix.
Now, it’s time to add the ice-cold water. Gradually add 6-8 tablespoons, one tablespoon at a time. Mix with a fork until the dough starts to come together. Don’t overmix! Gently shape the dough into a disc. Wrap it tightly in plastic wrap and chill in the fridge for at least 30 minutes. This helps the dough firm up.
Preparing the Filling
For the filling, gather 4 medium apples, like Granny Smith or Honeycrisp. Peel, core, and slice them thinly. Toss the apple slices in a bowl with 1 tablespoon of fresh lemon juice, 1/4 cup of packed brown sugar, 1 teaspoon of ground cinnamon, 1/4 teaspoon of ground nutmeg, and 1 tablespoon of cornstarch.
Mix it lightly until the apples are evenly coated. Let the mixture sit for a few minutes. This allows the flavors to blend and the apples to release some moisture.
Assembling and Baking the Galette
Preheat your oven to 400°F (200°C). While it heats, roll out the chilled dough on a lightly floured surface. Aim for a rough circle about 12 inches wide. Carefully transfer this rolled dough to a baking sheet lined with parchment paper.
Now, spoon the apple mixture into the center of the dough. Leave a 2-inch border around the edges. Fold the dough over the apples, creating pleats for a rustic look. Make sure the apples are still visible in the center.
Brush the folded edges with the beaten egg for a golden finish. Sprinkle turbinado sugar over the crust for extra crunch.
Finally, bake the galette in your preheated oven for 35-40 minutes. The crust should turn a lovely golden brown, and the apples should be tender and bubbly. Enjoy the delicious aroma wafting through your kitchen!
Tips & Tricks
Perfecting the Dough
To get the best dough, start with cold butter. Cut the butter into small cubes and mix it with flour. The key is to blend until it looks like coarse crumbs. This makes the crust flaky.
Chilling the dough is a must. Wrap it in plastic and put it in the fridge for at least 30 minutes. This helps the butter firm up. A cold dough rolls out better and keeps its shape.
Enhancing the Apple Filling
When choosing apples, I love Granny Smith or Honeycrisp. These apples give a nice tartness and hold their shape well when baked.
Balancing sweetness and spice is important. Use brown sugar for a rich taste, and don’t forget the cinnamon. A pinch of nutmeg adds warmth. Try to let the apple mixture sit for a few minutes. This helps the flavors blend nicely.
Serving Suggestions
For a tasty twist, serve your galette with ice cream or freshly whipped cream. The creaminess pairs well with the warm apples.
For the best look, place the galette on a rustic wooden board. Add fresh apple slices and a sprinkle of cinnamon on top. It makes for a beautiful presentation that everyone will love!
Pro Tips
- Chill Your Ingredients: For a flakier crust, ensure your butter and water are ice-cold before mixing them into the dough.
- Choose the Right Apples: Combining tart and sweet apples, like Granny Smith and Honeycrisp, will create a more complex flavor profile in your galette.
- Watch the Baking Time: Keep an eye on the galette as it bakes; every oven is different, and you want to avoid over-browning the crust.
- Serving Suggestions: Enhance the flavor by serving the galette warm with a scoop of vanilla ice cream or a dollop of whipped cream for a delightful contrast.
Variations
Flavor Variations
You can easily change the taste of your galette. Adding nuts or dried fruits gives it a fun twist. Chopped walnuts or pecans add crunch and flavor. Dried cranberries or raisins can bring sweetness. Just mix them in with the apples.
Using different spices or extracts can also enhance the flavor. Try adding ginger or allspice for warmth. A drop of vanilla extract can add depth to the filling. These small changes can really make your galette unique.
Dietary Adjustments
If you need a gluten-free option, use gluten-free flour. Many brands work well in pie crusts. For a vegan version, swap the butter for coconut oil or vegan margarine. You can also replace the egg wash with almond milk for a nice glaze.
If you want to reduce sugar, cut back on the brown sugar. You can also use natural sweeteners like honey or maple syrup. Adjust the amount based on your taste. This way, you can enjoy a healthier galette without losing flavor.
Storage Info
Refrigerating Leftovers
To keep your galette fresh, wrap it in plastic wrap or place it in an airtight container. This helps prevent it from drying out. You can store the galette in the fridge for up to three days. Just make sure it cools to room temperature before you store it. If you want to enjoy it later, it’s best to reheat it in the oven. This ensures that the crust stays crisp and tasty.
Freezing Options
You can freeze the galette both before and after baking. If you freeze it before baking, wrap it well in plastic wrap and then in foil. It can stay in the freezer for up to three months. When you’re ready to bake it, remove it from the freezer and let it thaw in the fridge overnight.
If you freeze it after baking, let it cool completely first. Then, wrap it tightly and freeze. To reheat, place it in the oven at 350°F (175°C) for about 20 minutes. This will warm it through and give the crust a nice crunch again. Enjoy your delicious rustic apple cinnamon galette any time!
FAQs
Can I make the galette ahead of time?
Yes, you can make the galette ahead of time. Prepare the dough and filling, then store them separately in the fridge. You can also assemble the galette and chill it before baking. It helps the flavors blend and makes it easier to bake later. Just remember to bake it fresh for the best taste and texture.
What should I do if my dough is too sticky?
If your dough is too sticky, add a little more flour. Start with one tablespoon at a time. Mix it in gently, so you don’t overwork the dough. If the dough sticks to your hands, dust your hands with flour, too. This will help you handle it better.
How can I tell when the galette is done baking?
Your galette is done when the crust is golden brown and the apples are soft. The filling will bubble slightly, showing it's cooked through. Look for a nice, even color on the crust. You can use a toothpick to poke the apples; they should be tender but not mushy.
Can I use other fruits for the galette?
Absolutely! You can use many fruits for a galette. Pears, peaches, or berries work well. Just make sure to adjust the sugar and spices to match the fruit's flavor. For example, add more cinnamon for pears or a dash of vanilla for berries. Get creative with the filling!
You learned how to make a delicious apple galette, starting from simple ingredients. We covered dough preparation, filling, and baking. You also got tips for a perfect crust and a full, tasty filling. Try fun variations to suit your taste, and don't forget the best storage methods. Making this galette is enjoyable and rewarding. Enjoy the process and share the results with friends and family. Baking can bring joy, and your galette will impress everyone around!