If you're dreaming of a dessert that leaves you floating on a cloud of rich, creamy bliss, look no further than Vanilla Bean Crème Brûlée. This classic treat combines the warmth of baked custard with an irresistible caramelized sugar crust. With simple ingredients and easy steps, I’ll guide you through crafting this delightful dessert that dazzles any table. Ready to impress your friends and family? Let’s dive into this sweet adventure together!
Why I Love This Recipe
- Decadent Flavor: This crème brûlée boasts an exquisite balance of rich vanilla and creamy custard, making every bite a heavenly experience.
- Elegant Presentation: The striking contrast between the smooth custard and the crispy caramelized sugar top is sure to impress at any gathering.
- Versatile Dessert: Perfect for special occasions or simple weeknight treats, this recipe can be dressed up or down to suit any event.
- Make Ahead: With the option to refrigerate for up to three days, this dessert can be prepared in advance, saving you time on the day of serving.
Ingredients
Main Ingredients
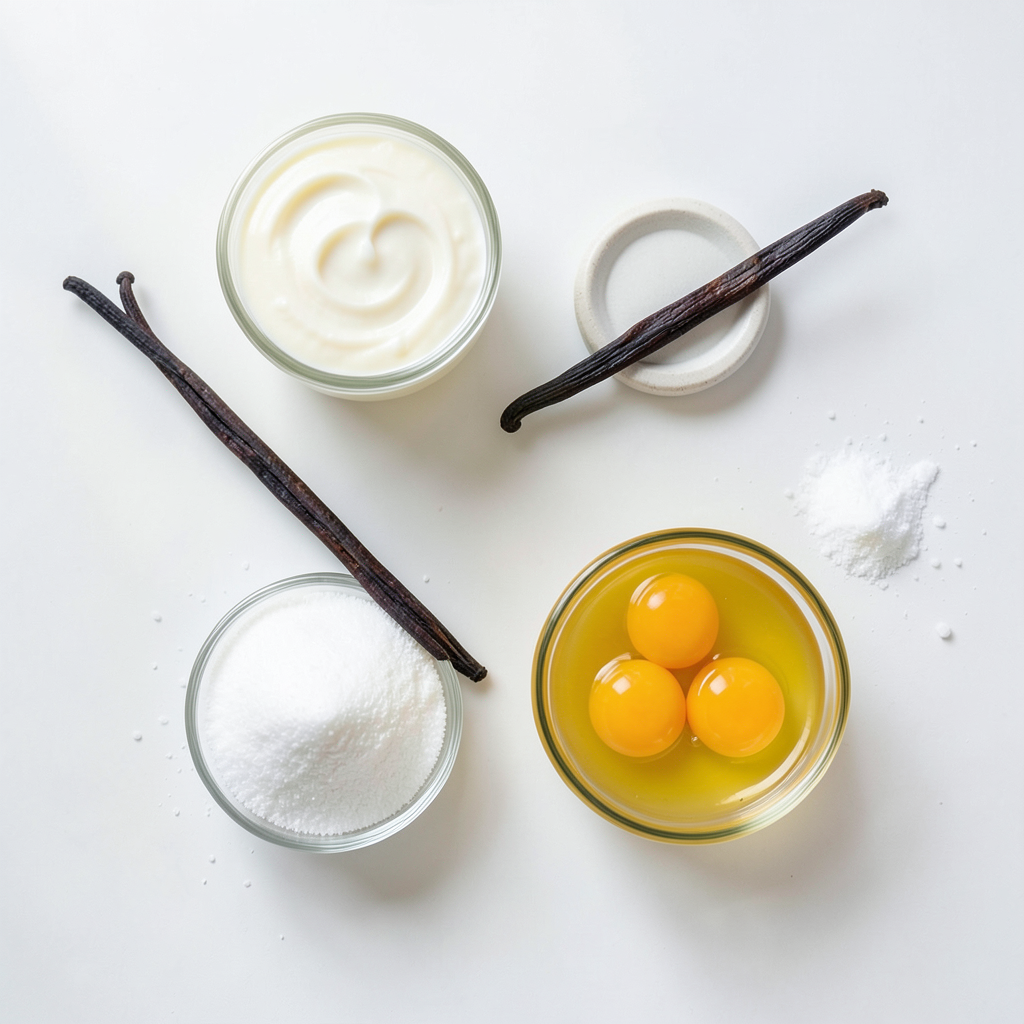
- 2 cups heavy cream
- 1 vanilla bean (or 2 teaspoons of vanilla extract)
- 5 large egg yolks
- 1/2 cup granulated sugar
- A pinch of salt
I love using fresh vanilla beans for this dish. They add a deep, rich flavor that makes the crème brûlée shine. If you can’t find them, high-quality vanilla extract works just fine. Just remember, the vanilla is key to that classic taste.
Additional Ingredients
- Granulated sugar for caramelizing
You will need extra sugar for the crispy top. This layer creates that satisfying crack when you dig in.
Suggested Garnishes
- Fresh berries
- Mint leaves
Garnishing adds fun to your dessert. I like to use fresh berries for color and taste. A sprig of mint also looks great and adds a refreshing touch.
Step-by-Step Instructions
Preheating and Preparing the Cream
- Preheat the oven to 325°F (160°C).
- In a medium saucepan, pour in 2 cups of heavy cream. Add 1 vanilla bean, split and scraped. Heat over medium heat until it steams. Remove from heat and let it sit for 15 minutes. This helps the vanilla flavor to infuse well.
Mixing the Egg Yolk Mixture
- In a bowl, whisk together 5 large egg yolks, 1/2 cup of granulated sugar, and a pinch of salt. Whisk until pale and thick, about 2-3 minutes.
- Gradually pour the warm vanilla cream into the egg yolk mixture. Whisk continuously to avoid cooking the eggs. If you used the vanilla bean, toss out the pod. If using extract, stir it in now.
Baking and Cooling
- Strain the custard mixture through a fine mesh sieve into a jug. This step removes lumps for a smooth texture.
- Carefully divide the mixture into four ramekins. Place the ramekins in a larger baking dish. Fill the dish with hot water halfway up the sides of the ramekins. This water bath helps cook evenly.
- Put the baking dish in the oven. Bake for about 35-40 minutes. The centers should be set but slightly jiggly.
- After baking, remove the ramekins from the water bath. Let them cool to room temperature. Cover each with plastic wrap and refrigerate for at least 2 hours. You can chill them for up to 3 days for better flavor.
Tips & Tricks
Achieving the Perfect Custard Texture
To get a great custard, use a water bath. This method helps the heat spread evenly. It keeps the custard creamy and smooth. Fill a larger dish with hot water before placing your ramekins in. This step is key for perfect results.
Check for doneness by gently shaking the ramekin. The center should be set but still jiggle a bit. If it’s too firm, it might be overcooked. Keep an eye on the time, around 35 to 40 minutes works well.
Caramelizing Sugar Effectively
For a crispy top, you can use a kitchen torch. Hold it a few inches above the sugar and move it around. This gives a nice even caramel color.
If you don’t have a torch, use the broiler. Place your ramekins under it for 2-3 minutes. Watch closely to prevent burning. A perfectly caramelized crust should be golden and glossy.
Enhancing Flavor and Presentation
Chill your crème brûlée for better flavor. Give it at least 2 hours in the fridge. The longer it sits, the more the flavors blend.
For a beautiful presentation, consider garnishing. Fresh berries or mint leaves add color. They also bring a nice contrast to the rich dessert. Serve it in the ramekins for a lovely touch.
Pro Tips
- Use Fresh Vanilla Beans: For the best flavor, opt for fresh vanilla beans instead of extract. They provide a rich, aromatic essence that elevates the custard.
- Strain Twice: To ensure a silky texture, strain the custard mixture through a fine mesh sieve twice before pouring it into ramekins. This removes any lumps and guarantees smoothness.
- Control the Heat: When caramelizing the sugar, keep your torch moving to avoid burning. A steady hand will create an even, golden crust without dark spots.
- Chill Well: Allow the crème brûlée to chill for at least 2 hours before serving. This not only enhances the flavor but also helps the custard firm up for a perfect scoop.
Variations
Flavor Enhancements
You can add twists to your vanilla bean crème brûlée. Here are two delicious options:
- Chocolate Vanilla Bean Crème Brûlée: Melt some dark chocolate and mix it into your cream. This gives a rich, sweet taste. The chocolate pairs well with the vanilla. It makes each bite a delight.
- Coffee-infused version: Brew a strong cup of coffee. Replace some of the cream with this coffee. It adds a nice depth to the flavor. The coffee gives a warm touch to the dessert.
Dietary Variations
You can adjust this dessert to fit different diets. Here are two ideas:
- Dairy-free option using coconut cream: Swap the heavy cream for coconut cream. This makes a creamy, rich dessert without dairy. It also adds a subtle coconut flavor that works well with vanilla.
- Reducing sugar for a lighter recipe: You can cut the sugar to a quarter cup. Use natural sweeteners like honey or maple syrup. This keeps the sweetness but lowers calories.
Serving Suggestions
Presentation makes a big difference. Here are some fun ways to serve crème brûlée:
- Pairing with dessert wines or coffee: A sweet dessert wine, like a Sauternes, goes well. You can also serve it with a cup of freshly brewed coffee. This creates a lovely end to your meal.
- Serving with a side of fruit compote: A fresh fruit compote adds a nice touch. You can use berries or any seasonal fruit. The tartness balances the rich custard, making each bite exciting.
Storage Info
Proper Refrigeration
To keep your crème brûlée fresh, store it in the fridge. Use plastic wrap to cover each ramekin. This helps prevent the custard from absorbing other flavors in your fridge. You can store it for up to three days for the best taste. After that, the flavor may start to fade.
Reheating Caramelized Tops
If you want to enjoy that crispy sugar topping again, you can reheat it. Use a kitchen torch to carefully caramelize the sugar again. If you don’t have a torch, a broiler works too. Just watch it closely. You want to avoid burning it. Caramelizing before serving gives you that perfect crunch.
Long-Term Storage Options
You can freeze crème brûlée, but it may change the texture. If you freeze it, leave off the sugar topping. Wrap the ramekins tightly in plastic wrap, then in foil. This helps prevent freezer burn. For leftover caramelized sugar, store it in an airtight container. This way, you can use it later for other desserts.
FAQs
How long does homemade vanilla bean crème brûlée last?
Homemade vanilla bean crème brûlée can last in the fridge for up to three days. Store it in an airtight container to keep it fresh. If you cover each ramekin with plastic wrap, it helps prevent the custard from absorbing other odors in the fridge. However, for the best taste, enjoy it within the first two days.
Can I use vanilla extract instead of a vanilla bean?
Yes, you can use vanilla extract instead of a vanilla bean. The flavor will differ slightly. A vanilla bean gives a richer, more complex taste. To substitute, use two teaspoons of high-quality vanilla extract. Add it to the egg yolk mixture after mixing in the cream. This ensures your crème brûlée still has that lovely vanilla flavor.
What to do if my crème brûlée doesn't set properly?
If your crème brûlée doesn't set, it may need more time in the oven. Check if the centers are still jiggly but not liquid. If they are too runny, bake them a bit longer. Another reason could be that the water bath was not deep enough. Make sure the water reaches halfway up the ramekins. If it still doesn’t set, try straining the mixture again for a smoother custard.
In this blog post, we explored how to make perfect crème brûlée. We covered the main ingredients, step-by-step instructions, helpful tips, and variations. Remember to use a water bath for even cooking and chill the dessert for the best flavor. Whether you choose classic vanilla or a fun variation, this treat will impress everyone. Keep your crème brûlée refrigerated for freshness and enjoy it with tasty garnishes. With these tips, you can master this dessert and enjoy sharing it with friends and family. Happy baking!