Go Back
- 4 cups Rice Krispies cereal - 10 oz marshmallows - 3 tablespoons unsalted butter - 1 teaspoon pure vanilla extract - 1 cup semi-sweet chocolate chips - 1 tablespoon coconut oil (optional) - Flaky sea salt Gathering these ingredients is the first step to making these treats rich in flavor. The Rice Krispies give a nice crunch. Marshmallows add sweetness and a soft texture. Unsalted butter helps bind everything together. Vanilla extract enhances the overall taste. The chocolate chips are key for dipping. They melt into a smooth coating. If you want a glossy finish, use coconut oil. It helps the chocolate flow better. A sprinkle of flaky sea salt adds a fun twist. This balance of flavors makes your treats really special. When you have all the ingredients, you can start your fun cooking adventure. Each bite will be a mix of sweet and salty, crunchy and smooth. Make sure to enjoy every step of the process! To start, you need to prepare your baking dish. Lightly grease a 9x13 inch dish with unsalted butter. This step is key. It helps the treats come out easily after they cool. You can also use non-stick cooking spray. This spray is great for preventing sticking. Next, we move on to melting the butter and marshmallows. In a large saucepan, melt 3 tablespoons of unsalted butter over medium heat. Keep an eye on it to avoid burning. Once the butter is melted, add the 10 oz of marshmallows. Stir them with a spatula until they melt into a smooth mixture. After the marshmallows melt, remove the pan from heat. Now, stir in 1 teaspoon of pure vanilla extract. This adds a rich flavor that makes your treats special. Now it's time to combine. Add 4 cups of Rice Krispies cereal to the melted marshmallow mix. Use a spatula to fold the cereal in gently. Make sure every piece gets coated evenly. Be careful not to crush the cereal; we want it light and crispy. Once mixed, transfer the mixture to your prepared pan. Use a greased spatula or your hands to press it down evenly. This step is crucial for compacting the treats. Allow them to cool at room temperature for about 30 minutes. This will help them set properly, making them easier to cut later. - Use microwave-safe bowls: Always use bowls that can handle heat. Glass bowls work well. They let you see the chocolate melt. - Best practices for melting chocolate: Melt chocolate in short bursts. Start with 30 seconds, then stir. Repeat until smooth. Stirring helps avoid burning. If you want a smoother mix, add coconut oil. - How to achieve a smooth chocolate coating: Make sure the chocolate is fully melted. If it’s too thick, add more coconut oil. Dip quickly to avoid a messy coating. - The right temperature for set treats: Let your Rice Krispie treats cool completely before dipping. If they are warm, the chocolate may not set well. - Presentation tips for serving: Place your treats on a nice plate. A tiered tray looks fancy. You can drizzle leftover chocolate on top for extra flair. - Creative ways to showcase the treats: Use colorful sprinkles or chopped nuts for decoration. You can even serve them in cute boxes for gifts. {{image_4}} You can easily boost the taste of your chocolate dipped Rice Krispie treats. Adding peanut butter or butterscotch can create a rich twist. Mix in half a cup of creamy peanut butter while melting the marshmallows. This will give the treats a nutty flavor that many enjoy. Butterscotch chips can also replace some of the chocolate chips for a sweet surprise. For chocolate types, you can use milk, dark, or white chocolate. Each brings its own flavor. Dark chocolate adds a rich, deep taste. Milk chocolate is creamy and sweet. White chocolate offers a smooth, sweet profile. Experiment with different combinations to find your favorite. If you need gluten-free options, look for gluten-free Rice Krispies. These are made with rice, not wheat. Check the box to ensure they meet your needs. For a vegan version, swap out the butter for coconut oil. This will still give a nice texture. Use vegan marshmallows instead of regular ones. Many brands now offer these, making it easy to enjoy the treats without animal products. You can make your treats festive for any occasion. For holidays, add colored sprinkles or edible glitter on top of the chocolate. These small touches make a big impact. For special occasions, think about flavor combos. Try adding peppermint extract for a holiday twist. You could even mix in mini marshmallows or crushed candy canes. This adds both flavor and color to your treats, making them stand out. Keep your chocolate dipped Rice Krispie treats fresh by using airtight containers. This method helps prevent them from getting stale. A good choice is a plastic or glass container with a tight lid. When stored this way, they stay tasty for up to one week. Freshness is key for the best flavor, so try to eat them soon. If you want to save some for later, freezing is a great option. First, cut the treats into squares. Then, wrap each piece in plastic wrap. Place them in a freezer-safe bag or container. They can last up to three months in the freezer. When you're ready to enjoy them, take them out and let them thaw at room temperature for about 30 minutes. This way, they taste just as good as fresh. If you're giving these treats as gifts, consider wrapping them nicely. Use clear bags tied with ribbons for a cute look. You could also use a decorative box for a special touch. For eco-friendly options, try using recycled paper or fabric wraps. This not only looks good but is kind to the planet, too. To make these treats, you need a few simple steps. First, gather your tools: a large saucepan, spatula, and a baking dish. 1. Prepare the Pan: Grease a 9x13 inch baking dish. 2. Melt the Butter and Marshmallows: Melt 3 tablespoons of butter, then add 10 oz of marshmallows. Stir until smooth. 3. Combine with Rice Krispies: Pour in 4 cups of Rice Krispies cereal. Mix gently. 4. Press into the Pan: Transfer the mixture and press it down firmly. Let it cool for 30 minutes. 5. Prepare the Chocolate Dipping: Melt 1 cup of chocolate chips in a bowl. Use a microwave. 6. Dip the Treats: Cut treats into squares and dip half into the melted chocolate. 7. Add a Twist of Flavor: Sprinkle flaky sea salt on top. 8. Set the Chocolate: Cool on parchment paper for 15-20 minutes. Yes, you can use other cereals. Some good options include: - Cornflakes - Crispy Rice - Chex These cereals will give a different texture but will still work well. You can use different types of chocolate: - Milk Chocolate: Sweet and creamy. Great for kids. - Dark Chocolate: Rich and slightly bitter. Perfect for adults. - White Chocolate: Sweet and smooth. Adds a unique flavor. Each type brings its own taste to the treats. To keep chocolate from cracking, follow these tips: - Cool Slowly: Let the chocolate set at room temperature, not in the fridge. - Store Properly: Keep the treats in an airtight container. This keeps them fresh. - Avoid Moisture: Keep them away from humidity, which can cause cracks. These steps help maintain a smooth, beautiful chocolate coating. Making Rice Krispie treats is simple and fun. You start with just three main ingredients: Rice Krispies, marshmallows, and butter. Then, you add extras like chocolate and vanilla. The steps are easy—melt, mix, press, and enjoy. You can even create unique flavors and variations. Remember to store them right for the best taste. In the end, have fun with this treat. You can get creative and share it with friends and family. Enjoy every bite!

Chocolate Dipped Rice Krispie Treats

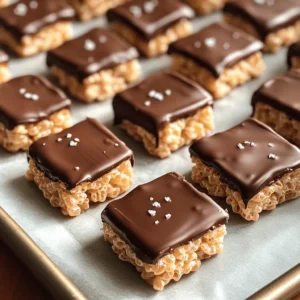
Indulge in these delightful Chocolate Dipped Rice Krispie Treats that are bound to be a hit! With just a few simple ingredients, you can create sweet, gooey goodness dipped in smooth chocolate and topped with a sprinkle of sea salt. Perfect for parties or a tasty snack. Ready to whip up this irresistible treat?

Ingredients
  

4 cups Rice Krispies cereal

10 oz marshmallows (approximately 1 standard bag)

3 tablespoons unsalted butter

1 teaspoon pure vanilla extract

1 cup semi-sweet chocolate chips

1 tablespoon coconut oil (optional, for a smoother chocolate consistency)

Flaky sea salt (for garnishing)

Instructions
 

Prepare the Pan: Lightly grease a 9x13 inch baking dish with unsalted butter or use non-stick cooking spray to ensure the treats do not stick after cooling.

    Melt the Butter and Marshmallows: In a large saucepan, melt the butter over medium heat. Once the butter is melted, add the marshmallows. Stir continuously with a spatula until the marshmallows have fully melted into a smooth, creamy mixture. Remove the saucepan from the heat and stir in the vanilla extract until well incorporated.

      Combine with Rice Krispies: Add the Rice Krispies cereal to the melted marshmallow mixture. Using a spatula, gently fold the cereal into the mixture, taking care to coat each piece evenly without crushing the cereal.

        Press into the Pan: Carefully transfer the combined mixture into the prepared baking dish. Using a greased spatula or lightly greased hands, press the mixture down firmly and evenly to compact the treats. Allow them to cool at room temperature for about 30 minutes to set.

          Prepare the Chocolate Dipping: In a microwave-safe bowl, combine the semi-sweet chocolate chips and coconut oil (if using). Heat the mixture in the microwave in 30-second intervals, stirring well in between each interval, until the chocolate is completely melted and smooth.

            Dip the Treats: Once the Rice Krispie treats have cooled and set, cut them into squares of your desired size. Dip one half of each square into the melted chocolate, allowing any excess chocolate to drip back into the bowl.

              Add a Twist of Flavor: While the chocolate is still wet, sprinkle a delicate pinch of flaky sea salt on top of the dipped section for a delightful contrast in flavors.

                Set the Chocolate: Place the dipped Rice Krispie treats on a baking sheet lined with parchment paper. Let them cool until the chocolate has fully hardened, which should take about 15-20 minutes.

                  Prep Time: 15 mins | Total Time: 1 hr | Servings: 12-16 squares

                    - Presentation Tips: Arrange the finished treats on a decorative plate or tiered serving tray. Consider drizzling any leftover melted chocolate over the treats just before serving for an added touch of elegance.